You’ll transform your compact yard into a private retreat by layering evergreen hedges, curved pathways, and strategic plantings that create intimate zones without fortress-like walls. Map your sunlight at key times—9 AM, 12 PM, 3 PM, 6 PM—to guide plant placement. Position seating against boundary walls, add multi-stem trees to block sightlines, and weave climbing vines through lattice for soft screening. Low-voltage pathway lighting and subtle focal points extend your garden’s usable hours while preserving that airy, inviting feel. The specific techniques for maximizing every square foot reveal themselves when you explore the layering strategy further.
Key Takeaways
- Layered screening with height hierarchy – Combine tall evergreens, mid-range shrubs, and groundcovers to create intimate, enclosed spaces without consuming square footage.
- Curved pathways with hidden focal points – Design winding routes framed by plants and trees; use mixed stone sizes to conceal endpoints and encourage exploration.
- Strategic seating placement – Position low-profile furniture against boundary walls and tuck modular pieces near fences to eliminate neighbor sightlines completely.
- Climbing vines on structures – Train clematis, roses, and honeysuckle on trellises and arbors to add vertical interest while maintaining privacy year-round.
- Ambient lighting and water features – Install LED candles, lanterns, and pondless waterfalls in central zones to enhance nighttime ambiance and create focal point magic.
Why Hidden Gardens Solve Small-Space Privacy Problems
When you’re crammed into a tight urban lot or a modest suburban property, privacy feels like a luxury you can’t afford.
Hidden gardens change that equation.
Customizable screens and vertical solutions deliver seclusion without consuming precious square footage, letting you relax on your patio without worrying about neighbors’ eyes.
These strategic barriers create psychological boundaries that deter casual observation, even at modest heights.
You’ll shield valuables like grills and furniture from street view, reducing theft risk significantly.
Dense materials muffle neighborhood noise, transforming cramped spaces into serene retreats.
Strategic placement blocks harsh winds and UV rays, extending your outdoor living season.
Scout Your Backyard for Location, Sunlight, and Seclusion
Where you position your hidden garden matters more than you might think—the right spot determines whether you’ll actually use and maintain it. Scout locations near your house doors, driveway, or mailbox where you’ll see the garden frequently. Choose level ground that drains well and stays accessible year-round.
Assess seclusion by checking animal paths and neighborhood wildlife routes. Install appropriate fencing—3 feet for rabbits, 6-8 feet for deer. Evaluate wind exposure, seasonal directions, and proximity to road salt effects.
| Factor | Assessment |
|---|---|
| Location | Near high-traffic areas for convenience |
| Drainage | Test soil; avoid flooding-prone spots |
| Protection | Evaluate fencing needs and wind exposure |
Position close to water sources and match sunlight exposure to your plants’ requirements for optimal growth.
Map Sunlight Patterns to Protect Your Retreat
How’ll you know which garden spots’ll flourish and which’ll languish? Map your yard’s sunlight patterns to guide strategic plant placement and create your ideal retreat.
Conduct observations at 9 AM, 12 PM, 3 PM, and 6 PM on a sunny day.
Document three categories: Full Sun (6+ hours), Part Sun (3-6 hours), and Full Shade (under 3 hours).
Use distinct colors or symbols to distinguish each level.
Consider your yard’s orientation.
South-facing areas receive consistent sunlight; north-facing spots stay shaded.
East-facing gardens offer morning sun, while west-facing areas provide afternoon warmth.
Diagonal directions fall between these extremes.
Layer your observations using transparent overlays or color-coded versions to reveal patterns.
This comprehensive map reveals microclimates across your space, becoming your foundational planning tool for a flourishing garden sanctuary.
Layer Enclosures to Create Progressive Seclusion
Once you’ve mapped your sunlight patterns, you’re ready to build the physical and botanical framework that’ll transform your yard into a private sanctuary.
Layered enclosures create progressive seclusion through strategic height placement and structure.
You’ll stack U-shaped frames with vertical supports to establish physical boundaries, while planting taller specimens against fences and walls with progressively shorter plants moving forward.
This tiered approach adds depth and movement to flat yards.
Consider these essential elements:
- Ground layer plants (6 inches to 2 feet) form transitional edges
- Foreground shrubs and perennials (2 to 5 feet) create mid-depth screening
- Background specimens (over 5 feet) establish visual anchors
- Climbers on trellises double vertical interest in compact spaces
Bridge height gaps with intermediate plantings to avoid visual interruptions.
Mass plants in overlapping clusters within layers for seamless integration, varying cluster shapes for natural flow.
Choose Evergreen Hedges for Year-Round Screening
Why settle for fences that’ll rot, splinter, and demand constant maintenance when evergreen hedges offer decades of reliable privacy without the upkeep?
You’ll maintain lush foliage year-round while reducing street noise and creating natural windbreaks.
Species like Thuja ‘Green Giant’ reach 30–40 feet rapidly, while Boxwood provides shapeable 3–6 foot borders.
Japanese Holly ‘Hedge Box’ thrives in zones 4–9, and Distylium ‘Buckhead Bold’ suits warmer climates.
Plan strategically by measuring your backyard and assessing sunlight.
Space plants according to mature size and select dense varieties for opaque screening.
Fertilize in early spring with balanced formula, trim annually, and inspect for pests.
You’ll enjoy progressive seclusion with minimal intervention.
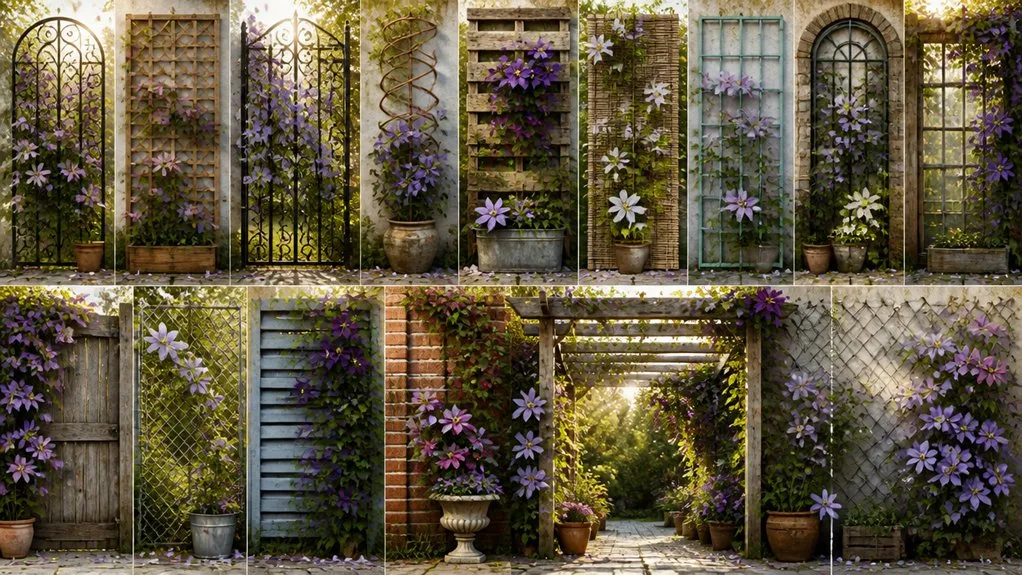
Use Climbing Vines to Build Natural Walls
What if you could transform a bare wall into a living tapestry of foliage and flowers?
Climbing vines create stunning natural walls by covering hard surfaces with lush greenery.
You’ll start by assessing your wall’s direction and sunlight exposure—north or east-facing walls work best in hot climates to prevent scorching.
Install support systems using eye hooks, wire, or sturdy trellises spaced strategically across your wall.
Key considerations for your vine wall:
- Select structured vines like jasmine or clematis suited to your climate zone
- Plant vines 4-6 inches from the support to allow root expansion
- Tie and weave stems through the trellis for vertical growth guidance
- Trim every two months to maintain even wall coverage
Water deeply and fertilize regularly for vigorous growth.
With patience, your bare wall becomes an enchanting living backdrop.
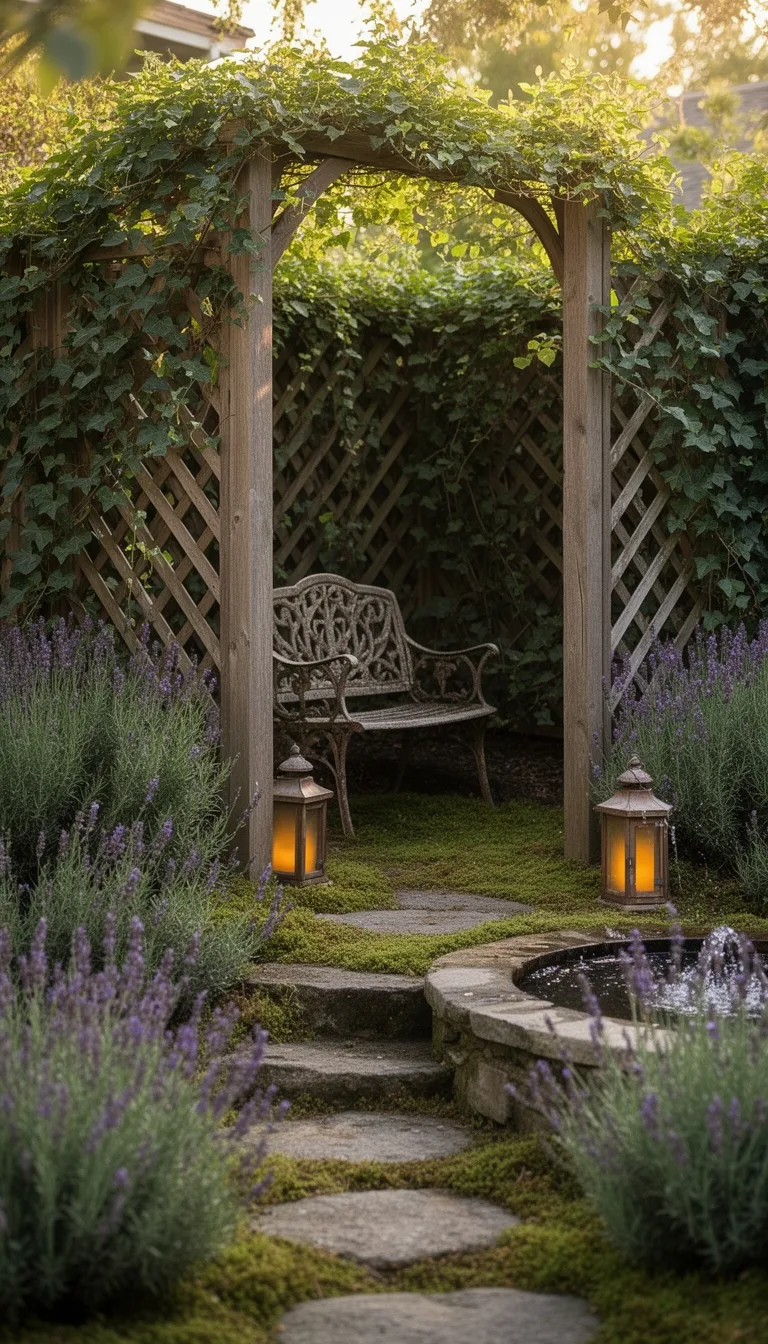
Install Arbors and Pergolas as Entry Gateways
How better to define your garden’s entrance than with a handcrafted arbor or pergola that frames the passage while supporting climbing vines?
You’ll assemble this structure using four 4×4 posts trimmed to 80 inches, creating an 81½-inch overall height.
The framework consists of 2x4s and 2x2s secured with exterior screws and pocket holes for durability.
Install 2×2 runners across the top, evenly spaced for vine training.
Add welded wire fencing or lattice paneling to the sides using ¾-inch staples.
Dig post holes 18 inches wide and 4 feet deep, then anchor with concrete.
Position and level carefully, checking squareness by measuring diagonal distances.
This gateway transforms your garden’s entry into an inviting, verdant passage.
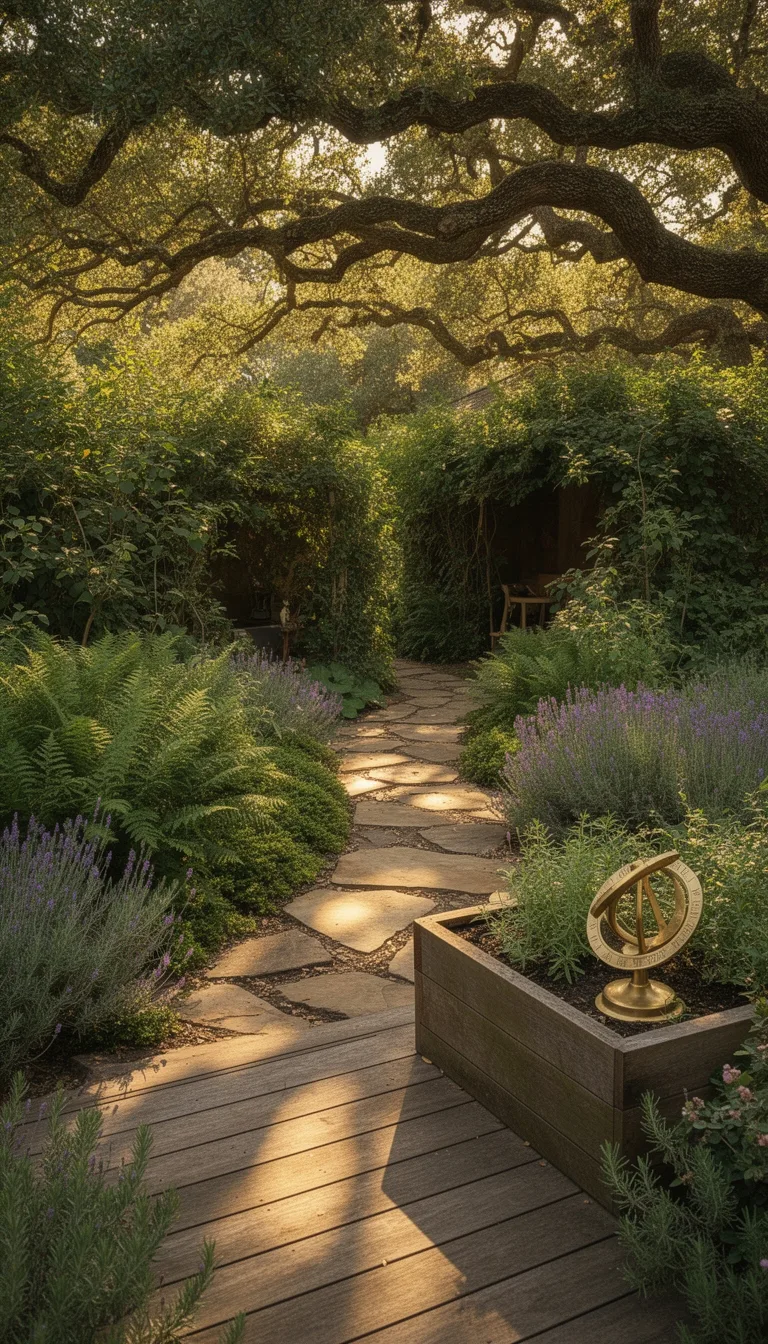
Design Curved Pathways That Invite Exploration
Once you’ve established your garden’s entry with a welcoming arbor, the next step is guiding visitors deeper into your outdoor space.
Curved pathways create visual intrigue while making compact yards feel expansive.
They naturally soften your landscape’s aesthetic compared to rigid straight lines.
When designing your curves, follow these key principles:
- Use gentle bends scaled to your yard’s dimensions for comfortable navigation
- Lead pathways toward focal points like patios, fountains, or flowering trees
- Maintain 3-5 feet width for side-by-side passage and wheelbarrow access
- Select materials like bluestone, interlocking pavers, or permeable options
Frame your pathways with layered plantings—hostas, ornamental grasses, and shrubs—creating intimate garden sections.
Add low-voltage lighting for safety and ambiance.
Professional hardscapers ensure proper stone placement for longevity and visual cohesion throughout your secret garden sanctuary.
Build Welcoming Entrances With Mystery and Accessibility
As you transition from curved pathways into the heart of your garden sanctuary, you’ll want to create a distinct entrance that signals the shift from ordinary yard to enchanted space. Strategic entrance markers transform your garden into an intimate retreat while maintaining accessibility.
| Entrance Type | Structure | Planting | Effect |
|---|---|---|---|
| Arbor | Wooden frame | Climbing vines | Elegant overhead transition |
| Natural Gates | Paired trees | Moss and ferns | Organic boundary |
| Reclaimed Door | Hinged wood | Roses and greenery | Whimsical mystery |
| Stone Pillars | Stacked rocks | Low flowers | Subtle definition |
| Stepped Patio | Elevated transition | Ornamental grasses | Progressive discovery |
Position entrances away from your home’s back door to enhance mystery. Layer structures with climbing plants and accessories like wind chimes or signs to personalize the space. Multiple entry points encourage exploration throughout your hidden sanctuary.
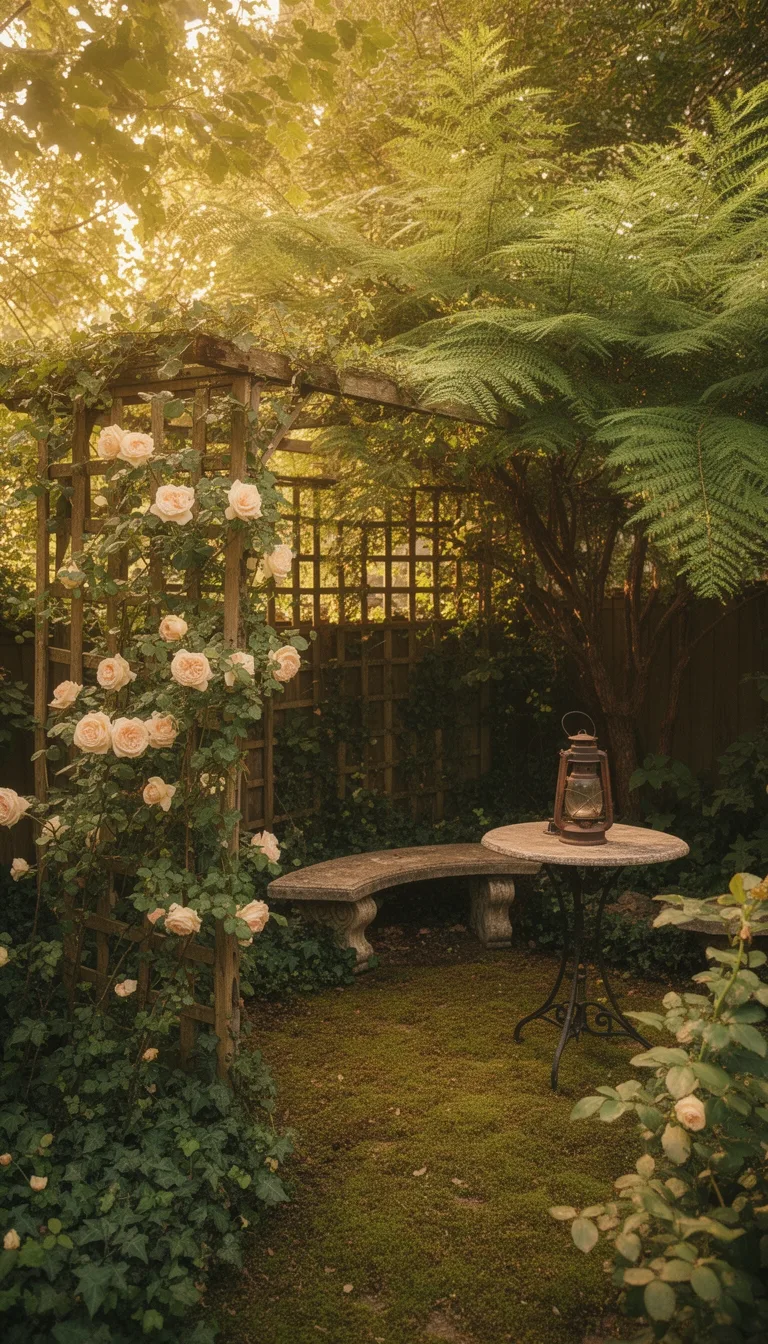
Select Seating That Anchors Your Hidden Retreat
The right seating transforms your garden from a beautiful backdrop into a functional sanctuary where you’ll actually want to spend time.
Low-profile designs like outdoor bean bags naturally shield you from overlooking windows while creating a cocooning effect that enhances seclusion.
Strategic placement amplifies privacy’s impact:
- Position seating against boundary walls to eliminate sightlines from neighboring properties
- Tuck lightweight modular pieces near fences for targeted screening on specific sides
- Place multi-stem trees in front of chairs to break overlooking views while framing intimate conversation spots
- Layer outdoor rugs, throw blankets, and cushions to transform basic furniture into inviting relaxation destinations
Create multiple zones—reading nooks, dining areas, fire pit gatherings—that encourage you to explore different garden corners.
This versatile approach ensures your retreat adapts to your mood and seasonal needs.
Plant Layers by Height to Create Visual Depth
While your garden’s layout and seating create the foundation for privacy, it’s the strategic arrangement of plants that transforms flat spaces into layered sanctuaries with genuine visual depth.
You’ll position tall specimens—shade trees, large evergreens, and shrubs reaching 6+ feet—as your backdrop.
Mid-range perennials like anemones and sedums bridge structural gaps in the middle ground.
At ground level, groundcovers and shorter plants complete the composition.
Stagger similar-sized plants to create seamless visual flow, and vary textures through feathery, sword-like, and mounded forms.
Climbing vines like clematis add vertical interest without consuming precious space.
This tiered approach—combining height, texture, and spacing—transforms your retreat into a sophisticated outdoor room with captivating dimension.
Choose Plants That Thrive in Shade and Interest
How do you transform shaded corners into vibrant garden rooms without sacrificing color and texture?
You’ll discover that shade doesn’t limit your options—it expands them.
Strategic plant selection turns dim spaces into dynamic focal points.
Consider these shade champions:
- Begonias and impatiens deliver continuous blooms from summer through frost, thriving where sunlight barely reaches
- Foliage-forward plants like hostas, coral bells, and coleus provide year-round visual interest with striking colors ranging from deep burgundy to bright yellow
- Low-growing varieties such as lungwort and Coral Bells Primo ‘Wild Rose’ create defined borders while maintaining layered depth
- Shade shrubs like mahonia and diervilla add structure and screening while displaying seasonal interest
You’ll layer these plants by height, combining flowering specimens with bold foliage to create dimension.
The result? Your shadiest spaces become the garden’s most inviting retreats.
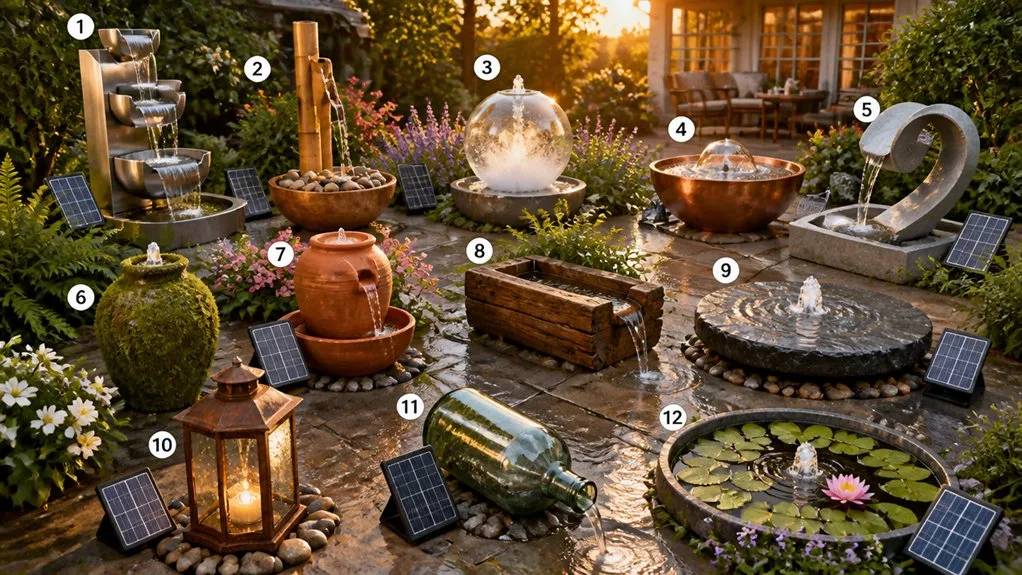
Position a Water Feature as a Focal Point
Once you’ve layered your shade plants into a cohesive garden design, you’ll want to anchor those spaces with a compelling visual centerpiece—and nothing commands attention quite like moving water.
Position your fountain or waterfall centrally in your garden to naturally draw the eye. A pondless waterfall works beautifully in compact yards, cascading into hidden reservoirs while minimizing upkeep.
For modest courtyards, an elegant fountain serves as a sophisticated focal point. Consider placing your water feature near seating areas or patios to create an inviting entertainment zone.
Add low-wattage LED lights around your feature for intimate nighttime ambiance. These strategic placements transform ordinary spaces into captivating retreats while enhancing your property’s overall appeal and value.
Use Stepping Stones to Guide Without Revealing
What if you could craft a garden path that encourages exploration rather than telegraphing destinations?
Stepping stones guide you through your garden while maintaining mystery and intrigue.
You’ll create subtle pathways that reveal themselves gradually, inviting slow discovery rather than rushed movement.
- Mix stone sizes and spacing to force your gaze downward, concealing distant views and the path’s endpoint
- Integrate plants between stones—moss, ground covers, and herbs soften edges while camouflaging the route
- Use material contrasts like colorful inlaid stones or hypertufa accents to draw attention locally instead of ahead
- Leave stones slightly above grade with mulch or gravel fill for seamless, natural-looking concealment
Install a 3-inch crushed rock base beneath each stone for stability.
This approach transforms your stepping stones into elements of discovery, transforming your backyard into an inviting, mysterious retreat.
Repeat Pathway Materials to Tie Everything Together
Because your garden’s pathways are its circulatory system, you’ll want the materials you choose to echo throughout your landscape, creating visual continuity that pulls all your garden areas together.
Repeating brick in herringbone patterns, linear stone slabs, or permeable gravel establishes rhythm and guides movement naturally.
When you combine materials—pavers with gravel sections, stepping stones in bark mulch, or grass edged with consistent bricks—you create textured contrasts that tie zones together cohesively.
Locally sourced materials like self-binding gravel reduce environmental impact while allowing water permeation.
Varying sizes within repeated patterns prevents monotony, while odd-numbered groupings please the eye.
This strategic material repetition transforms your pathways from mere connectors into unified design elements that enhance your entire garden’s flow and aesthetic.
Place Art to Frame Views Within Your Space
Just as your pathways guide movement through the garden, strategic framing directs your eye toward its most compelling moments.
Artwork and structures function as visual anchors that organize your space and highlight its best features.
Position sculptures, water features, or artistic installations at the end of sight lines to create natural focal points.
Trellises and arbours frame views dynamically, drawing attention through openings while establishing rhythm throughout your garden.
Consider these framing strategies:
- Place sculptural pieces where multiple pathways converge for maximum visual impact
- Use iron arbours to create peek-through views that invite exploration
- Position artwork off-center to generate dynamic perspectives from different angles
- Layer climbing vines around structures to soften frames and add textural depth
Your carefully placed art transforms ordinary moments into framed vistas that reward repeated viewing from every corner of your cozy backyard.
Design Cozy Nooks That Feel Open and Sheltered
How do you create spaces that feel simultaneously intimate and expansive? You’ll balance enclosed elements with open sightlines.
Hang two-person swings from sturdy tree branches, adding cushions for comfort while maintaining views of your surroundings.
Layer handwoven hammocks with outdoor rugs and floor pillows, positioning them in shaded spots that feel secluded yet connected to your yard.
Frame these retreats with natural elements—bamboo plants, potted flowers, or tall privacy screens—rather than solid walls.
Install minimalistic lanterns or LED candles for soft ambient lighting.
Position low seating benches on gravel platforms, incorporating water features like tabletop fountains nearby.
Each nook functions as your private sanctuary while preserving the garden’s flowing, airy character.
Layer Aromatic Plants Throughout Your Hidden Retreat
Now that you’ve shaped your retreat’s physical structure, you’ll want to engage your senses through carefully layered aromatic plants.
Start with foundation herbs that thrive in your climate and sunlight. Spanish Lavender flourishes in north Texas, while Jasmine requires partial sun with 4-6 hours daily light.
Layer in rosemary for earthy evergreen scent and alertness, then add basil varieties like Thai or Lemon for culinary versatility and uplifting benefits.
Fill gaps with complementary plants:
- Peppermint creates dense borders with crisp refreshing fragrance
- Lemon balm releases subtle lemon aroma intensifying on contact
- Chamomile offers apple-like scent when walked upon
- Gardenia delivers rich creamy white flower scent near seating areas
This strategic arrangement transforms your hidden space into a multisensory sanctuary where fragrance deepens your relaxation experience.
Combine Lattice Fences With Climbing Vines
Why settle for flat garden boundaries when you can build vertical interest through lattice fences and climbing vines? You’ll maximize your garden’s potential by combining these elements strategically.
Lattice structures provide the ideal framework for climbing plants, allowing vines to crisscross through openings while reaching upward. Your plants can grow 30% to 50% faster with proper support.
Choose roses, clematis, or honeysuckle for colorful blooms and fragrance. If you prefer edibles, try pole beans, cucumbers, or tomatoes for overhead harvesting without bending.
Install weatherproof lattice panels to handle mature vine weight. Guide tendrils through the framework initially, then let plants establish their upward growth pattern.
Maintain your vertical garden through regular pruning, ensuring proper ventilation around vines and preventing excessive density. Well-drained soil and timely fertilization keep your climbing garden thriving year-round.
Create Multiple Entry Points to Surprise Visitors
Your garden’s vertical elements create a stunning backdrop, but what draws visitors deeper into your outdoor space?
Multiple entry points transform your yard into an intriguing landscape that encourages exploration and discovery.
- Position pathways away from obvious back entrances to build secretive vibes and extend the journey through your garden
- Use curved or zigzagged routes that reveal new areas gradually without requiring extensive square footage
- Frame openings with natural elements—mature trees marked with solar lights, rock walls, or topiary hedges—to signal transition zones
- Vary your path materials from paving to stepping stones, bark, and planks to maintain visual interest throughout
Craft a Gravel Pathway With Subtle Definition
How do you transform a simple dirt route into an inviting gravel walkway that feels intentional and polished?
Start by marking your centerline with a flexible garden hose, then define edges using marking paint or flour.
Excavate four inches deep, remove sod, and tamp the soil thoroughly.
Lay landscape fabric across the entire length, securing it with five-inch staples to prevent weeds from penetrating your gravel bed.
Choose pea gravel or angular crushed granite for your two to three-inch top layer—rounded stones require rock dust stabilization, while angular varieties remain naturally stable.
Install metal or plastic edging to contain the gravel and maintain clean borders.
This straightforward approach creates a polished pathway that guides visitors naturally through your garden while remaining budget-friendly and easy to maintain.
Use Subtle Lighting to Extend Your Garden’s Evening
Once the sun dips below the horizon, strategic lighting transforms your garden into an enchanting evening retreat.
You’ll extend your outdoor enjoyment by layering subtle illumination techniques that create depth and atmosphere without overwhelming the space.
Consider these lighting approaches:
- Uplighting: Position LED spike lights at tree bases to cast magical silhouettes against dark backgrounds
- Downlighting: Mount spotlights in mature trees angling downward to filter light through branches, mimicking natural moonlight
- Wall washing: Place lights 60 cm from structures at sideways angles for even, subtle glows across surfaces
- Path lighting: Install recessed ground lights along walkways and solar stakes in flower beds for seamless safety and drama
You’ll discover that thoughtful placement of low-wattage fixtures creates intimate zones while maintaining the garden’s natural beauty.
The result’s an inviting evening sanctuary.
Keep It Private Without Making It Feel Fortress-Like
While evening lighting creates ambiance, privacy screening ensures you’ll enjoy those magical nights without feeling exposed to neighbors’ gazes.
You can achieve seclusion through layered plantings that combine tall evergreens like arborvitae with mid-sized shrubs and ground covers, creating natural density without heavy barriers.
Climbing vines—clematis, jasmine, or honeysuckle—soften hardscapes by weaving through pergolas and fences, adding romance rather than rigidity.
Vertical gardens and trellises maximize small spaces while remaining open and airy.
Fast-growing ornamental grasses like switchgrass or bamboo provide modern screening that feels organic.
Stone walls paired with planters and greenery establish boundaries gracefully.
Strategic layering of evergreens, deciduous trees, and flowering perennials creates year-round coverage that feels welcoming, not fortress-like.
Tie Your Hidden Garden Into Your Broader Yard
A private garden won’t feel isolated from the rest of your property if you create intentional visual and physical connections that guide visitors naturally from one space to the next.
- Curved pathways linking your hidden garden to patios and decks maintain visual flow while preserving mystery around corners
- Layered plantings between zones screen views without creating harsh boundaries that disconnect spaces
- Stone walkways with planned sight lines reveal glimpses of your secret retreat from the main yard
- Complementary materials echo the house and surrounding landscape, creating cohesive design throughout
You’ll want your hidden garden to feel like a natural extension rather than a separate realm. Use consistent paving materials, repeat plantings, and strategic openings that hint at what lies beyond. This approach transforms your garden into an integrated sanctuary that enhances your entire property’s appeal.
Conclusion
You’ve crafted your sanctuary—a retreat where dappled sunlight filters through evergreen branches, gravel crunches softly beneath your feet, and warm lantern glow pools across intimate corners. Your hidden garden breathes with you, seasons shifting the light while hedges shelter your solitude. It’s not walls that define this space; it’s the thoughtful layering of plants, pathways, and purposeful shadows. You’ve woven privacy throughout your yard, creating a secret haven that whispers invitation rather than exclusion.
The Only Tools You Need for a Thriving Garden 🌱
Whether you're a weekend gardener or growing daily — these hand-picked tools make every session faster, easier, and more satisfying.