You can achieve a stylish backyard fence on a minimal budget with smart material choices. Reclaimed wood, bamboo rolls, and simple wire structures offer strong foundations. The real impact comes from integrating climbing plants and strategic finishes. You’ll find that durability and aesthetics aren’t expensive when you combine these practical elements correctly.
Key Takeaways
- Use reclaimed pallet wood for a rustic, chic fence at a very low initial cost.
- Install bamboo or reed rolls on posts for an instant, affordable privacy screen.
- Choose chain link as a budget-friendly base for vines to create a living fence.
- Build a simple post-and-rail fence with rough-sawn lumber for under $100.
- Attach salvaged doors or gates to a sturdy frame for an eclectic, statement fence.
Start With the Cheapest Chic Fence Idea: Pallet Wood

You can build a stylish perimeter for nearly nothing by starting with reclaimed pallet wood. You’ll need to deconstruct the pallets, so source heat-treated (HT) stamped ones, not chemically treated.
You’ll pull the boards with a pry bar and remove all nails. For a plant-integrated fence, consider spacing the vertical boards.
You’d leave consistent gaps between them; this slat design costs less in materials and creates a framework for climbing vines or allows sunlight through for border plantings. You can also orient boards horizontally and stagger their ends for a rustic, modern look.
Plan for posts from inexpensive 4×4 lumber, setting them deep into the ground with concrete for a stable base. The rough-sawn texture and inherent wood tones provide instant, weathered character.
Give Your Pallet Fence a Polished Finish

While the raw, reclaimed wood offers rustic appeal, applying a finish protects your investment and elevates the look. You’ll seal out moisture and extend its life significantly. Choose a finish based on your desired protection and aesthetics. Use a penetrating oil for a natural, water-repellent sheen that’s plant-safe when fully cured. A solid-color stain or paint provides maximum UV and weather protection, allowing you to coordinate with nearby foliage. Always sand pallet wood smooth first to prevent splinters. Apply finishes with a brush, working with the grain. Let dry completely between coats.
| Finish Type | Primary Benefit | Best For Plant Adjacency |
|---|---|---|
| Tung Oil | Deep, natural grain highlight | Excellent; non-toxic when cured |
| Linseed Oil | Water resistance & flexibility | Good; allow full curing |
| Acrylic Stain | UV protection & color variety | Very good; low VOC options |
| Exterior Paint | Maximum weatherproofing | Good; creates solid barrier |
| Clear Sealant | Invisible protection | Check for plant-safe formulas |
Create Instant Privacy With Budget Bamboo or Reed Rolls

For a quick and natural privacy screen, bamboo or reed fencing rolls offer an affordable, plant-integrated solution.
You simply unroll and attach them to existing posts, a chain-link fence, or a simple wire support.
These materials blend seamlessly with garden foliage, creating an instant green backdrop while you wait for climbing plants to establish.
Their organic texture softens hardscapes better than many manufactured panels.
- Material Choice: Select thick, densely packed bamboo canes for maximum durability and privacy, or lighter reed for a more rustic, filtered light effect.
- Installation: Use UV-stable plastic zip ties or galvanized wire every 8-12 inches along the top, middle, and bottom for secure attachment.
- Longevity: Apply a clear, penetrating sealant to raw bamboo to prevent graying and extend its lifespan outdoors.
- Plant Integration: Train fast-growing annual vines like morning glory or perennial clematis directly onto the rolls for a living fence.
Build a Rustic Post-and-Rail Fence for Under $100
Achieving a classic boundary doesn’t require a hefty budget; a rustic post-and-rail fence provides structure and charm for less than $100. Source rough-sawn cedar or pressure-treated pine posts and rails from a local mill or lumberyard’s cull pile.
Use a post-hole digger to set your posts, spacing them six to eight feet apart, ensuring they’re plumb. Secure your horizontal rails with galvanized screws or sturdy nails.
This open design defines space without blocking light or air. You’ll integrate plants directly by allowing native shrubs or perennial vines to grow naturally at its base; they’ll soften the lines and anchor the fence into your landscape.
A simple wood stain can protect your materials for years, preserving its rustic appeal.
Transform Simple Chicken Wire With Climbing Vines
Using inexpensive chicken wire to support climbing vines instantly elevates a basic fence into a living, textured screen.
You’ll gain privacy and visual interest for a fraction of the cost of solid materials.
Staple the wire securely to wooden posts or an existing frame, ensuring it’s taut.
Your choice of vine dictates the final effect; you must match the plant’s vigor to your maintenance willingness.
- Fast Annuals: Use morning glory or sweet pea for quick, seasonal coverage.
- Lightweight Perennials: Clematis or jasmine provides delicate, fragrant blooms year after year.
- Edible Options: Grow pole beans or cucumbers for a functional, productive screen.
- Woody Climbers: Train slower-growing ivy or climbing hydrangea for a permanent, dense mat.
Upcycle Old Gates and Doors Into a Statement Fence
Salvaged gates and doors can become a fence brimming with character, far exceeding the visual interest of any uniform paneling.
You’ll need a strong, pressure-treated base structure. Use rot-resistant posts and a sturdy horizontal header to anchor your disparate pieces. Bolt the gates and doors directly to this frame, ensuring they’re plumb. You’ll often work with solid wood, so pre-drill your holes to prevent splitting.
This eclectic mix creates perfect pockets for planting. Tuck climbing roses or clematis into gaps between panels; their growth will soften the joins and unify the composition. Use trailing plants like ivy in front of solid sections to add depth. This method turns architectural salvage into a deeply personal garden boundary.
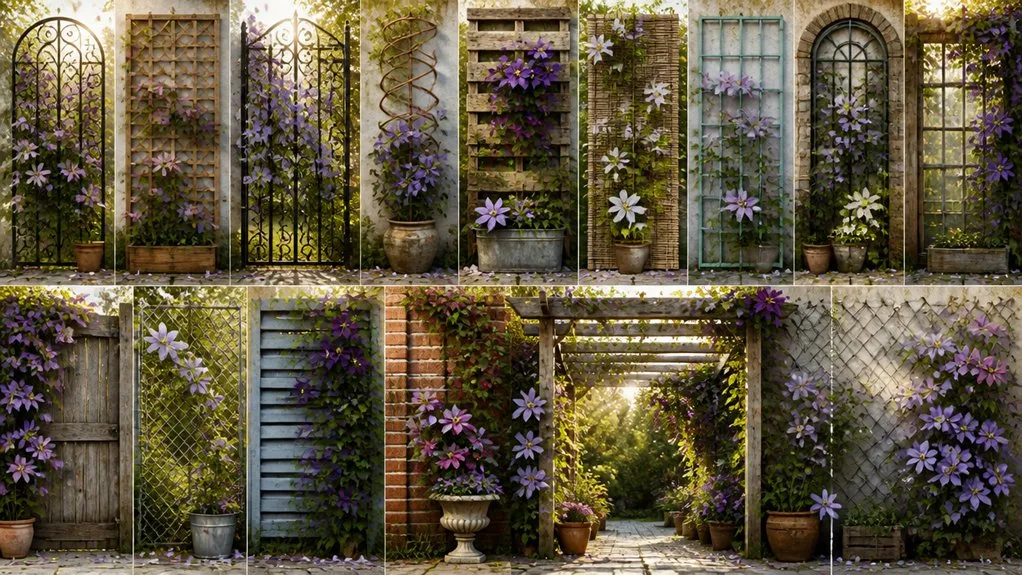
Add Charm With a Classic and Affordable Lattice Panel
You can dress up a plain wood or wire fence without breaking the bank by adding a simple lattice panel. This classic crisscross structure provides immediate visual texture and a ready-made trellis for climbing plants.
You’ll typically find affordable, pre-assembled panels made from pressure-treated pine or cedar at any home center. Attach them directly to your existing fence posts with exterior-grade screws for a permanent upgrade.
- Select rot-resistant woods like cedar or pressure-treated pine for longevity without constant maintenance.
- Use the lattice as a living screen by training vines like clematis or sweet peas up the open framework.
- Paint or stain the panel before installation for easier coverage and better protection against the elements.
- Ensure proper airflow by mounting the panel an inch away from a solid fence to prevent moisture buildup and rot.
Paint a Simple Wood Fence for Maximum Impact
A fresh coat of paint immediately transforms a tired wood fence, offering both potent curb appeal and essential weatherproofing.
You’ll begin by cleaning and sanding the surface, then use an exterior-grade acrylic latex primer. This creates a durable, breathable base.
Apply two thin coats of a high-quality exterior paint, ensuring uniform coverage and longevity.
Your color choice is a functional tool. A crisp white or soft gray provides a clean backdrop that makes greenery pop, while a dark charcoal or black recedes visually, enhancing your garden’s depth.
This painted surface becomes a living element when you train climbing plants like jasmine or clematis against it; the paint protects the wood from moisture these plants introduce.
Use Corrugated Metal for an Industrial Chic Look
Often overlooked for its potential in garden design, corrugated metal fencing delivers a durable, weather-resistant barrier with a distinctly modern aesthetic.
You’ll secure galvanized steel or aluminum panels directly to posts, creating a long-lasting structure with minimal upkeep. Its industrial character softens dramatically when integrated with climbing plants. Consider its practical and visual advantages.
- Opt for pre-rusted Corten steel to achieve an instant, stable patina that requires zero maintenance.
- Train fast-growing vines like clematis or jasmine up simple wire trellises fixed to the metal’s face.
- Mount panels with visible fasteners to embrace the raw, utilitarian aesthetic authentically.
- Pair the metal’s hard lines with soft, billowing ornamental grasses planted directly at its base for textural contrast.
Craft a Natural Willow or Hazel Wattle Fence
Crafting a willow or hazel wattle fence transforms flexible, freshly cut branches into a living, rustic barrier that you can weave directly between sturdy posts.
You’ll harvest long, straight whips in late winter when the sap is down, choosing willow, hazel, or even dogwood for their pliability. You then set hardwood posts firmly into the ground at close intervals. The weaving process involves threading the thinner ends of your branches between these uprights, alternating the weave direction with each new layer to create a tight, interlocking lattice. You tamp each woven course down tightly.
Over time, willow cuttings may even take root and sprout leaves, creating a truly integrated, living fence that evolves with your garden.
Combine Materials for a Custom Mixed-Media Fence
Weaving a living willow fence harnesses natural growth, but you can also achieve a distinctive boundary by merging manmade and organic components. This approach adds textural complexity and structural longevity.
Use a simple metal frame or reclaimed wooden posts as your primary support structure. Then, integrate climbing plants or weave in natural materials directly. This combination creates a living, evolving barrier that’s cost-effective and uniquely yours.
- Frame with Chain Link, Grow with Vines: Use standard chain link as an inexpensive, durable trellis for fast-growing clematis or ivy.
- Reclaimed Wood and Willow Hybrid: Build a post-and-rail base and weave living willow whips horizontally between the rails.
- Concrete Block Planter Wall: Stack inexpensive concrete blocks in a staggered pattern, filling the voids with soil and drought-tolerant succulents.
- Wire Grid and Bamboo Screen: Attach a grid of galvanized wire to posts, then weave harvested bamboo poles through it for instant privacy.
Define What ‘Cheap and Chic’ Means for Your Space
Every successful budget fence project starts with aligning your definition of ‘cheap and chic’ with your site’s specific needs and resources. Chic doesn’t mean costly; it signifies smart, intentional choices.
For you, ‘cheap’ might prioritize initial cost, using recycled pallet wood or found branches. For another, it’s long-term value from durable, low-maintenance materials like pressure-treated pine.
Analyze your yard’s sun exposure and soil to integrate fast-growing, dense plants like bamboo or privet, which form a living fence over time. Your chic factor comes from clean lines, thoughtful staining, or a cohesive design that complements your home’s architecture.
Understand your local climate’s impact on materials, as this directly influences your project’s longevity and ultimate cost-effectiveness.
Match Your Fence Style to Your Yard’s Needs
While planning your fence, you’ll choose a style based on your yard’s primary needs—whether that’s privacy, wind control, or pet security. The design must perform its core job. For high privacy, you’d pick a solid wood or vinyl panel fence, planting fast-growing vines like ivy or clematis for added density and a chic look.
A slatted horizontal design offers moderate wind control and visual interest. For pet security, a basic chain-link provides a durable, affordable frame that climbing roses or jasmine can transform. Assess your purpose first; your materials and any plant-integrated solutions follow directly from that function.
- Max Privacy: Use solid panels and layer with tall, dense plantings like bamboo or arborvitae.
- Windbreak Fence: Opt for slatted wood or composite screens to filter strong gusts.
- Pet Containment: Install sturdy chain-link or welded wire, softened by sprawling vines.
- Pure Border Definition: Employ simple split-rail, post-and-wire, or low picket styles.
Source Stylish Fencing Materials for Less (or Free)
After deciding on your fence’s function, sourcing its materials economically becomes the next practical step.
First, check online marketplaces and salvage yards for reclaimed lumber or metal; you’ll often find character-rich pieces for a fraction of the cost.
You can also source materials directly from your property. Harvest bamboo canes or straight saplings for a natural lattice, or weave flexible willow branches into a living fence framework.
For a rustic look, use fallen branches as horizontal rails between posts. Don’t overlook construction site dumpsters for free off-cuts of wood or concrete blocks—always ask for permission first.
These reclaimed and foraged elements, when combined with climbing plants, create a stylish barrier that blends utility with organic texture.
Gather Your DIY Fence-Building Toolkit
Now you’ll need a basic toolkit to turn those found materials into a sturdy structure. Your tools should handle both the construction and integration of natural elements. You’ll primarily manage wood, wire, and potential living plants, so choose implements for cutting, fastening, and earthwork.
This isn’t about specialized gear; it’s about versatile, durable tools that prepare your reclaimed lumber and support climbing vines or woven branches. Having the right equipment on hand makes the build efficient and ensures your fence withstands weather and growth pressure.
- A sturdy hammer for driving nails and tamping posts.
- A cordless drill/driver with assorted bits for screws and pilot holes.
- A reliable handsaw or reciprocating saw for cutting timber to size.
- A post hole digger and a solid level for setting stable, upright supports.
Plan Your Fence Layout and Height the Smart Way
Before you gather a single board, sketch your fence’s line and decide its height based on your yard’s sun patterns and the materials you’ll use.
A low lattice or woven wire fence won’t block light for your vegetable beds, while a taller panel fence creates privacy.
Consider material lengths; standard cedar planks are eight feet, so a six-foot height wastes less wood.
Use stakes and string to mark your perimeter, checking for level ground.
Integrate climbing plants like beans or clematis from the start; design your posts or wire grid to support their growth.
This planning phase ensures your materials work efficiently and your fence becomes a living part of your garden.
Use These Simple Tricks to Make Any Cheap Fence Last
Since you’re using affordable materials, protecting them from the elements and rot becomes your top priority.
Focus on foundational and maintenance practices to extend your fence’s lifespan for years, integrating some clever planting for natural support.
- Seal or Stain Immediately: Apply a quality water-repellent sealant or stain to all wooden components, especially cut ends, before installation to block moisture penetration.
- Elevate Wood Posts: Set wooden posts in gravel for drainage, not concrete, and ensure the bottom end is at least two inches above soil level to prevent ground-contact rot.
- Plant a Root Barrier: Install shallow-rooted, non-invasive ground covers or shrubs near the fence line; their root systems stabilize soil and reduce erosion without damaging the structure.
- Perform Annual Inspections: Tighten loose fasteners, replace any corroded hardware, and reapply protective coatings to sections showing wear, focusing on joints and the base.
Plant Fast-Growing Climbers to Soften Your New Fence
After ensuring your fence’s durability, you can immediately enhance its appearance by covering it with fast-growing climbers.
Choose plants that suit your fence’s material. For wood, use self-clinging varieties like Boston ivy; their aerial roots won’t damage sturdy lumber.
On wire or chain-link, select twining climbers such as morning glory or clematis; they’ll weave through the mesh. You must provide initial support with garden twine to guide growth.
Opt for annual vines for a quick, dense screen in one season. Ensure you plant them about a foot from the fence’s base and water regularly to establish roots.
This living coverage adds texture and color while softening the fence’s hard lines.
Apply These Final Pro Tips for a High-End Look
While you can achieve an affordable fence, applying a few finishing touches ensures it looks polished and intentional. Your final focus should be on integrating plants and enhancing material details for a cohesive, designer finish. This elevates basic lumber or chain link without significant expense.
- Cap your posts with simple, pre-cut wooden caps or decorative metal finials to prevent water damage and add vertical interest.
- Stain or seal uniformly, applying product to all sides of each board for consistent color and maximum protection from weathering.
- Install a gravel border along the fence line to suppress weeds, improve drainage, and create a clean, defined edge.
- Layer plantings by placing taller shrubs at the base and using mid-height perennials to break the visual plane of the fence.
Frequently Asked Questions
Do I Need a Permit for These Fences?
You’ll likely need a permit. Always check local codes first. Your material choice, height, and whether you’re attaching structures affects this. Using a living willow fence may also alter the requirements. Contact your building department.
Will These Fences Keep Pets Securely Contained?
Check fencing height and weave; some pets climb or dig. Use wire mesh buried with hardware cloth to stop diggers. You can train plants over the structure for beauty without compromising the fence’s security.
How Do I Handle a Fence Dispute With a Neighbor?
First, check your property line. Use metal stakes or a survey to confirm. Discuss materials like split-rail with woven vines for a natural barrier. Consider installing a living fence to define the boundary clearly.
Which Way Should the “Good” Side of the Fence Face?
You should face the “good” side toward your neighbor. That’s standard practice and often required by local codes. Construct the fence with the exposed posts on your side; you can conceal them with planting.
Are These Fence Ideas Suitable for a Rental Property?
They’re rarely suitable; you risk violating your lease. Use temporary, plant-based solutions instead. Plant fast-growing bamboo in movable containers or a dense, inexpensive annual hedge. You get privacy without permanent alterations.
Conclusion
Your chosen materials now need integration. Seal wood, cap posts, and bed them in gravel for longevity. Immediately plant those climbers like clematis or annual vines on your trellises or wire. Layer staggered shrubs or hardy succulents at the base. This fusion of smart structure and rapid, soft growth creates a durable, stylish boundary that looks established, not just built, on your budget.
The Only Tools You Need for a Thriving Garden 🌱
Whether you're a weekend gardener or growing daily — these hand-picked tools make every session faster, easier, and more satisfying.