You’ll transform your garden into a rustic retreat by repurposing reclaimed materials for pathways, building raised beds with weathered wood, and installing pergolas for climbing vines. Mount old hand tools as living wall art, grow edible herbs in galvanized containers, and string fairy lights through arbors. Layer native flowers and hardy plants that thrive with minimal care. Add weathered benches beneath tree canopies and fragrant herb borders along paths. These budget-friendly elements combine functionality with charm, and there’s plenty more rustic inspiration waiting to elevate your outdoor sanctuary.
Key Takeaways
- Reclaimed pathways using bricks, concrete, and tiles save 40% while diverting waste from landfills sustainably.
- Repurposed metal planters and mounted tools on garden walls create functional rustic focal points with vertical interest.
- Raised beds built from reclaimed pallets or weathered wood paired with corrugated metal provide textural contrast.
- Pergolas wrapped with climbing clematis or wisteria establish cozy reading nooks with natural shade and fragrance.
- Fragrant herb borders of thyme and rosemary stabilize slopes while naturally repelling pests year-round.
Build Garden Pathways From Reclaimed Materials
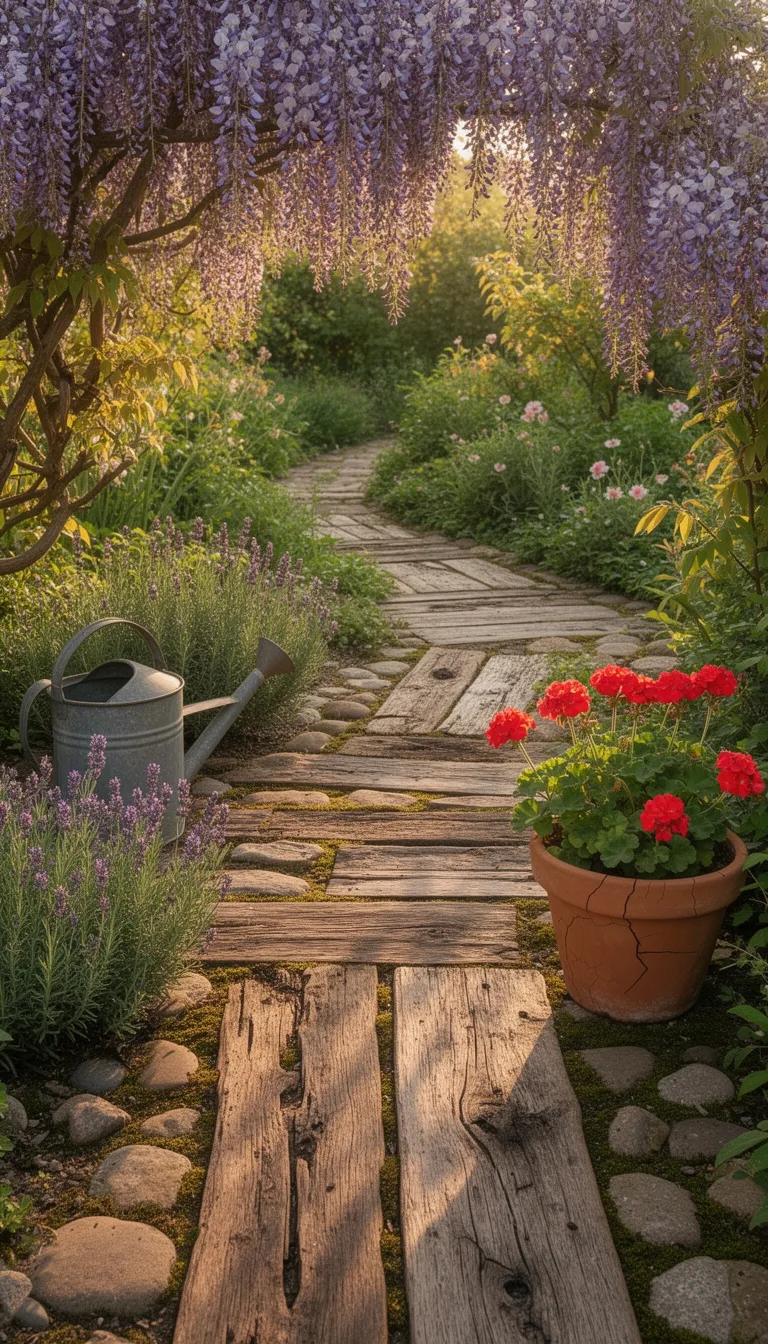
Why spend thousands on new landscaping materials when you can create stunning garden pathways from reclaimed resources?
You’ll save up to 40% while diverting waste from landfills and gaining unique character that new materials can’t match.
Start by excavating 4-6 inches deep, removing all vegetation and debris.
Add a 2-3 inch crushed gravel base, then a 5cm sand layer.
Choose from reclaimed bricks, broken concrete, tiles, pallet wood, or even glass bottles for visual interest.
Arrange your materials in straight, winding, or branching patterns, mixing shapes and sizes for organic movement.
Compact each section thoroughly using a hand tamper or plate compactor.
Keep pathways 3-4 feet wide for comfortable walking.
Brush kiln-dried sand between gaps for stability.
Your rustic pathway combines durability, sustainability, and distinctive charm.
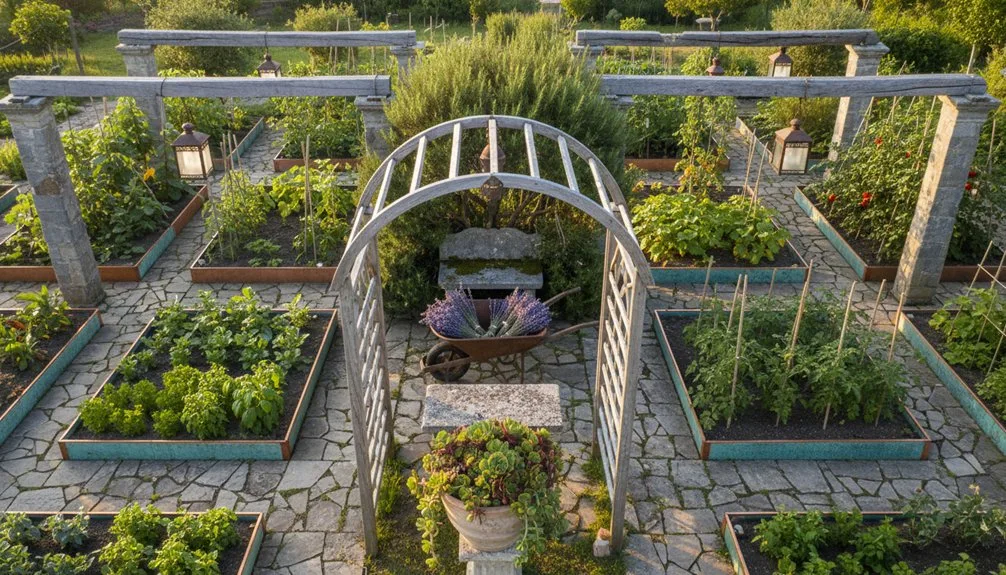
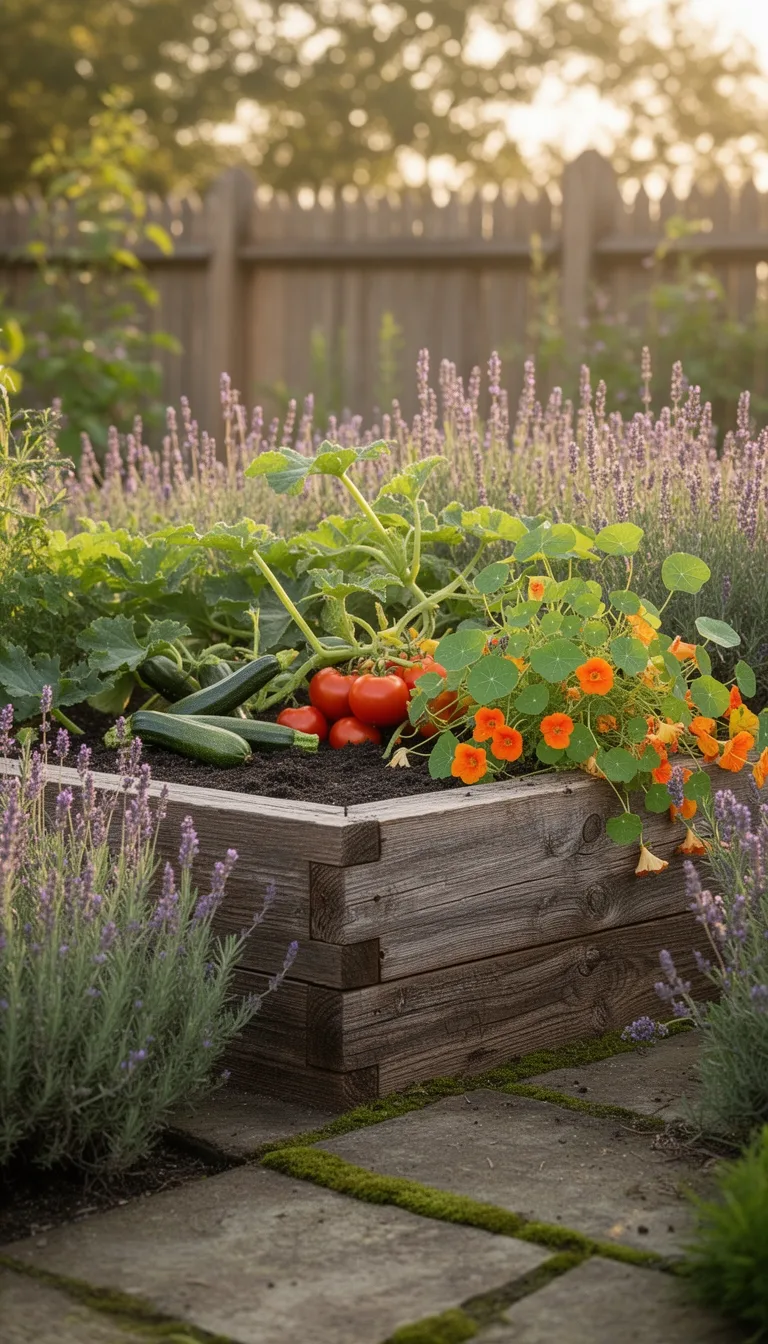
Design Rustic Raised Garden Beds
How can you transform your garden into a functional, beautiful space?
Design rustic raised beds using materials that reflect your style and budget.
You’ll find reclaimed pallets offer an affordable, eco-friendly foundation with natural character.
For durability, stack 2×6 boards three high on 24-inch 4×4 corner posts—this creates standard 4×4, 4×8, or 4×10 beds.
Arrange them in a Four-Garden Classic layout over 15 feet for balanced aesthetics.
Consider pairing corrugated metal with weathered wood for farmhouse appeal, or combine red bricks with thick planks for textural contrast.
Add log borders using split tree trunks for organic charm.
Install ½-inch hardware cloth across bottoms to block gophers while allowing drainage.
For functionality, incorporate arch trellises connecting beds or obelisk structures within centers.
Built-in benches along borders provide seating while maximizing your garden’s purpose.
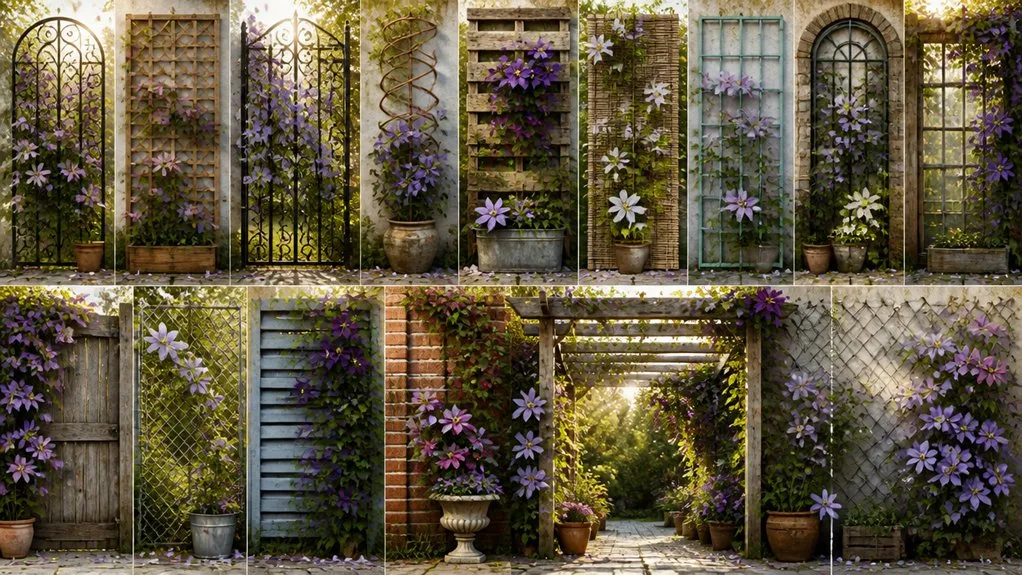
Install a Pergola for Climbing Vines and Shade
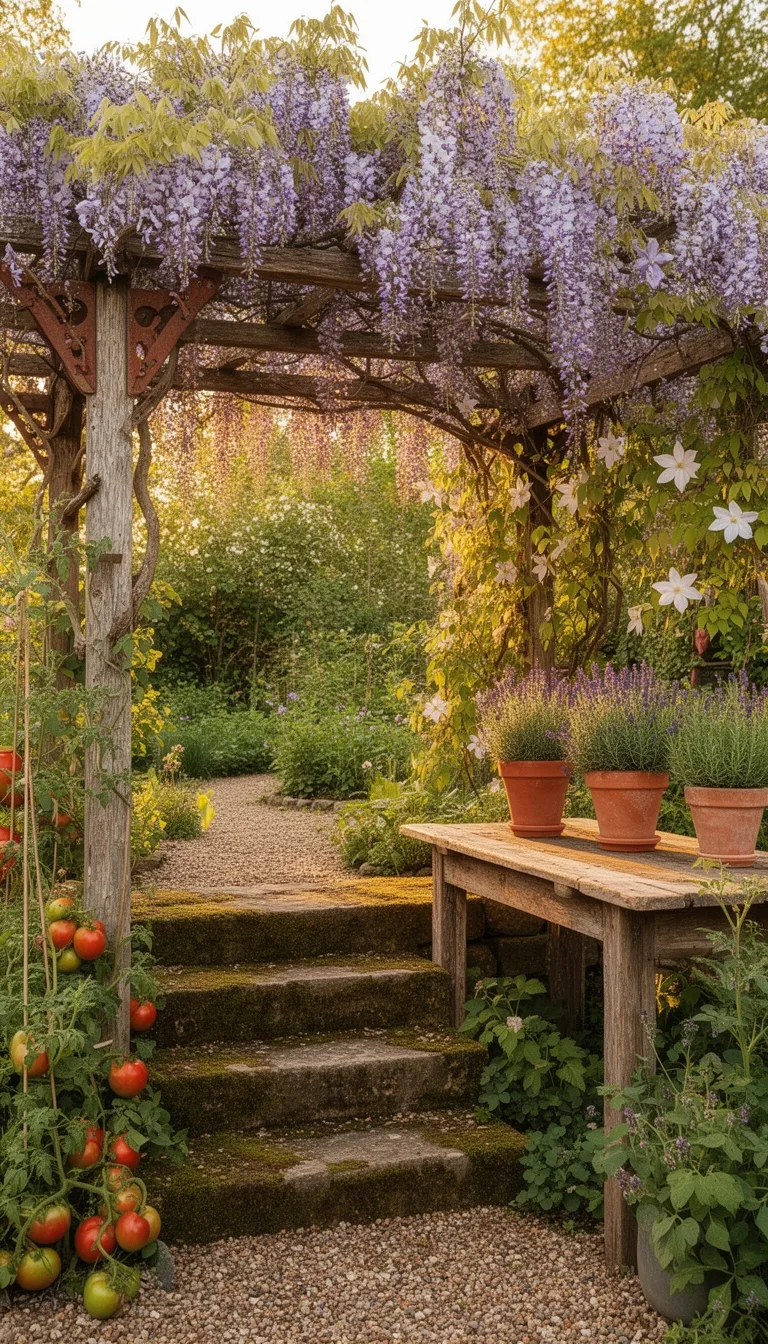
Once you’ve established your raised beds, you’ll want to add vertical interest and cooling shade by installing a pergola with climbing vines.
Start by positioning your pergola near planting areas, using sturdy cedar or vinyl to support mature vines.
Plant vines at the base and guide young stems to posts with soft ties or twine. Choose varieties matching your soil conditions—clematis prefers moist, neutral soil while wisteria tolerates alkaline conditions.
As shoots grow, spiral them around pillars and tie stems horizontally across beams to form a canopy.
Pinch shoot tips to encourage vertical growth, and redirect stray vines back to the structure. Regular pruning and watering keep plants healthy and prevent invasive growth while maximizing shade coverage.
Mount Reclaimed Hand Tools as Living Wall Accents
As your pergola matures and provides shade overhead, you’ll want to add visual interest at eye level by mounting reclaimed hand tools as decorative wall accents.
Start by securing reclaimed pallets as backing structures on your garden walls.
Attach steel hooks firmly using an impact driver with pilot holes, ensuring they’ll support tool weight safely.
Arrange old rakes, cultivators, and shovels artistically, positioning sharp edges away from walkways.
Use twine to bind tools together or secure them to posts.
Consider inserting vintage rakes into container pots for structural interest, or hang glass bottles below mounted tools to display fresh-cut flowers.
These weathered pieces create functional focal points that communicate your garden enthusiasm while transforming aged materials into intentional art installations.
Grow Edible Herbs in Galvanized Containers
Why not transform inexpensive galvanized tubs into a thriving herb garden that’ll complement your rustic space?
You’ll find 17-gallon containers at garden centers for around $25, or grab smaller buckets at Walmart for $8.
Start by drilling drainage holes in the bottom, then fill with organic potting mix and add starter fertilizer.
Plant basil, oregano, thyme, and rosemary directly into the soil.
Chives need root-bound plants teased before planting, while mint requires quarantine to prevent overgrowth.
Water immediately after planting, then monitor closely since metal containers heat quickly.
Leave soil space at the top to prevent spillover during watering.
These durable, rustic containers work beautifully while remaining budget-friendly.
Lay Stone Walkways With Natural Stepping Stones
Before you’ll need to carefully plan your walkway’s route and prepare the site.
You’ll measure your desired path, mark it with spray paint, and contact a utility locating service to identify underground lines.
Next, excavate 6–8 inches deep and remove all vegetation.
Spread two compacted 2-inch layers of crushed stone as your foundation, then apply a 1-inch layer of moistened stone dust.
Now you’re ready to lay your stones:
- Start at one end and place stones on the prepared bed
- Use a rubber mallet to tap each stone level and secure it firmly
- Leave small gaps between stones and fill them with stone dust for authentic rustic appeal
Verify everything’s level before finishing.
Place Weathered Wooden Benches for Seating
Where’ll you place your seating to anchor the garden’s social spaces? Position weathered wooden benches along garden paths or beneath tree canopies for natural shade.
Choose a 63-inch acacia bench for garden porches that seats up to three persons comfortably.
For intimate seating areas, a 24-inch width works well in smaller gardens.
Select benches with ergonomic contoured seating and angled backrests for comfort during extended visits.
Cedar construction provides 20+ years of outdoor durability with minimal maintenance—simply hose down with soap and water.
Marine-grade stainless steel hardware and zinc-coated components resist corrosion and rust from environmental stresses.
Most benches arrive partially assembled with pre-drilled holes and instructions, enabling quick setup.
Their hand-sanded surfaces and traditional joinery celebrate rustic charm while withstanding harsh weather conditions.
Repurpose Metal Tubs and Buckets as Planters
How can you transform forgotten metal containers into charming garden features?
You’ll find that repurposing old tubs and buckets offers both sustainability and style to your outdoor space.
Start by drilling drainage holes with a metal bit, then cover them with landscape fabric to prevent soil loss.
Line sunny spots with bubble wrap to insulate the hot metal.
Fill containers with quality potting mix and add gravel at the bottom for improved drainage.
Consider these strategic placements:
- Stack tubs in trios for vertical interest and visual impact
- Hang containers from chains or deck railings for elevated displays
- Position on patios and decks with casters for easy mobility
You’ll contain invasive plants like mint while adding seasonal color with lantanas, zinnias, or herbs.
This approach maximizes small spaces efficiently.
Train Climbing Roses on Wooden Arbors
Training climbing roses on wooden arbors transforms ordinary structures into spectacular focal points bursting with blooms. Start by securing treated wood firmly into the ground, then identify your three to five strongest canes with woody bark and swollen buds.
Fan out these main canes horizontally at shallow 45-degree angles to maximize coverage and blooms.
Tie canes every 12-18 inches using soft garden twine or Flexi-Tie, ensuring ties are firm but not restrictive.
Spiral new stems around uprights, weaving them across supports in an S-shape pattern to prevent rubbing and disease.
During year one, establish your framework with light pruning.
Each subsequent year, extend canes and remove weak growth.
Annually, shorten laterals and deadhead spent flowers for continuous blooming throughout the season.
Line Garden Edges With Fragrant Thyme and Rosemary
While climbing roses command attention overhead, you’ll want to ground your rustic garden with fragrant herbs that define borders and deliver multiple practical benefits.
Thyme and rosemary create natural garden edges that perform beyond aesthetics.
Plant thyme along pathways where its subtle, earthy fragrance releases when you walk across it.
Rosemary’s strong pungent scent establishes a formal atmosphere while deterring pests through scent disruption.
These herbs offer substantial advantages:
- Pest management: Thymol compounds naturally repel mosquitos and insects without chemicals
- Erosion control: Deep fibrous roots stabilize slopes and prevent runoff
- Low maintenance: Both thrive in poor soils, require minimal watering, and eliminate regular mowing
Once established, these evergreen borders maintain year-round fragrance while supporting pollinators.
You’ll reduce garden upkeep significantly while creating defined, functional edges throughout your rustic landscape.
Hang Wrought Iron Lanterns for Evening Glow
As evening descends on your rustic garden, wrought iron lanterns transform ordinary spaces into atmospheric retreats. You’ll create intimate zones by positioning fixtures near seating areas and along garden walls to graze stucco surfaces. Flank main entry doors with symmetrical pairs for visual impact.
| Placement Location | Purpose |
|---|---|
| Porch alcoves | Shadow amplification near arches |
| Planting beds | Path illumination and wayfinding |
| Garden walls | Ambient glow on surfaces |
| Seating areas | Evening gathering zones |
Before installation, dry fit and level each lantern, aligning tops with door trim. Use masonry anchors for secure mounting, then seal penetrations discreetly. Select dimmable LED bulbs at 2700K for warm, inviting light. Frosted bulbs prevent glare while creating soft ambiance. Test plumb alignment and verify ground continuity before final wiring, following local electrical codes throughout.
Tuck Reading Nooks Among Climbing Vines
Where could you carve out a private retreat within your garden’s vertical spaces? You’ll create an intimate reading sanctuary by nestling a bench or hammock beneath a pergola wrapped in climbing roses and trailing vines.
This layered approach transforms an ordinary corner into an immersive escape.
Consider these elements for your reading nook:
- Built-in seating with shelving: Position a curved bench against a pergola wall, then install shelves behind it for your garden library. Trailing plants like Pothos drape naturally alongside your books.
- Overhead vine coverage: Let cascading roses and ivy soften the structure while filtering sunlight onto your reading spot.
- Ambient additions: Add string lights, a side table for drinks, and textured throws to extend your retreat into cooler evenings.
Layer Broken Tiles and Gravel for Border Texture
How can you define garden beds with materials you’ve already got on hand? Layer broken tiles and gravel to create stunning border texture that separates plants from walkways while adding visual depth.
| Material | Installation Depth |
|---|---|
| Broken tiles | 8 inches (200mm) |
| Gravel layer | Over tile base |
| Backfill soil | Secure placement |
Place tile pieces upright in a shallow 4-inch trench, setting them half their length deep for stability. Backfill with removed soil, then apply loose sand in front to prevent shifting. Top with gravel for additional support and aesthetic appeal.
You’ll achieve clean borders while repurposing salvaged materials. This cost-effective approach works beautifully for vegetable beds, flower borders, and pathways, accommodating both rustic and contemporary designs effortlessly.
Plant Ferns Along Shaded Stair Edges
Transform your shaded stairways into lush garden spaces by planting ferns along the edges—they’ll soften hard lines, prevent erosion, and create inviting transitions between levels.
Select ferns strategically based on your space:
- Groundcover options: Use fragile ferns, lemon button ferns, or Japanese painted ferns for diminutive native coverage along stair edges
- Layered heights: Combine shorter varieties with medium Lady ferns (24-30 inches) and taller Ostrich ferns (5 feet) for visual depth
- Companion planting: Mix ferns with hostas, astilbe, or bleeding heart to enhance texture and interest
Plant smaller ferns between exposed roots for dynamic fill.
Ensure consistently moist, organic-rich soil with a slightly acidic pH of 5.5-6.5.
Most varieties thrive in shade with dappled morning light.
Lady ferns and Ghost ferns are particularly winter hardy, making them reliable choices for rustic stair edging.
Turn Rusty Wheelbarrows Into Garden Statement Pieces
Why let a weathered wheelbarrow gather dust when you can transform it into a striking focal point? Start by cleaning dirt with a broom, then wire brush heavy rust manually. An angle grinder with flap disc removes stubborn rust, followed by chemical rust remover treatment. Apply white oil-based primer, dry 24 hours, then paint with one coat. Wait 48 hours before planting.
| Step | Method | Time |
|---|---|---|
| Cleaning | Broom removal | Immediate |
| Rust removal | Wire brush/angle grinder | 1-2 hours |
| Chemical treatment | Rust remover application | 1 hour |
| Priming | Oil-based primer coat | 24 hours dry |
| Painting | Oil-based paint | 48 hours dry |
Drill drainage holes in the basin, fill with soil and rocks, then plant full-sun varieties like petunias. Position in sunlight and wheel to shelter during rain for maximum impact.
Create Intimate Stone Patio Zones
Once you’ve established focal points like planted wheelbarrows, you’ll want to create comfortable gathering spaces where you and your guests can actually enjoy them.
Stone patios define these intimate zones while maintaining that rustic charm you’re after.
Start by choosing your layout style:
- Circular flagstone patterns radiating from a central point naturally draw people together and work beautifully around fire pits
- Small square paver grids with grass gaps maximize coziness in compact yards while keeping costs manageable
- Raised stone platforms separate intimate areas visually and improve functionality on sloped terrain
Layer in mixed-material borders using stone and brick to highlight sightlines and create distinct boundaries. Add stepping stone lounge areas connected by winding pathways.
This approach transforms fragmented yards into purposeful, inviting spaces that encourage lingering conversations and memorable gatherings.
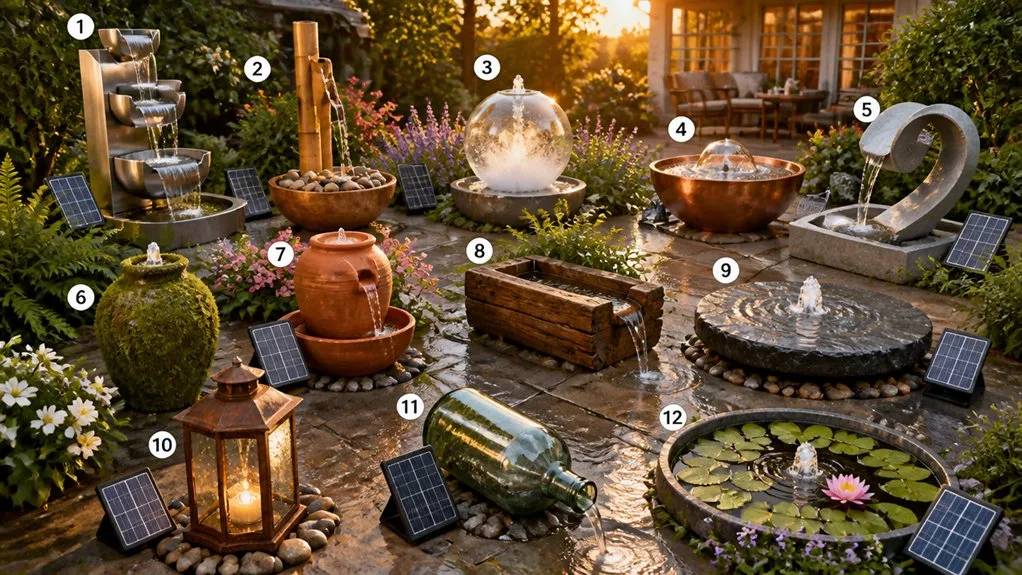
String Fairy Lights Through Arbors and Pergolas
As you’re finalizing your stone patios and gathering spaces, string lights can elevate your rustic garden into an enchanting evening retreat. Start by measuring your pergola and sketching your desired pattern—drape, zigzag, or crisscross—then purchase weatherproof LED lights with shatterproof bulbs and a timer.
Install heavy-duty outdoor hooks every 1-3 feet along rafters, spacing them evenly for optimal illumination. Use zip ties or twist ties to secure strands without causing abrasion damage. Loop lights through S-hooks placed over crossbeams, allowing natural drape for visual appeal.
Connect to a GFCI outlet using weatherproof extension cords, or opt for solar-powered alternatives if outlets aren’t accessible. For added ambiance, intertwine lights with climbing vines or grapevines, focusing installation over seating areas to create intimate zones that transform your garden after sunset.
Grow Native Flowers for Year-Round Color
How can you maintain vibrant garden color from spring through frost without relying on high-maintenance annuals? You’ll plant native perennials that bloom in succession throughout the seasons.
Start with spring bloomers like Eastern Blue Star and Golden Alexander, which transition beautifully into summer performers.
Layer in Coreopsis and Yarrow for consistent color from spring through fall. Add Blue Mistflower and Maryland Aster for late-season interest.
These natives thrive with minimal care:
- Select plants suited to your hardiness zone and soil conditions for long-term success
- Choose varieties with staggered bloom times to ensure continuous flowers across seasons
- Deadhead spent blooms on Cosmos and Garden Phlox to extend flowering periods
Native flowers attract pollinators while reducing maintenance demands, creating a rustic garden that evolves beautifully year-round.
Design a Rustic Outdoor Dining Spot
Your vibrant native garden creates the perfect backdrop for an outdoor dining space where you’ll want to spend your evenings.
Start by selecting sturdy, weather-resistant furniture like wooden tables or round distressed wood pieces that maximize your space. Hang commercial-grade LED string lights on stainless steel cables to create ambiance as daylight fades.
Layer in natural elements with potted plants, oak branches as centerpieces, and climbing vines around a wooden pergola.
Add texture through chunky weave rugs and linen throws in earthy tones like terracotta and mustard yellow.
Complete your setup with practical touches: stone pathways, vintage serving trays, and twine-tied napkins.
Consider installing a fire pit nearby for cozy evening gatherings. These intentional choices transform your garden into an inviting rustic retreat.
Choose Hardy Plants That Thrive With Minimal Care
Once you’ve established your rustic dining area, it’s time to fill your garden with plants that won’t demand constant attention.
Hardy perennials like yarrow, echinacea, and black-eyed susans thrive in drought conditions while maintaining vibrant blooms throughout the season. You’ll want to incorporate:
- Drought-tolerant shrubs such as lavender and Russian sage that require minimal watering once established
- Season-spanning bloomers like asters and daylilies that extend your garden’s visual interest from spring through fall
- Structural elements including ornamental grasses and hostas that provide year-round texture and contrast
These plants resist pests naturally and tolerate poor soil conditions, eliminating the need for frequent fertilizing or spraying.
Conclusion
You’ll create a stunning rustic garden by blending these ideas strategically. According to the National Gardening Association, 42% of American households now grow food at home, making edible herbs and native plants increasingly popular choices. You can start small with reclaimed materials and gradually expand your space. Focus on hardy plants that’ll thrive with minimal maintenance, and you’ll enjoy a beautiful, sustainable garden year-round without constant upkeep.
The Only Tools You Need for a Thriving Garden 🌱
Whether you're a weekend gardener or growing daily — these hand-picked tools make every session faster, easier, and more satisfying.