You’ve got a backyard, a balcony, or even a tiny patio, and you want to turn that space into a low‑maintenance garden without a massive overhaul. By mixing compact wooden frames, repurposed pallets, and lightweight fabric beds with tiered trays, self‑watering reservoirs, and simple masonry or corrugated‑metal structures, you can create versatile raised beds that fit any layout. The right soil mix, drip or wicking irrigation, and a selection of hardy perennials and herbs will keep the garden productive year‑round. Ready to see how each idea works in practice?
Key Takeaways
- Choose a 3‑4 ft wide, under‑8 ft long frame for easy access and turning, using untreated wood, pallets, or concrete blocks.
- Build with a sturdy base: lay a 2‑inch gravel layer, compact, then add landscape fabric before filling with a compost‑peat‑sand mix.
- Incorporate tiered or portable designs—fabric‑lined boxes, stacked trays, or metal frames—for balconies or small spaces.
- Plant low‑maintenance perennials (lavender, coneflower, daylilies) in groups of three, spacing 12–18 in apart for airflow and visual impact.
- Add a simple drip‑irrigation system with perforated hose and a timer, plus 2–3 in of organic mulch to retain moisture and suppress weeds.
Choose the Right Bed Size for Your Space

When planning a raised flower bed, start by measuring the area you have available and decide on a size that fits comfortably without crowding walk pathways or other garden features.
Measure length and width, then subtract space needed for edging and access. Aim for a width of 3‑4 feet so you can reach the center without stepping on soil, and keep length under 8 feet for easy turning. If you have a narrow strip, a 2‑foot width works, but ensure you can still tend the plants.
Consider the crops you’ll grow; larger vegetables need more room, while herbs thrive in compact sections.
Sketch the dimensions on paper, then double‑check clear you have enough room for watering hoses, tools, and mulch edges.
Build a Simple Wooden Frame With Recycled Pallets

You’ve got the perfect dimensions, now it’s time to turn those measurements into a sturdy frame using recycled pallets. First, pick pallets free of chemicals and in good condition. Strip any loose boards, then cut them to the length you need.
Lay the pieces flat, align the corners, and secure them with galvanized screws or nails. Add corner brackets for extra rigidity, and sand rough edges to protect plant roots. Finally, place the frame on a level surface, fill it with soil, and you’re ready to plant.
- Choose clean, untreated pallets
- Cut boards to exact side lengths
- Assemble with screws, using brackets at each corner
- Sand edges for safety
- Position frame, fill with soil, and plant
Set Up a Low‑Maintenance Concrete Block Raised Bed
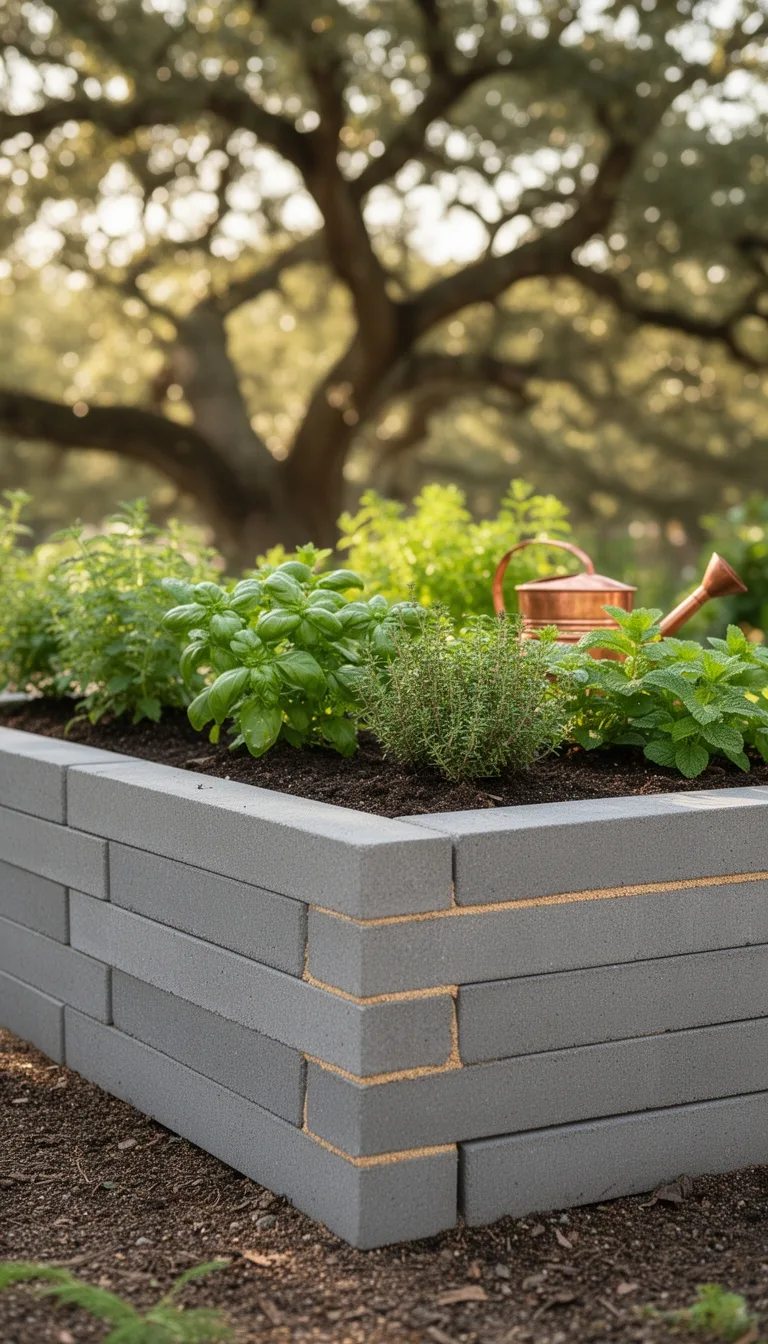
Start by laying out the concrete blocks on a level spot, making sure each piece sits flat and aligns with the garden’s dimensions. Check the ground for weeds, remove them, then add a thin layer of landscape fabric to keep soil from escaping.
Stack the blocks, staggering joints like a brick wall for extra strength, and tap each one with a rubber mallet until it’s snug. Fill the interior with a mix of compost, peat moss, and coarse sand, watering as you go to settle the material.
Install a drip‑irrigation line along the base, covering it with mulch to reduce evaporation. Finally, plant your flowers, then step back and enjoy a sturdy, low‑maintenance raised bed that holds its shape season after season.
Build a Modern Geometric Raised Bed Using Corrugated Metal

After mastering the sturdy concrete‑block bed, you can give your garden a sleek, contemporary edge with a corrugated‑metal frame.
Cut the metal sheets into triangles or hexagons, then bolt them together with stainless steel brackets for a clean, geometric look.
Use a level to ensure each panel sits flat, and add wooden cross‑supports inside to hold soil.
Line the interior with a heavy‑duty landscape fabric to keep rust from leaching into the earth.
Fill the bed with a light, well‑draining mix and plant low‑maintenance perennials for a striking, modern display.
- Triangle panels bolted at corners
- Hexagonal sections interlocked for visual flow
- Stainless steel brackets for durability
- Wooden cross‑supports for soil stability
- Landscape fabric liner to prevent rust contamination
Convert an Old Garden Bench Into a Raised Garden Bed
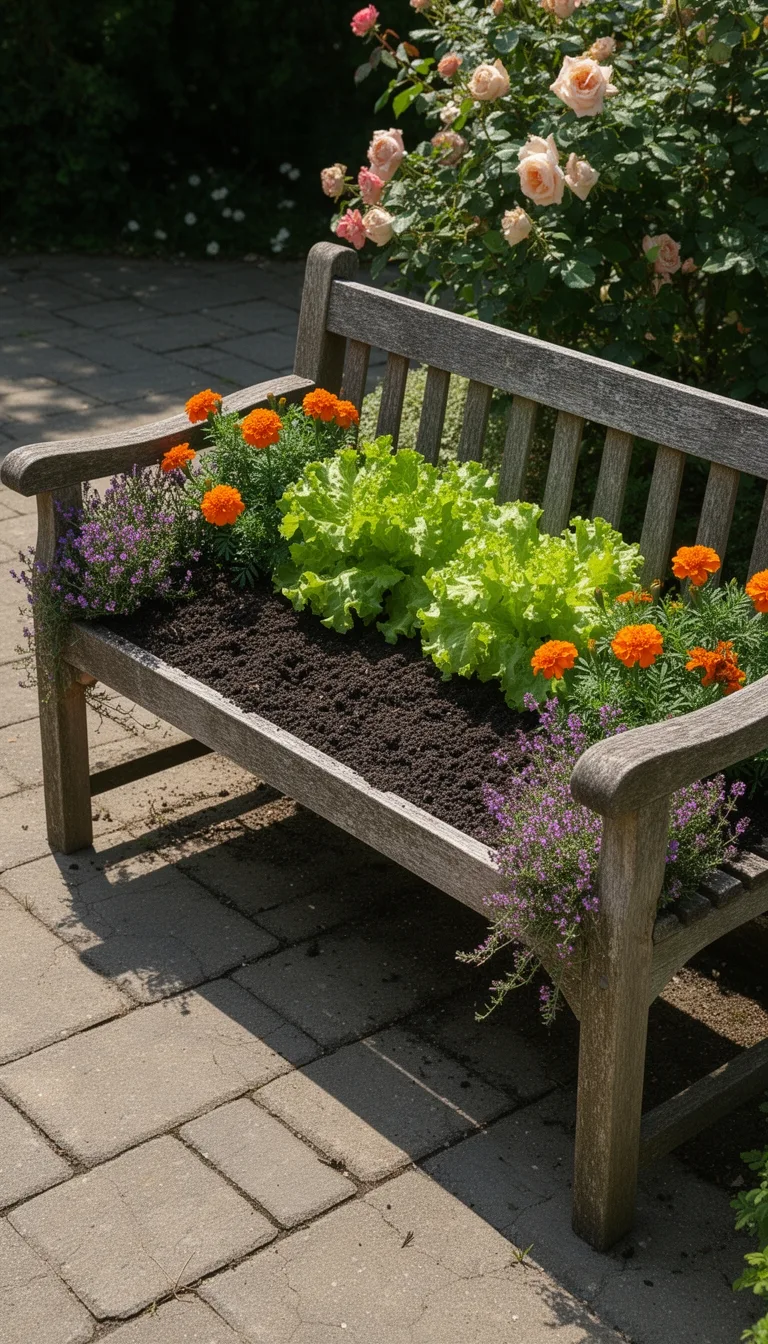
Turn your old garden bench into a raised bed by stripping away the seat and backrest, then hollowing out the interior to create a sturdy, soil‑holding box. First, unscrew any hardware and remove the slats; keep the frame intact.
Cut the bench’s legs to the desired height, usually 12‑18 inches, and reinforce with metal brackets if needed. Line the interior with landscape fabric to prevent soil loss, then fill with a mix of compost, peat, and perlite.
Plant shallow‑rooted herbs or lettuce, allowing easy access from all sides. Water thoroughly, then add a drip‑irrigation line for consistent moisture.
Finish by staining or painting the exposed wood to protect it from the elements and give the garden a cohesive look.
Create a Rustic Raised Bed With a DIY Stone Wall
Your reclaimed bench now sits as a sturdy box, but you can give your garden an even more rustic charm by building a stone‑walled raised bed.
Start by marking a 4‑by‑8‑foot rectangle, then dig a shallow trench for the foundation. Lay a 2‑inch gravel base, compact it, and begin stacking fieldstones with a mortar mix of sand, lime, and water.
Keep joints tight and stagger stones for strength. Once the wall reaches 24‑inch height, backfill with a blend of topsoil, compost, and coarse sand.
Finish with a drip‑irrigation line and plant your herbs or perennials.
- Gather fieldstones, mortar mix, and gravel
- Dig and level a shallow trench
- Build a staggered stone wall to 24 inches
- Backfill with soil‑compost‑sand blend
- Install drip irrigation and plant selections
Assemble a Portable Fabric Bed for Small Balconies
Start by measuring the balcony’s usable width and length, then cut a lightweight, water‑resistant fabric panel to fit, leaving a few inches of excess for folding.
Sew reinforced hems along the edges and install Velcro strips or snap fasteners at the corners so the panel folds into a compact rectangle.
Slip a thin, rigid frame—made from PVC pipe or aluminum slats—through the fabric pockets, securing it with zip ties.
Fill the frame with a high‑quality potting mix, spreading it evenly to avoid sagging.
Place the portable bed on a level surface, anchor it with suction cups or a low‑profile weight to prevent wind from tipping it.
When you’re done, detach the frame, roll the fabric, and store it flat until the next planting season.
Design a Tiered Multi‑Level Raised Bed for More Planting
Create a tiered, multi‑level raised bed to maximize planting space on a small balcony or patio. Start with a sturdy frame, then stack shallow trays or repurposed crates, securing each level with brackets or zip ties.
Fill the bottom with richer soil for vegetables, and use lighter mixes on higher tiers for herbs and flowers. Keep the design compact—no more than 3‑4 feet wide—so it fits comfortably against a railing.
Add a simple trellis on the top tier for vining plants, and make sure each level has a small drainage hole to prevent water pooling.
- Base layer: 12‑inch deep, nutrient‑rich soil
- Second tier: 8‑inch deep, balanced potting mix
- Third tier: 6‑inch deep, lightweight seed‑starting mix
- Brackets: metal L‑shapes or zip ties for stability
- Trellis: small bamboo or metal grid on top tier
Incorporate a Built‑In Irrigation System for Raised Beds
Integrate a simple drip‑line or soaker‑hose system into the tiered bed to keep soil evenly moist without overwatering.
First, lay a perforated hose along the base of each tier, securing it with zip ties or garden staples. Connect the hose to a timer‑controlled faucet or a low‑pressure pump, and run a main line to a central valve.
Use emitters or micro‑drip stakes positioned near each plant’s root zone, spacing them 6‑12 inches apart for uniform coverage. Adjust flow rates by tightening or loosening the emitters, and test the system before planting.
Regularly flush the tubing to prevent clogging, and check for leaks after heavy rain. This setup delivers water directly where it’s needed, conserving moisture and reducing weed growth.
Add Self‑Watering Reservoirs to Raised Beds for Low Maintenance
After setting up a drip‑line, you can boost low‑maintenance watering by adding a self‑watering reservoir beneath each raised bed.
Choose a sturdy, water‑tight container—plastic tote, rain barrel, or purpose‑built reservoir—and cut a hole for the drip line to feed plants directly.
Fill the tank with water, then let capillary action draw moisture up through a wicking material or porous pipe.
This system reduces daily watering checks, keeps soil evenly moist, and protects roots from drought stress.
Adjust the reservoir height to match your bed’s depth for optimal flow and easy refilling.
- Use a 5‑gal tote with a drilled inlet and outlet.
- Install a wicking fabric strip along the tank wall.
- Connect the drip line to a pressure‑regulating valve.
- Add a float valve for automatic refill from a rain barrel.
- Cover the tank with a UV‑resistant lid to prevent algae.
Plant Low‑Maintenance Perennials for Year‑Round Color
Add a handful of low‑maintenance perennials to your raised beds and you’ll enjoy color all year without constant fuss. Choose hardy varieties that thrive in your climate—lavender, coneflower, and black-eyed Susan handle heat, while hostas and daylilies tolerate shade.
Plant them in groups of three to five for a fuller look, spacing each 12‑18 inches apart to allow airflow. Mulch with shredded bark to retain moisture and suppress weeds, then water deeply once a week during dry spells.
Prune spent blooms in early fall to encourage rebloom and keep the beds tidy. Because these perennials are drought‑tolerant and disease‑resistant, you’ll spend less time maintaining and more time enjoying the continuous splash of color.
Mix Herbs and Edibles for a Functional Kitchen Garden
Start by grouping complementary herbs and edible flowers in the same raised bed to create a kitchen garden that’s both beautiful and useful.
Choose varieties that share soil, water, and light needs, and arrange them in layers for easy harvesting.
Plant low‑lying basil or thyme under taller chives or rosemary, and sprinkle nasturtium or marigold for color and pollinator draw.
Keep pathways narrow so you can reach every plant without stepping on the soil. Water consistently, mulch to retain moisture, and prune regularly to prevent overcrowding.
- Basil + nasturtium
- Thyme + calendula
- Chives + violets
- Rosemary + lavender
- Mint (contained) + edible nasturtium
Use Companion Planting to Boost Health and Yield
Pairing herbs and edible flowers in a raised bed already shows how plants can support each other, and companion planting takes that synergy a step further. You can boost health and yield by pairing nitrogen‑fixers with heavy feeders, or using aromatic herbs to deter pests. Plant marigolds beside tomatoes to repel nematodes, and sow basil with peppers to improve flavor and reduce aphids. Rotate crops each season to keep soil microbes balanced and avoid disease buildup.
| Plant Pair | Benefit |
|---|---|
| Basil & Peppers | Repels aphids, enhances flavor |
| Marigold & Tomato | Deters nematodes, improves yield |
| Nasturtium & Cabbage | Attracts beneficial insects, reduces pests |
Apply these combos, water consistently, and watch your bed thrive.
Apply Mulch and Ground Cover for Soil Health and Weed Control
Cover your raised bed with a thick layer of organic mulch or a living ground‑cover to lock in moisture, suppress weeds, and feed the soil as it breaks down.
Choose material that matches your garden’s aesthetic and climate. Spread it evenly, aiming for 2–3 inches depth, and keep it a few inches away from plant stems to prevent rot.
Refresh the layer annually or when it decomposes to maintain its protective benefits. A living cover like clover also adds nitrogen, making your soil richer without extra fertilizer.
- Straw or shredded leaves for quick, inexpensive mulching
- Wood chips for long‑lasting, decorative coverage
- Composted bark for nutrient‑rich, slow‑release mulch
- Low‑growing thyme or creeping sedum as a fragrant ground‑cover
- Living clover mix to fix nitrogen and deter weeds
Follow a Seasonal Care Checklist to Keep Your Raised Garden Beds Thriving
Typically, you’ll walk through a simple, four‑season checklist that keeps soil, water, and plants in balance. In spring, loosen soil, add compost, and sow cool‑season veggies. Summer calls for deep watering, mulching, and pest scouting. Autumn means trimming dead foliage, applying a thick organic mulch, and planting cover crops. Winter requires covering beds with straw or burlap and checking drainage.
| Season | Task | Why |
|---|---|---|
| Spring | Loosen soil, add compost | Boost nutrients, improve structure |
| Summer | Deep water, mulch, scout pests | Maintain moisture, reduce weeds |
| Autumn | Trim, mulch, sow cover crops | Protect roots, enrich soil |
| Winter | Cover beds, inspect drainage | Prevent frost damage, avoid waterlogging |
Follow this rhythm, and your raised beds will stay productive year‑round.
Conclusion
Now you’ve got 15 practical raised‑bed ideas that fit any space, budget, and skill level. By mixing compact frames, tiered trays, and upcycled materials, you’ll keep planting within easy reach, conserve water, and boost yields. Stick to low‑maintenance perennials, herbs, and smart companion pairings, mulch well, and rotate seasonally. Follow a simple care checklist, and your garden will stay productive, beautiful, and hassle‑free year after year.
The Only Tools You Need for a Thriving Garden 🌱
Whether you're a weekend gardener or growing daily — these hand-picked tools make every session faster, easier, and more satisfying.