You might think cinder blocks are just for construction, but they’re a secret weapon for transforming your outdoor space. Their simple, hollow design gives you a blank slate for countless projects, from practical planters to sophisticated water features. We’ll show you how to start with the right materials and a few key techniques to unlock their full potential affordably and stylishly. Your most creative garden solution is likely already at the hardware store.
Key Takeaways
- Build versatile, no-mortar planters and vertical herb gardens by stacking blocks.
- Create functional outdoor furniture like benches and side tables with blocks and wood planks.
- Construct a safe fire pit by circling blocks and adding a protective metal ring.
- Design a kid-friendly fairy garden using blocks on their sides as small compartments.
- Assemble a simple, tiered water feature using blocks to house a pump and basin.
Understand Cinder Block Basics Before You Build
Before you dive into building your cinder block garden, it’s essential to grasp a few practical fundamentals about the material itself.
You’ll primarily work with standard blocks, which are 8”x8”x16” and have two or three hollow cores. Those cores are key—you can fill them with soil for planting or use them to align and reinforce your structure with rebar.
You must understand that these blocks are porous, so they can wick moisture. In freezing climates, that moisture can expand and cause cracking.
For planting beds, you should consider lining the interior soil-facing sides with a barrier like plastic sheeting. This protects the block and prevents soil from leaching through.
You’re handling a versatile, durable, but permeable building component.
How to Source and Choose the Best Cinder Blocks
Locating the right cinder blocks requires checking building supply stores, landscape yards, and even construction site discards. You’ll often find the best deals on surplus or slightly chipped blocks there.
Always inspect each block for major cracks or crumbling, especially along the edges and where you’ll place mortar. For garden beds, ensure they’re standard concrete blocks, not lightweight cinder versions that may deteriorate faster outdoors.
Consider the block’s finish; smooth faces look cleaner, while split-face offers texture. For projects requiring precise alignment, choose blocks with consistent dimensions.
If you’re building seating, select blocks with solid tops, not the open-core kind. Plan your project first so you buy the correct quantity and style.
7 Essential Tools for Cinder Block Projects
Gather a solid set of tools and you’ll transform those simple cinder blocks into sturdy garden features with confidence. Start with safety gear like gloves and goggles. You’ll need a sturdy tape measure, a carpenter’s square for alignment, and a level to ensure everything’s plumb. For cutting, a masonry chisel and hammer handle splitting blocks. A rubber mallet gently taps blocks into place without damaging them. Mortar projects require a mixing tub, a trowel for application, and a jointer for finishing seams. These basic tools handle most foundational tasks.
| Safety & Layout | Cutting & Placement | Mortar Work |
|---|---|---|
| Gloves, Goggles | Masonry Chisel | Mixing Tub |
| Tape Measure, Square | Hammer, Rubber Mallet | Trowel |
| Level | Jointer |
Build a Simple and Sturdy Cinder Block Planter Box
Construct your first project by laying out a basic rectangle with cinder blocks to form a planter that’s both durable and simple to assemble. You won’t need mortar; the weight of the blocks creates a stable structure.
Use a level as you stack a second course, staggering the seams for strength. A single-course planter works for shallow roots, but two layers provides more depth. Position the blocks with their openings facing upward—these will become planting pockets.
You can customize the planter’s size by adjusting your rectangle. Choose a sunny, level spot on soil, gravel, or pavement.
This design offers excellent drainage and resists rot, giving you a low-maintenance garden bed that’ll last for years.
Fill Cinder Block Holes With Soil, Gravel, or Lights
Filling the hollow cores of your cinder block planter transforms them into versatile planting beds and decorative features.
For planting, pack the openings with a quality potting mix. This method is perfect for herbs, succulents, or cascading flowers, giving you a modular, space-saving garden.
Alternatively, you can fill the holes with gravel or drainage rock. This provides excellent weight and stability, which is crucial for freestanding walls or benches, and it prevents soil from washing through.
For a magical evening ambiance, insert solar-powered LED puck lights into the cores. They’ll cast a gentle glow, highlighting your block structures.
Each filling choice serves a distinct purpose, letting you customize your project’s function and aesthetic.
Paint and Seal Your Cinder Blocks for Longevity
Before you apply any color, it’s crucial to seal your cinder blocks with a masonry sealer to prevent moisture damage and efflorescence.
Apply the sealer to clean, dry blocks using a brush or sprayer. Let it cure fully according to the manufacturer’s instructions.
Then you can paint. Choose a high-quality exterior masonry paint or a concrete-specific coating. These withstand weathering better.
You’ll need a primer for a uniform base if your paint requires it. Use a brush for the edges and a roller for the flat surfaces.
Apply two coats for durability and vibrant color. This protective system shields your blocks from rain, sun, and frost, ensuring your projects look great and last for years.
Create a Modern Herb Garden With Stacked Blocks
If you’re looking for a stylish and space-saving way to grow herbs, stacking cinder blocks creates a clean, geometric planter. Choose a sunny spot and arrange your blocks in a simple vertical tower or a staggered L-shape. You don’t need mortar; gravity will hold them together.
Fill the block cavities and the central column with quality potting mix. This design provides perfect individual beds for herbs like basil, thyme, and mint, which can spread aggressively. Ensure your structure has drainage by keeping the bottom holes clear. The blocks’ thermal mass moderates soil temperature, and their height makes harvesting easy.
You’ll create a functional, architectural feature that maximizes a small patio or balcony space.
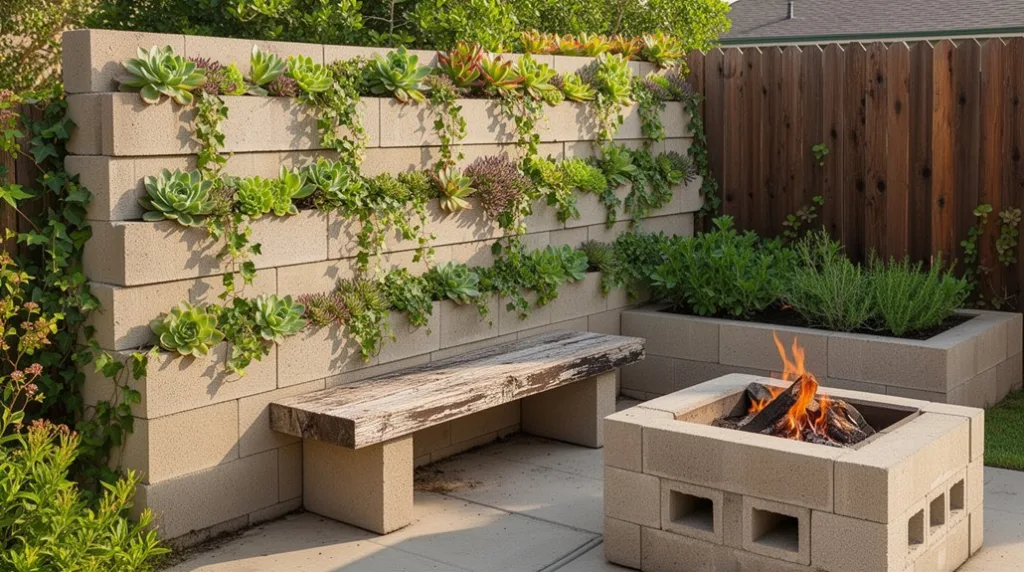
Design a Cascading Cinder Block Succulent Wall
Transform a bare wall into a lush tapestry by constructing a cascading succulent garden with cinder blocks.
You’ll first choose a sturdy, vertical surface, then stack the blocks offset to create planting pockets. Fill these cavities with a fast-draining cactus mix.
Start planting from the top, using drought-tolerant succulents like Sedum or Echeveria, and allow their trailing stems to gracefully spill downward.
You’ll want to ensure the wall gets ample sunlight and has proper drainage holes drilled into each block’s base to prevent root rot. Regular, minimal watering is key.
This project not only maximizes your vertical space but also creates a stunning, low-maintenance living wall that evolves beautifully over time.
Construct a Durable Outdoor Bench With Cinder Blocks
Craft a robust outdoor bench that withstands the elements using a straightforward arrangement of cinder blocks and wood planks. You’ll first need level ground, so prepare your site.
Lay your blocks to create the bench’s legs and frame; typically, two stacks of three blocks each form the ends. Ensure they’re perfectly vertical and stable.
Next, insert your wood planks as the seat, sliding them through the block openings. Use lumber like cedar or pressure-treated pine for longevity, cutting it to your desired length.
You can secure the planks with adhesive or simply rely on their snug fit within the blocks. The resulting bench is heavy, immovable, and ready for years of use with minimal upkeep.
Combine Blocks With Wood for a Rustic Look
For a more polished version of the simple bench, you can combine those same materials to achieve a rustic aesthetic. Start by sanding your lumber to remove rough edges, then apply a stain or a simple coat of linseed oil to enhance the wood grain and provide weather protection.
You can bolt the wood directly into the cinder block voids using concrete anchors for a secure, permanent structure. Alternatively, you can leave the bench freestanding for flexibility.
Consider using reclaimed barn wood or rough-cut timber to amplify the rustic charm. Arrange your blocks so the wood sits slightly recessed within the openings, creating a clean, integrated look that’s both sturdy and stylish.
Craft a Chic Side Table or Fire Pit Base
While you’re creating that rustic bench, you might find yourself with extra cinder blocks that are perfect for a simple side table or a stable fire pit base. You can transform them with minimal effort. For a table, just arrange the blocks and top them with a salvaged wood plank or a cut piece of stone.
A fire pit requires a flat, non-flammable surface; arrange the blocks in a circle and fill the center with gravel.
- Level your surface first to ensure stability and safety for either project.
- Use construction adhesive between blocks for a permanent, wobble-free structure.
- Apply a concrete sealer to protect your table from weather and stains.
- Always place a metal fire ring inside a cinder block pit to protect the blocks from intense heat.
Assemble a Cinder Block Garden Storage Unit
After building a bench or side table, those same versatile blocks can be organized into a garden storage unit to keep tools and supplies neatly at hand.
Start by laying a solid, level foundation using your cinder blocks. Stack them in a simple U or L shape, leaving the front open for access.
You’ll create sturdy shelving by placing boards, like 2x4s or repurposed planks, across the top openings of the blocks. This design instantly provides cubbies for pots, bags of soil, and gardening tools.
You can adjust the unit’s size by adding more blocks and boards. For stability, ensure each vertical column is properly aligned. It’s a remarkably simple build that organizes your entire garden space.
Fixing Common Cinder Block Build Problems
Even though cinder block builds are generally straightforward, you might occasionally face issues like wobbling or misalignment. Most problems stem from an uneven base or sloppy mortar application.
You can fix a wobbly structure by disassembling and leveling the ground with compacted gravel before you rebuild. For minor alignment issues, use a rubber mallet to gently tap blocks into place before the mortar sets. If you’re dealing with persistent instability, consider these solutions:
- For a Weak Foundation: Add a concrete footer below the frost line to prevent seasonal shifting.
- For Crumbling Mortar Joints: Chip out the old mortar and repoint the joints with fresh mix.
- For Water Pooling: Ensure your build has a slight slope or incorporate weep holes for drainage.
- For Cosmetic Flaws: Use a concrete patching compound to fill minor chips or cracks.
Build a Kid-Friendly Cinder Block Fairy Garden
Shifting focus from problem-solving to a playful project, you can engage a child’s imagination by building a cinder block fairy garden.
First, lay blocks on their sides to form small compartments. You’ll fill these with potting soil.
Let your child choose and plant miniature or slow-growing plants like sedum or thyme.
Then, search for natural decorations—pebbles for paths, twigs for fences, and moss for lawns.
Add tiny figurines or handmade furniture from bottle caps and popsicle sticks.
Place the garden in partial shade to protect delicate plants.
This activity teaches basic gardening and upcycles simple materials, resulting in a magical, low-maintenance space that sparks creative play for seasons.
How to Make a Simple Cinder Block Water Feature
With a little ingenuity and some basic supplies, you can turn a few cinder blocks into a soothing water feature for your patio or garden. You’ll need three blocks, a small submersible pump with tubing, a waterproof container to hide the pump, and some decorative stones.
Arrange the blocks to create a stable, tiered structure, ensuring one block’s hollow core can hold your water basin. Place the pump in the basin, run the tubing up through the blocks, and conceal it with stones. Fill the basin with water, plug in the pump, and you’ve created a serene, bubbling fountain.
- Choose a Level Spot: This ensures stability and proper water flow from your stacked design.
- Seal the Blocks (Optional): Apply a concrete sealer to the interior to minimize water absorption and algae.
- Hide the Mechanics: Use the container and stones to fully conceal the pump and tubing for a natural look.
- Maintain Regularly: Top off the water weekly and clean the pump intake every few months to prevent clogs.
10 Online Sources for Advanced Cinder Block Ideas
After setting up your water feature, you might be looking for more ambitious projects to tackle. You’ll find incredible inspiration online for complex designs. Pinterest is a visual powerhouse; create boards to collect ideas for entire outdoor kitchens or multi-level planters. YouTube offers essential, step-by-step video tutorials for structural projects like retaining walls or fire pits, showing you the techniques in real time. Dedicated DIY blogs and websites often provide the most detailed written plans and material lists for advanced builds, ensuring you’ve got a reliable guide.
| Platform | Best For | Example Project Idea |
|---|---|---|
| Visual Inspiration & Curation | Curved garden bench with integrated lighting | |
| YouTube | Step-by-Step Construction | Structural outdoor grill station |
| DIY Blogs | Detailed Plans & Troubleshooting | Elevated herb spiral with irrigation |
| Modern Design Trends & Hashtags | Minimalist geometric planter towers |
Cost Breakdown for Typical Cinder Block Creations
Because you’ve explored those ambitious designs online, you’ll need a practical budget to make them real. Cinder blocks are affordable, but your total cost depends on the project’s scale and finish.
You’ll typically buy the blocks, sand, gravel for drainage, mortar or construction adhesive, and optional supplies like capstones or paint. Prices can vary, but a basic cost framework keeps you on track.
- Materials: Expect $1.50-$3.00 per standard 8″x8″x16″ block. Mortar mix and sand add roughly $0.50-$1.00 per block used.
- Foundation: A bed of gravel or paver base for stability costs about $5-$10 per project area.
- Finish & Fill: A gallon of exterior masonry paint runs $25-$40. Soil or potting mix for planter projects adds variable cost.
- Tools: You’ll need a level, trowel, and gloves. If you don’t own these, factor in a $30-$50 initial tool investment.
Frequently Asked Questions
Can Cinder Blocks Withstand Extreme Weather?
Yes, they’re durable, but you’ll need to consider freeze-thaw cycles. You should seal them to prevent moisture damage in cold climates and avoid using them where extreme, repeated freezing and thawing occurs.
Are Cinder Blocks Safe for Growing Vegetables?
Yes, they’re generally safe. You’ll want to check that your blocks aren’t made with fly ash, a potentially harmful material. Line them with landscape fabric for extra safety and prevent soil contact directly.
How Do You Prevent Cinder Blocks From Staining?
You seal the blocks before building your project. Use a concrete sealant or masonry paint to create a waterproof barrier. This stops water from seeping in and causing those unsightly mineral stains on the surface.
Can You Build Cinder Block Projects on Grass?
You can, but you’ll need a firm base. First, level the grass and dig out your footprint. Add a layer of compacted gravel or sand to prevent settling and shifting. This gives your project stability.
Do Cinder Blocks Attract Termites or Pests?
Cinder blocks themselves don’t attract termites. However, the wood you might attach to them or moist soil around them can attract pests, so you’ll want to manage moisture and check for wood contact.
Conclusion
So grab your blocks and start building. You’ve seen how versatile and budget-friendly they are. Just remember your foundation, a good sealant, and those hollow cores for planting or light. These durable projects will refresh your space for years. Now it’s your turn to mix, stack, and create your own unique backyard feature.
The Only Tools You Need for a Thriving Garden 🌱
Whether you're a weekend gardener or growing daily — these hand-picked tools make every session faster, easier, and more satisfying.