Are you ready to transform your yard with unique charm and sustainable style? Imagine turning a humble teacup into a bird feeder or old boots into planters. We’ve gathered eighteen clever projects to personalize your space. You can build structures, add water features, and create lasting decor with simple materials. Discover how to blend creativity with practicality to craft a beautiful garden that’s truly your own.
Key Takeaways
- Craft whimsical upcycled planters from old boots or teacups to add charm.
- Build vertical herb gardens using ladders or reclaimed pallets for space efficiency.
- Create hanging mason jar lanterns or solar lights for ambient evening lighting.
- Make decorative hand-painted rock markers or garden signposts to label plants.
- Construct willow obelisks or window frame trellises to support climbing plants.
Craft a Whimsical Teacup Bird Feeder
Grab a vintage or sturdy teacup and saucer you don’t mind using outdoors to instantly create a charming bird feeder.
First, you’ll need strong, waterproof epoxy. Thoroughly clean and dry both pieces to ensure a good bond. Apply the epoxy to the foot of the cup and firmly press it onto the center of the saucer. Hold it for a minute, then let it cure completely—usually for 24 hours.
This creates a perfect seed-catching saucer base.
After it’s set, find a sheltered spot in your garden. You can fill the cup with black oil sunflower seeds or a wild bird mix. Watch as finches and chickadees visit your whimsical, upcycled creation, adding life and vintage charm to your yard.
Upcycle Old Boots Into Flower Pots
If your garden could use a touch of playful character, consider turning a pair of worn-out boots into vibrant flower pots. You’ll start by cleaning them thoroughly.
Next, drill a few drainage holes in each sole using a simple power drill; this is crucial for plant health. Then, fill the boots with a layer of gravel or small stones before adding your potting soil.
Choose cheerful, compact plants like succulents, pansies, or herbs that won’t overwhelm the space. Tuck them into the soil, water gently, and find a sunny spot to display your new creations.
Their whimsical shape instantly adds personality to a patio step, fence line, or garden border. It’s a wonderfully creative way to give old footwear a new purpose.
Make Hand-Painted Rock Garden Markers
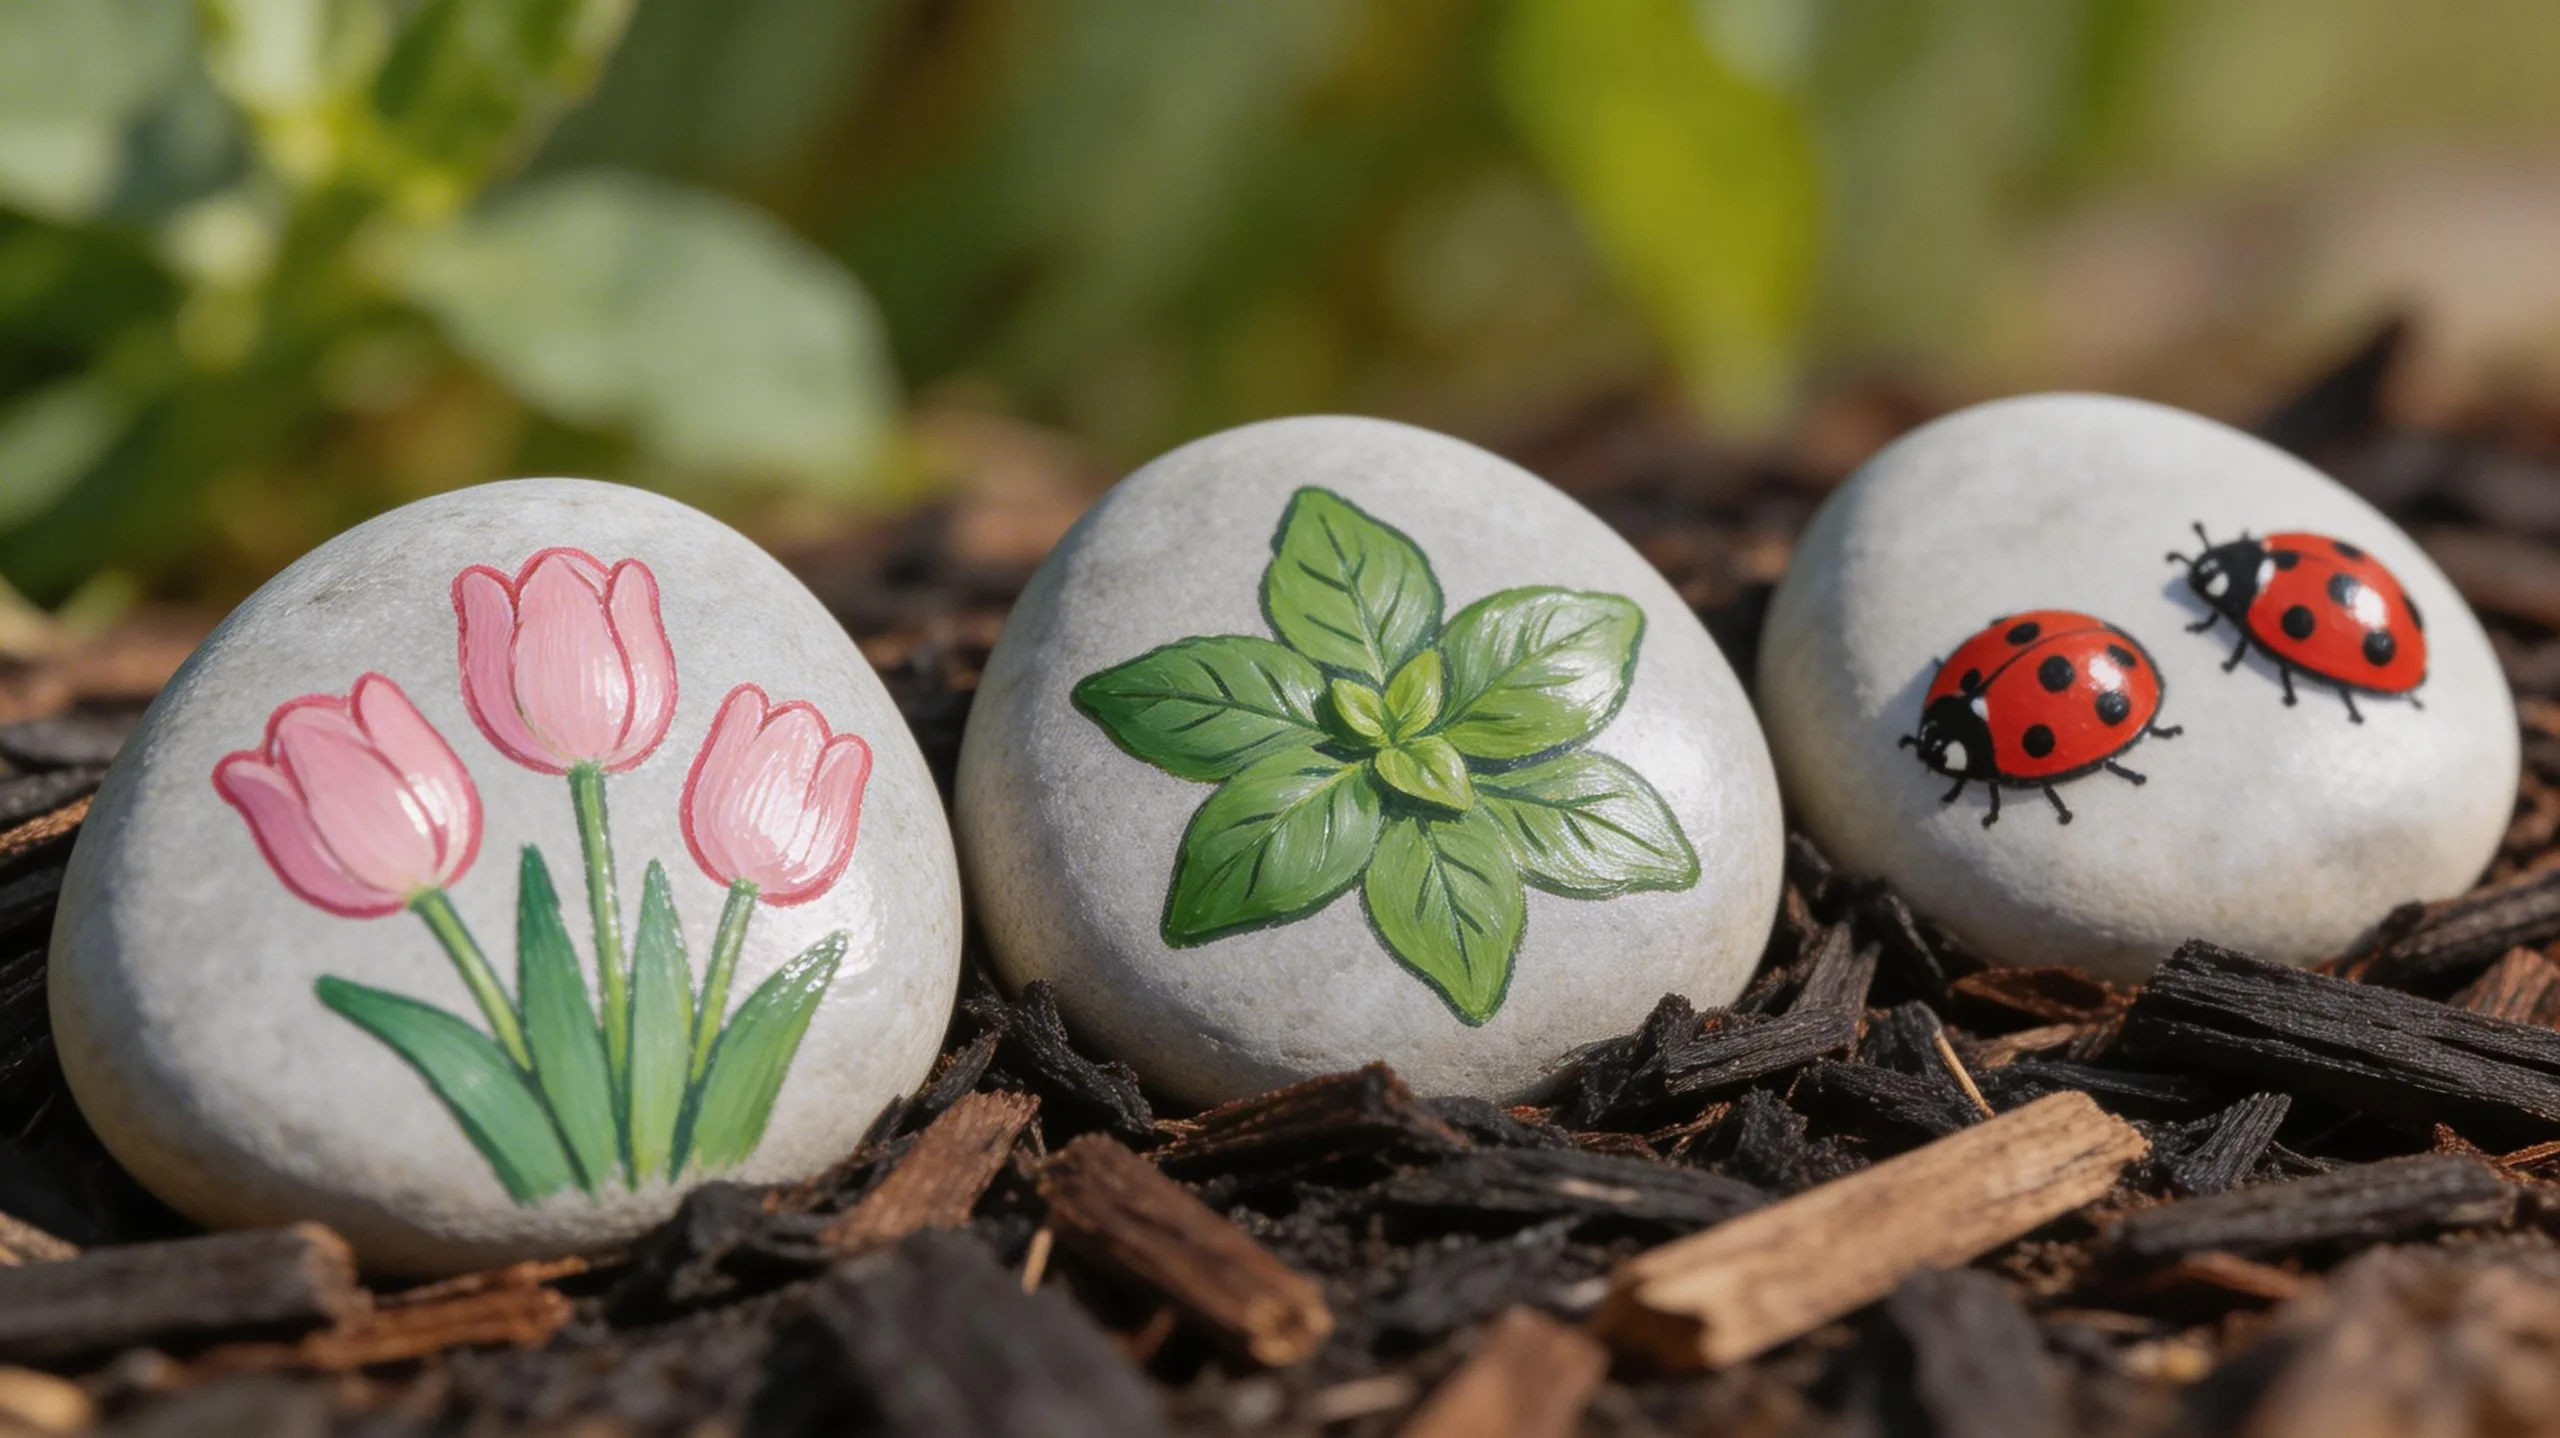
Mark your rows or identify specific plants with colorful, personalized rock garden markers that you can craft in just a few steps.
First, gather smooth, flat stones from your yard or a local supply. Wash and dry them thoroughly. Use acrylic craft paints or permanent outdoor paint pens for your designs. Sketch your plant names, draw simple veggies, or create fun patterns directly onto the rocks. Let the paint dry completely, then seal each piece with a clear outdoor varnish or a spray sealant.
This protective coat prevents fading and weather damage.
Finally, place your charming markers right at the base of your seedlings. You’ll love this quick, creative project that adds a pop of art and clarity to your garden beds.
Create a Miniature Fairy Garden
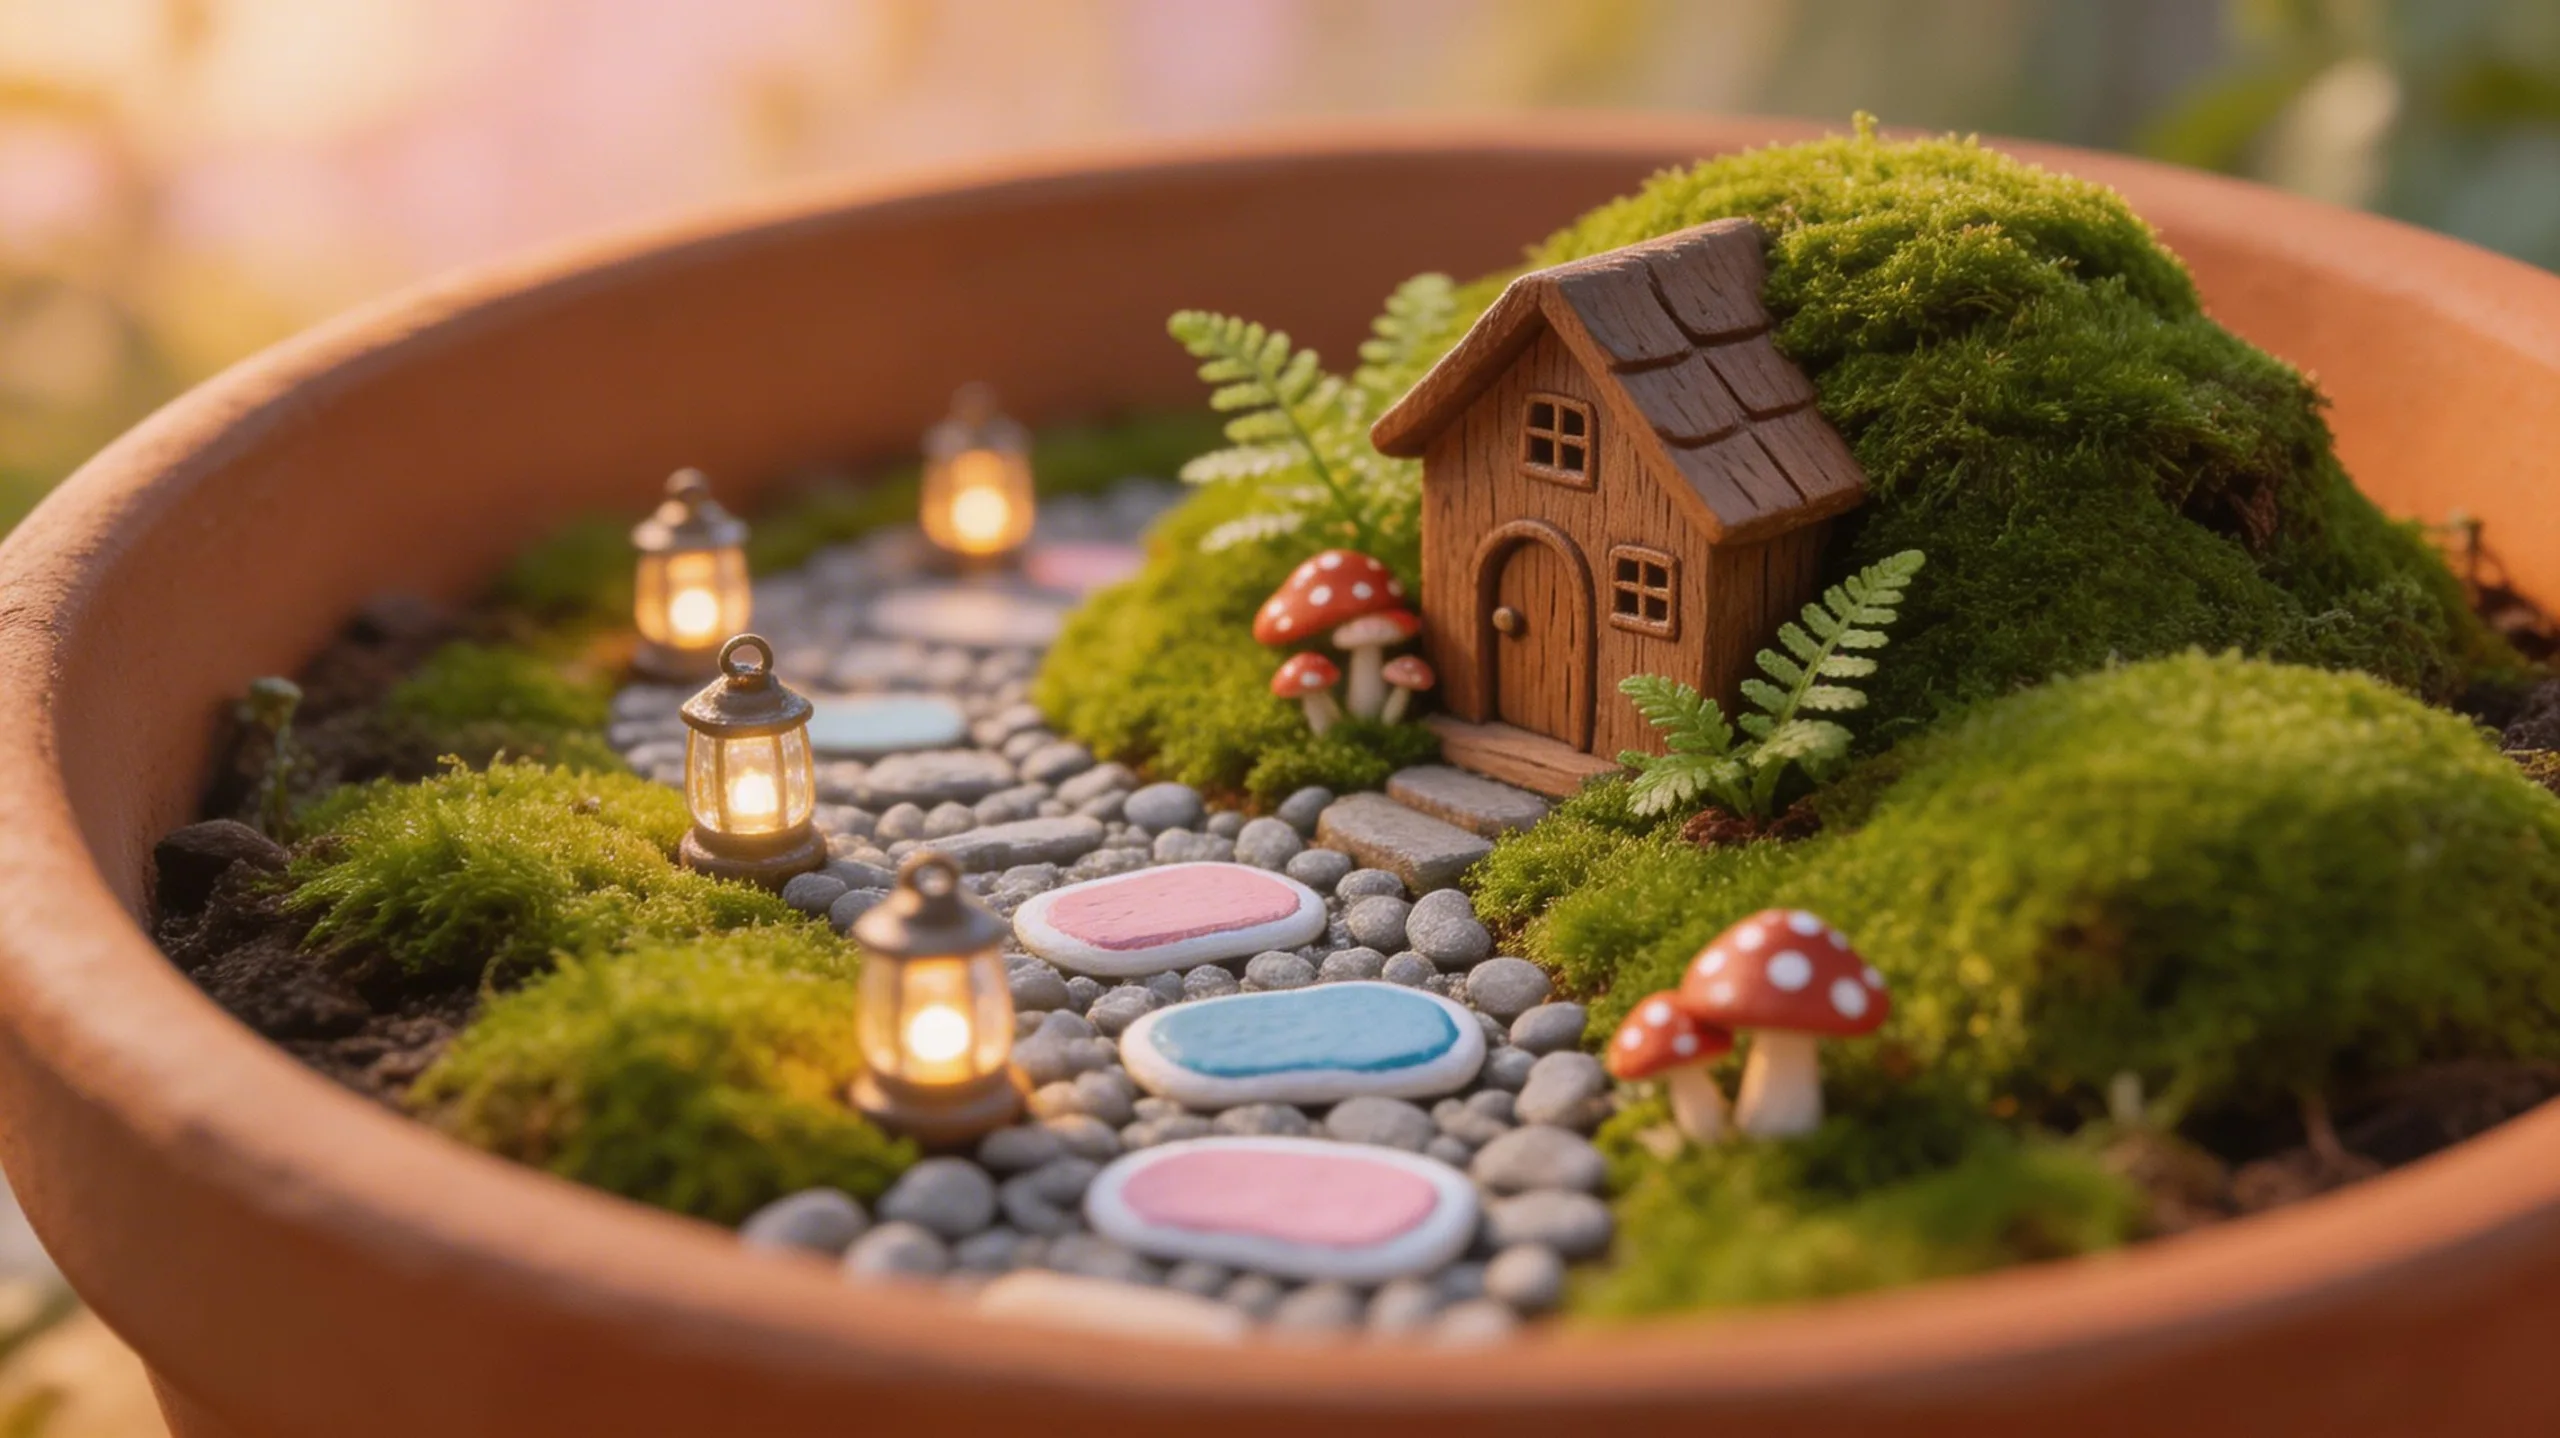
Decidedly one of the most whimsical projects, creating a miniature fairy garden lets you build a tiny, enchanting world in a container or a quiet corner of your yard.
You’ll start by selecting a suitable shallow pot or a cleared patch of soil. Layer it with pebbles for drainage, then add potting mix.
The real magic begins when you plant diminutive species like sedum, moss, or miniature ferns to form your lush landscape.
- Craft pathways using small stones, pebbles, or slices of bark to invite exploration through your tiny realm.
- Add architectural interest with a miniature bench, a tiny clay pot, or a charming fairy house as a focal point.
- Include playful details like a pebble fountain, a twig archway, or even a tiny sign to complete the enchanting scene.
Build a Simple Rustic Planter Box
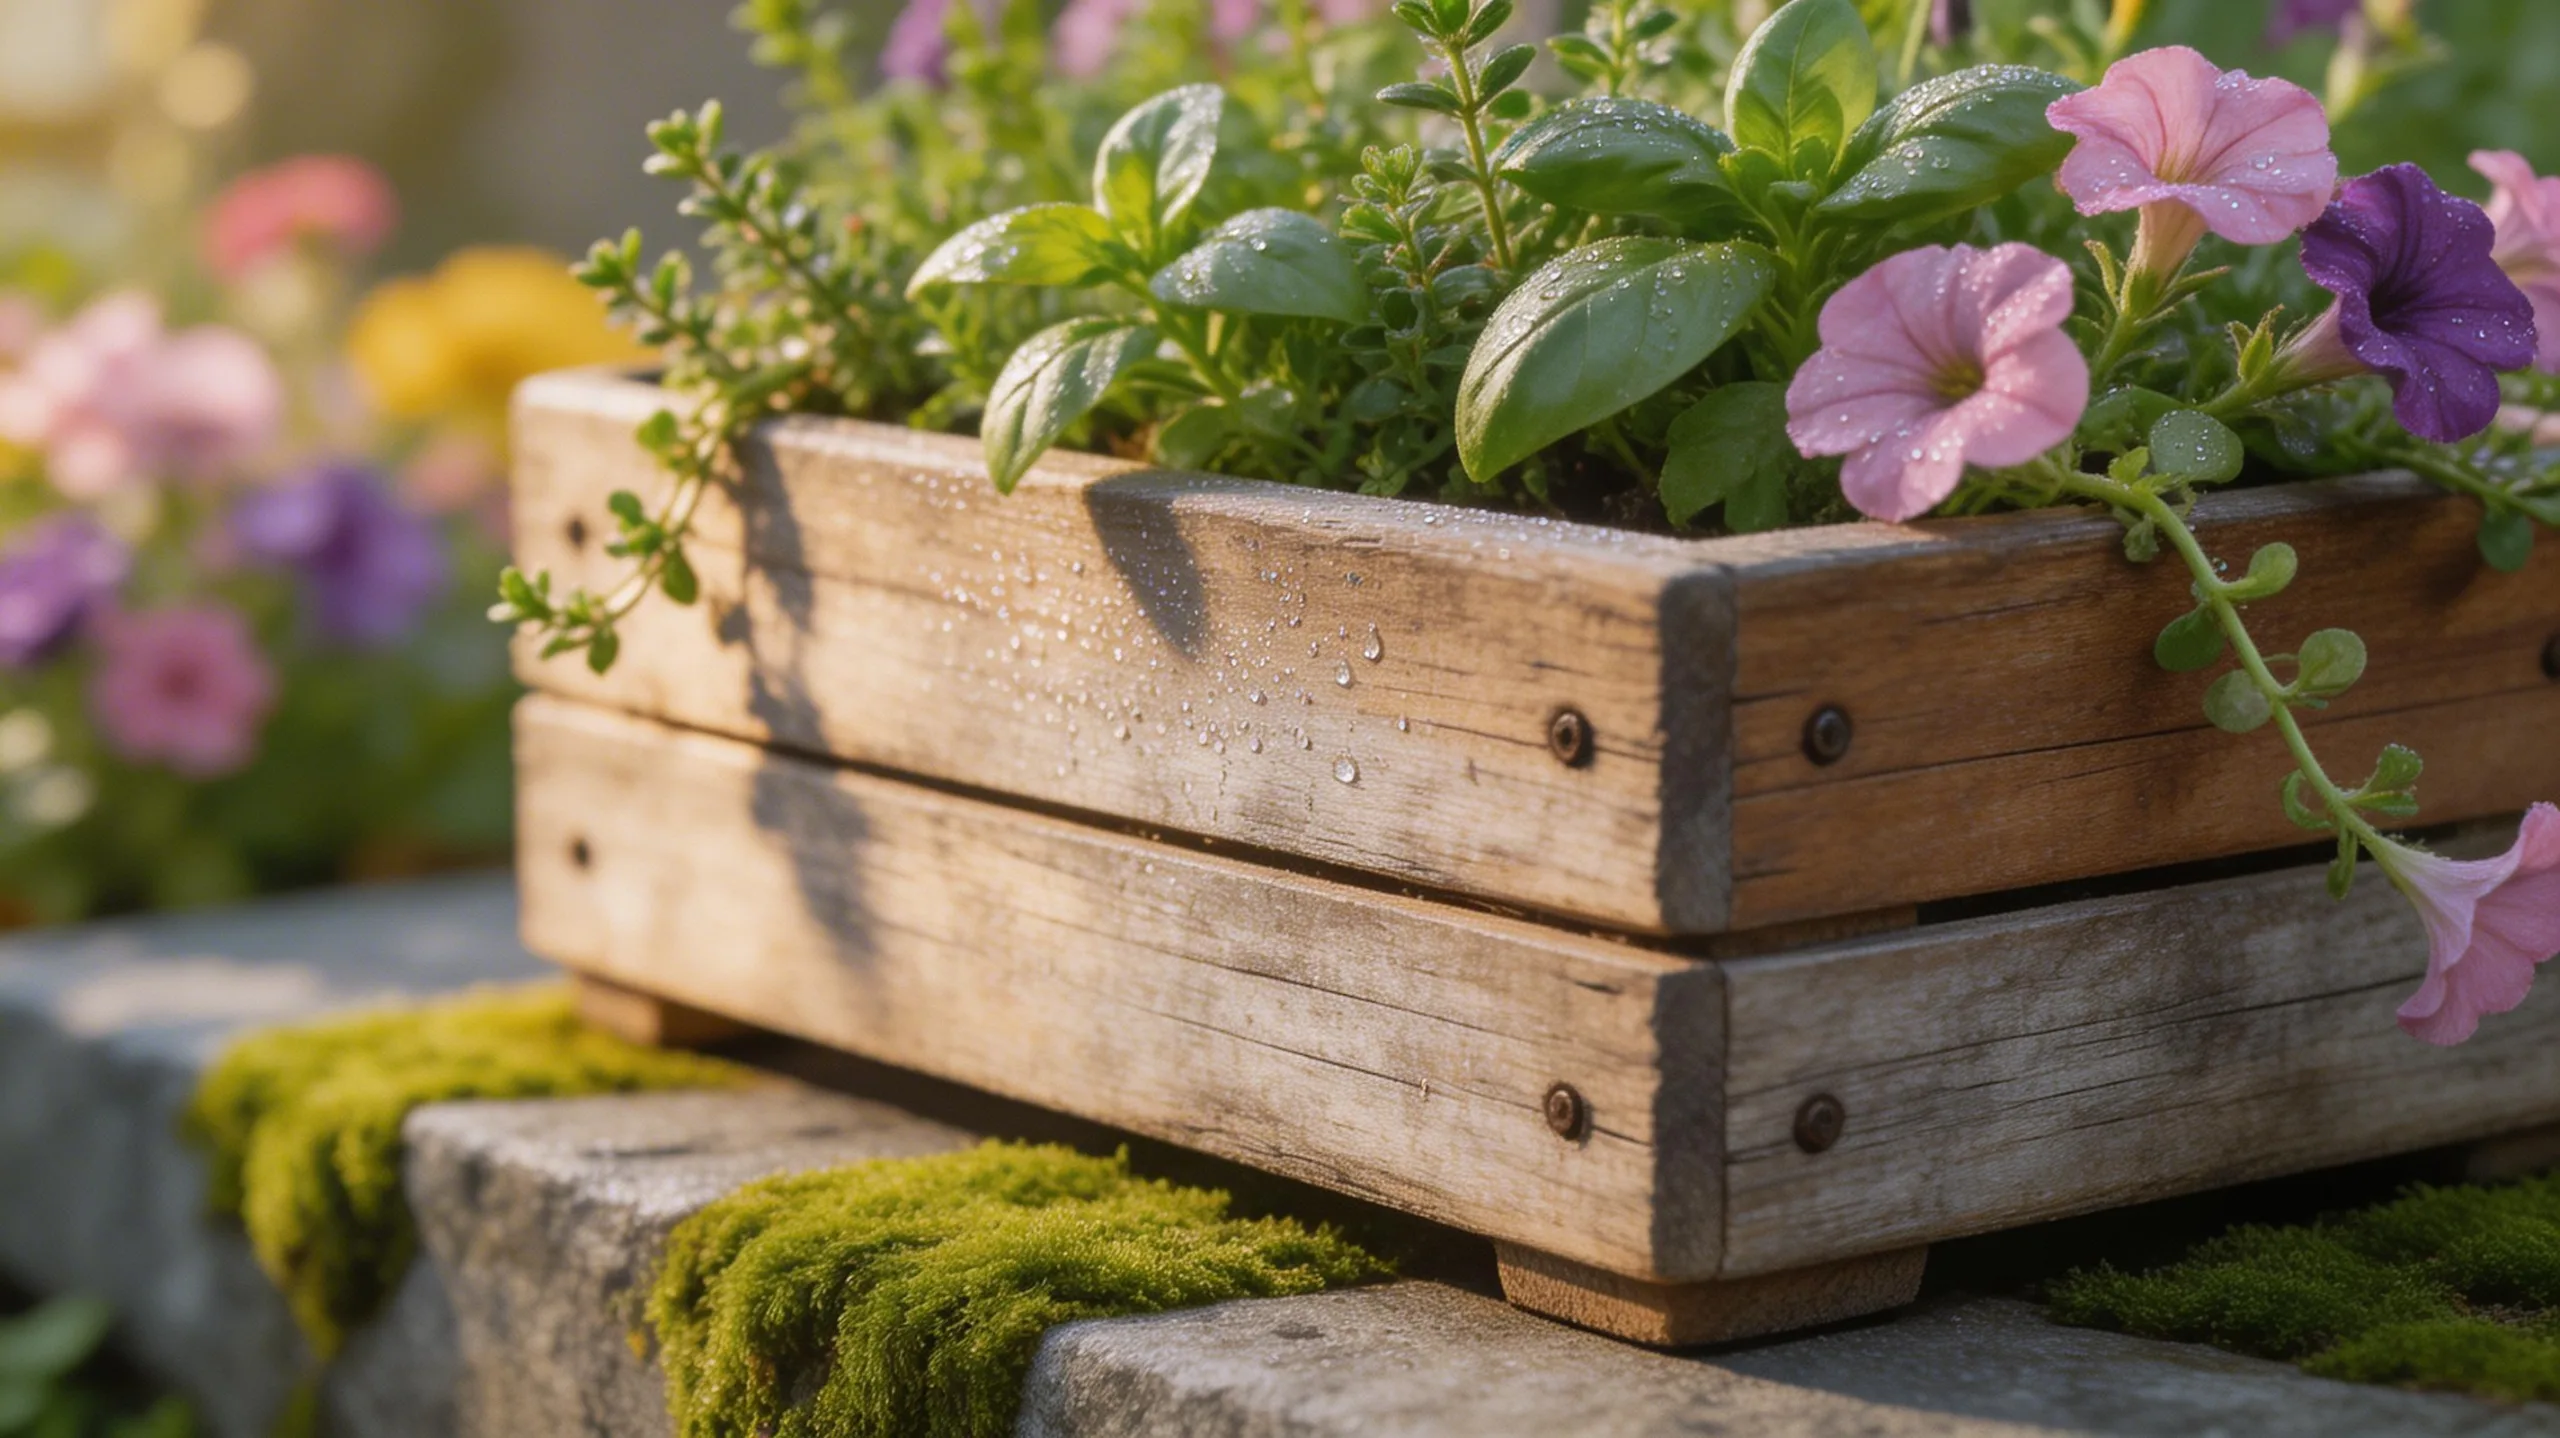
Grab some basic lumber and transform it into a beautiful rustic planter box that adds natural charm to your patio or garden. You’ll need a few cedar or pine boards, exterior wood screws, a saw, drill, and sandpaper.
Cut your boards to form a simple rectangular box, making the front and back pieces longer to create extended side legs. Sand all edges smooth to prevent splinters.
Assemble the box by screwing the sides to the front and back pieces, pre-drilling your holes to avoid splitting. Don’t seal the wood; let it weather naturally to a lovely silvery-gray.
You’ve now built a durable, charming home for your favorite herbs or flowers, showcasing your handiwork all season long.
String Up Solar-Powered Mason Jar Lights
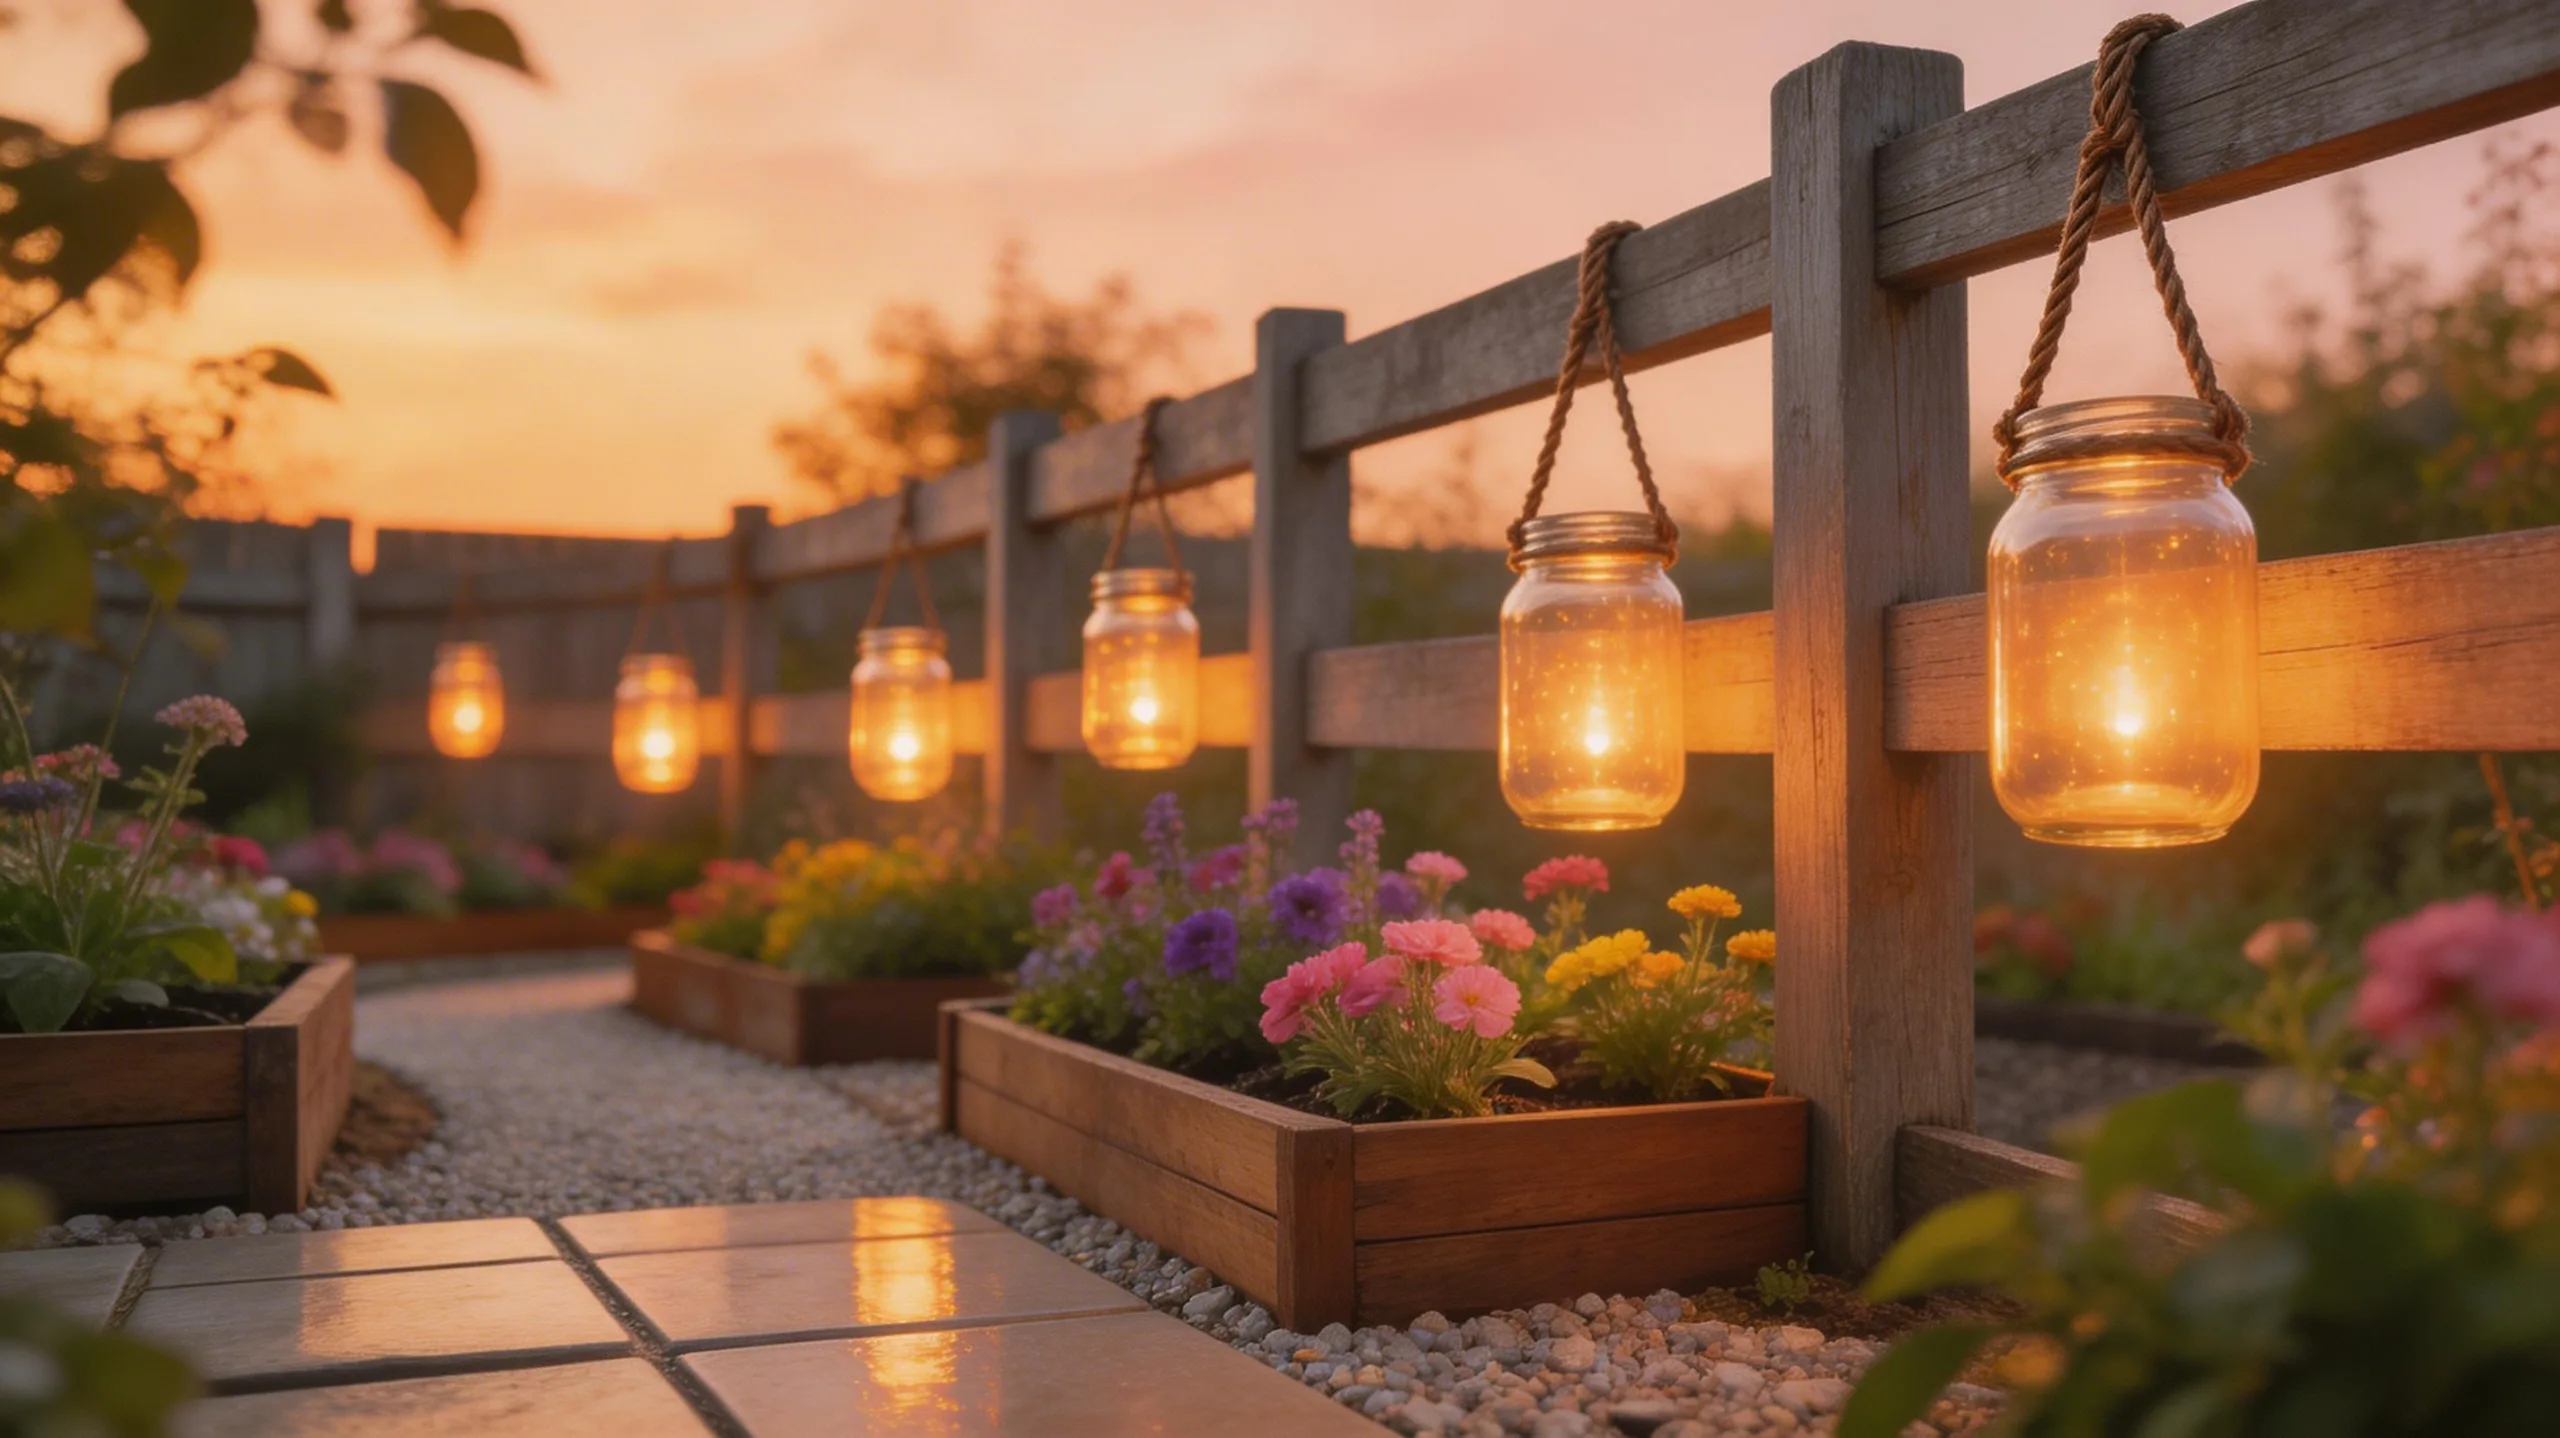
You can easily create a charming, eco-friendly glow by transforming mason jars into solar-powered string lights. This simple project will turn your patio or garden into a magical evening space using clean solar energy.
Start by purchasing a solar string light set. You’ll just pop a solar-powered LED bulb from the string into each jar, which acts as a perfect diffuser.
- Gather Your Supplies: You’ll need clean mason jars, a solar-powered string light set (ensure the bulbs fit the jar openings), and optional decorative elements like sand or seashells for the jar bottoms.
- Assemble the Lights: Simply insert each LED bulb into a jar, letting the rest of the string and the solar panel dangle outside.
- Position for Sun: Hang your jars from shepherd’s hooks or tree branches where the small solar panel gets full daytime sun to charge.
Make Colorful Bottle Edging for Garden Beds
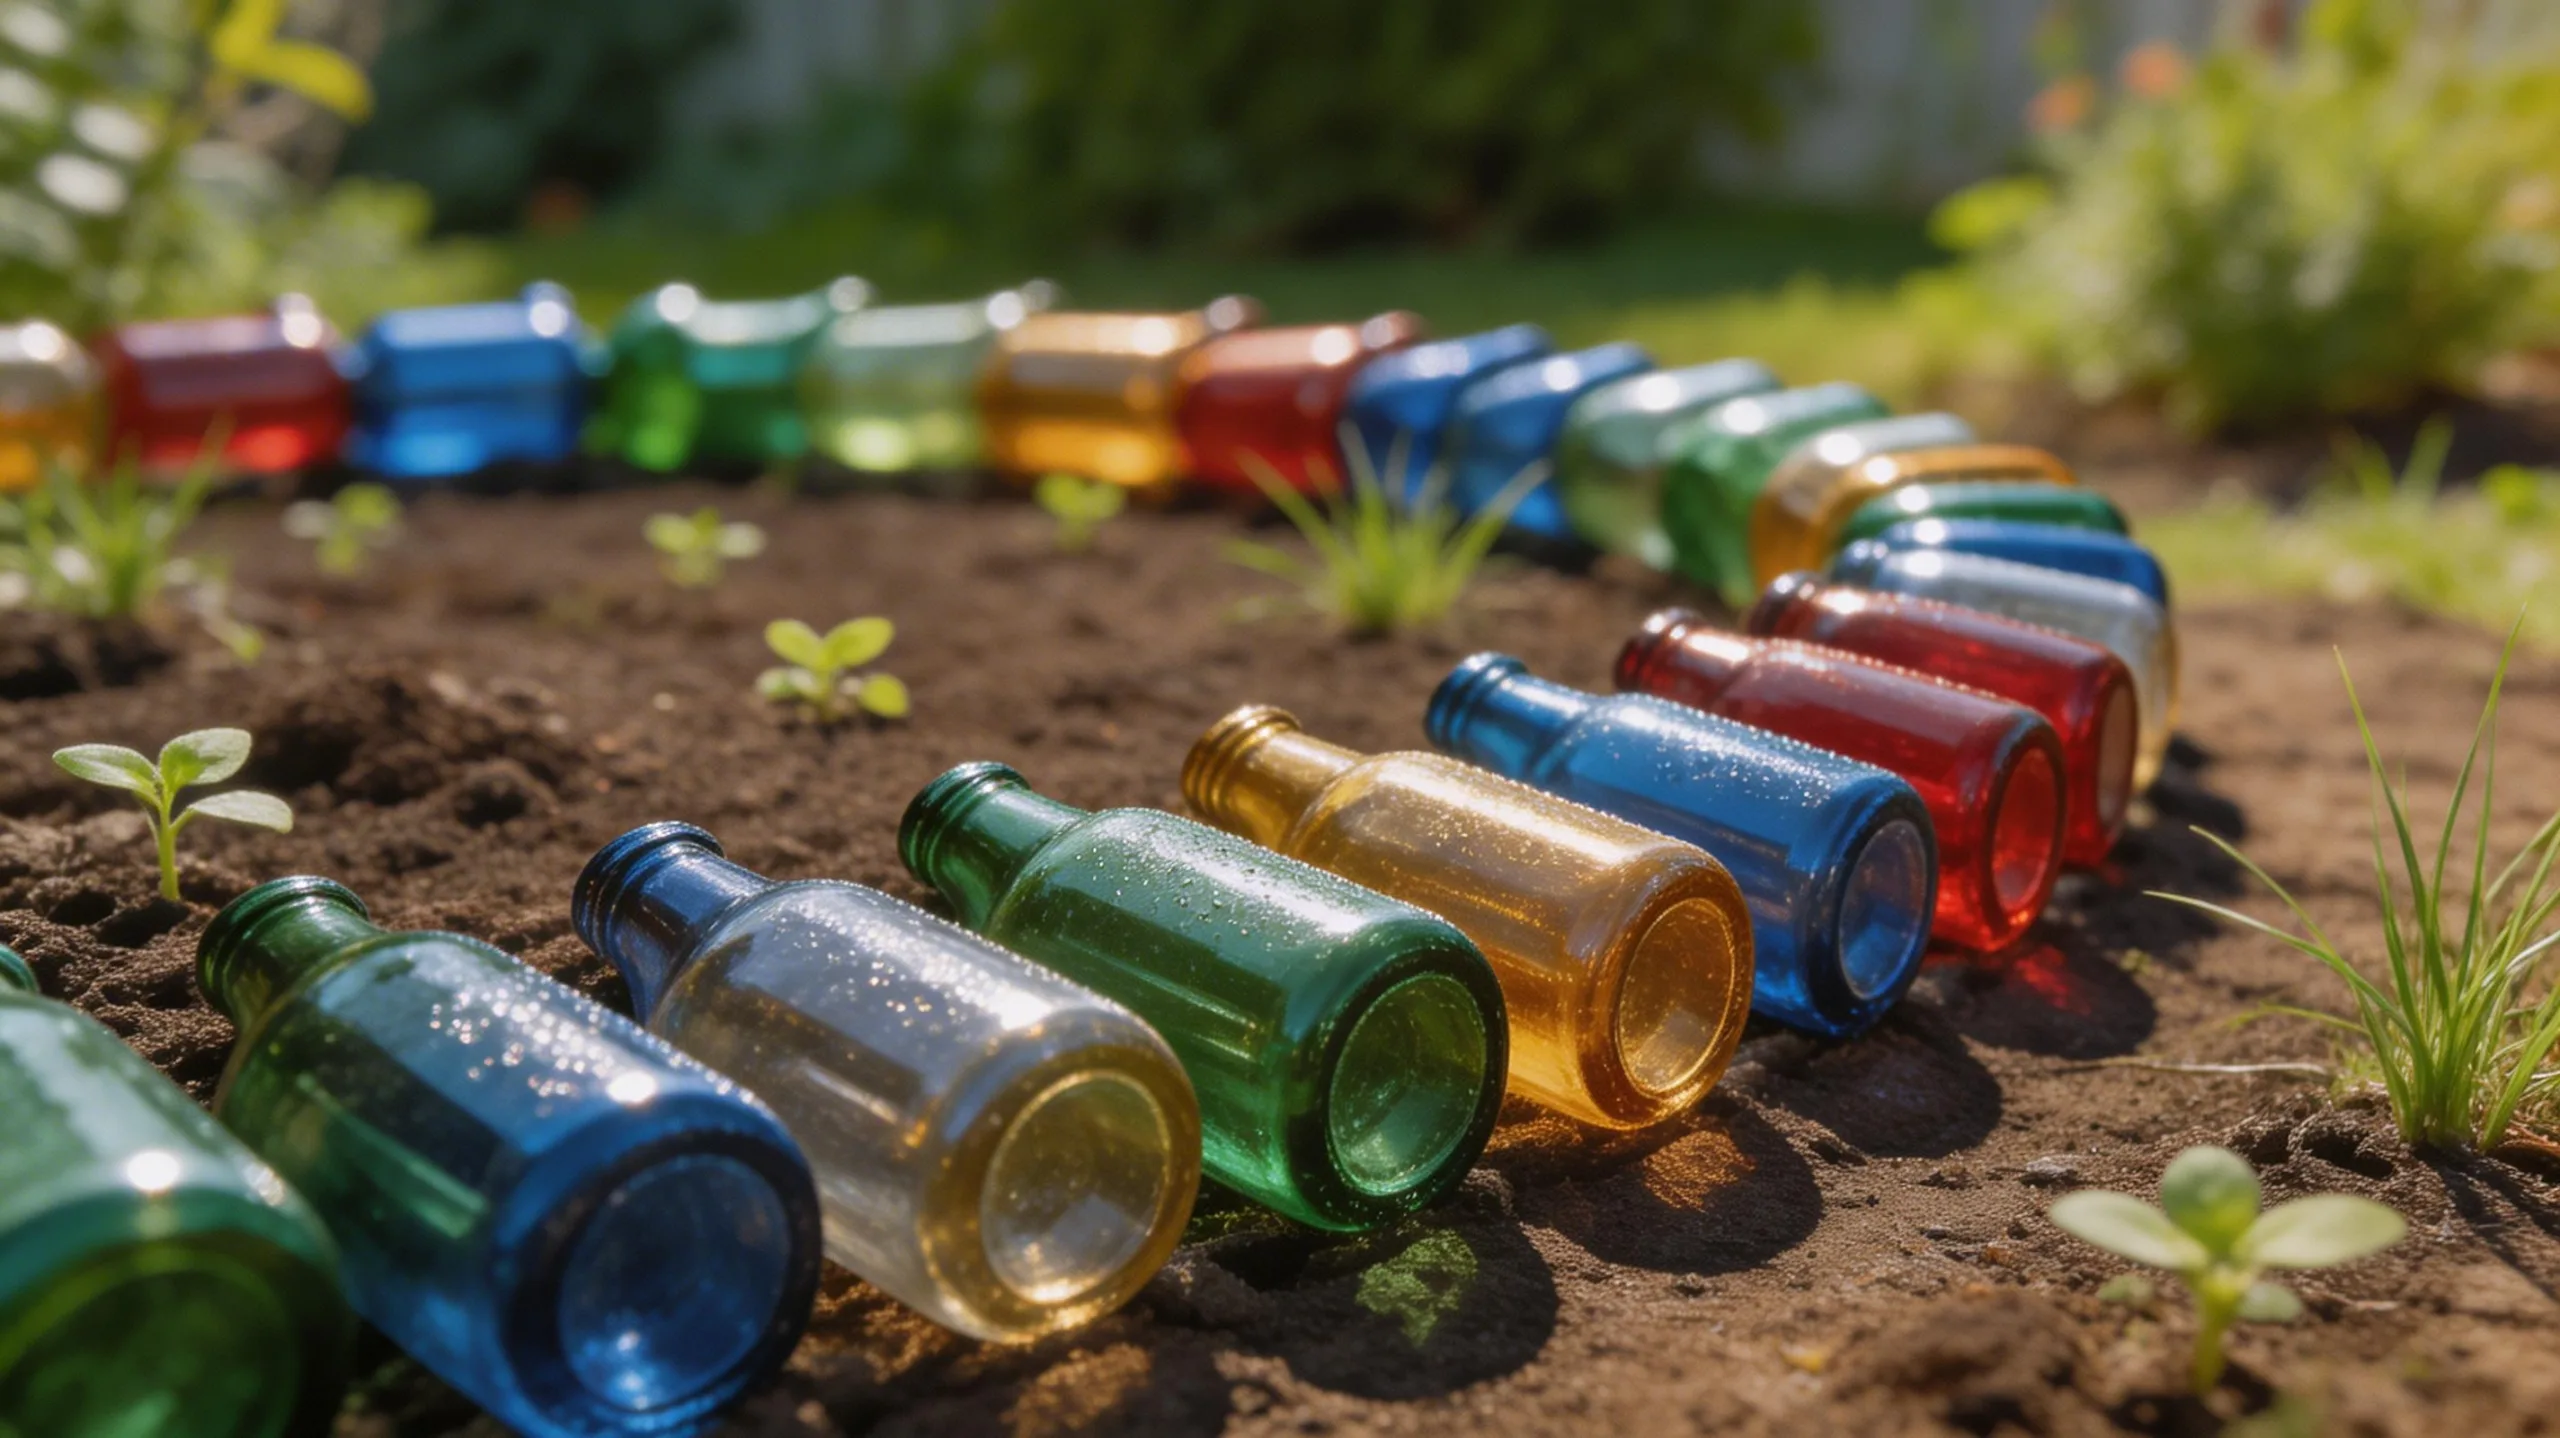
Several upcycled glass bottles can add a vibrant and durable border to your garden beds while keeping plastic out of landfills. You’ll gather bottles of similar size, clean them thoroughly, and remove labels. Then, dig a trench about a bottle’s height deep along your bed’s edge. Place each bottle neck-down, packing soil firmly around it to secure it. Arrange them by color to create stripes or a random rainbow effect. They’ll sparkle in the sun and withstand weather beautifully.
| Bottle Color | Best For | Pro Tip |
|---|---|---|
| Green | Herb gardens | Use wine bottles for uniformity |
| Blue | Cool-colored flower beds | Mix clear & blue for sparkle |
| Amber/Brown | Rustic or woodland themes | Try antique beer bottles |
Craft a Welcoming DIY Garden Signpost
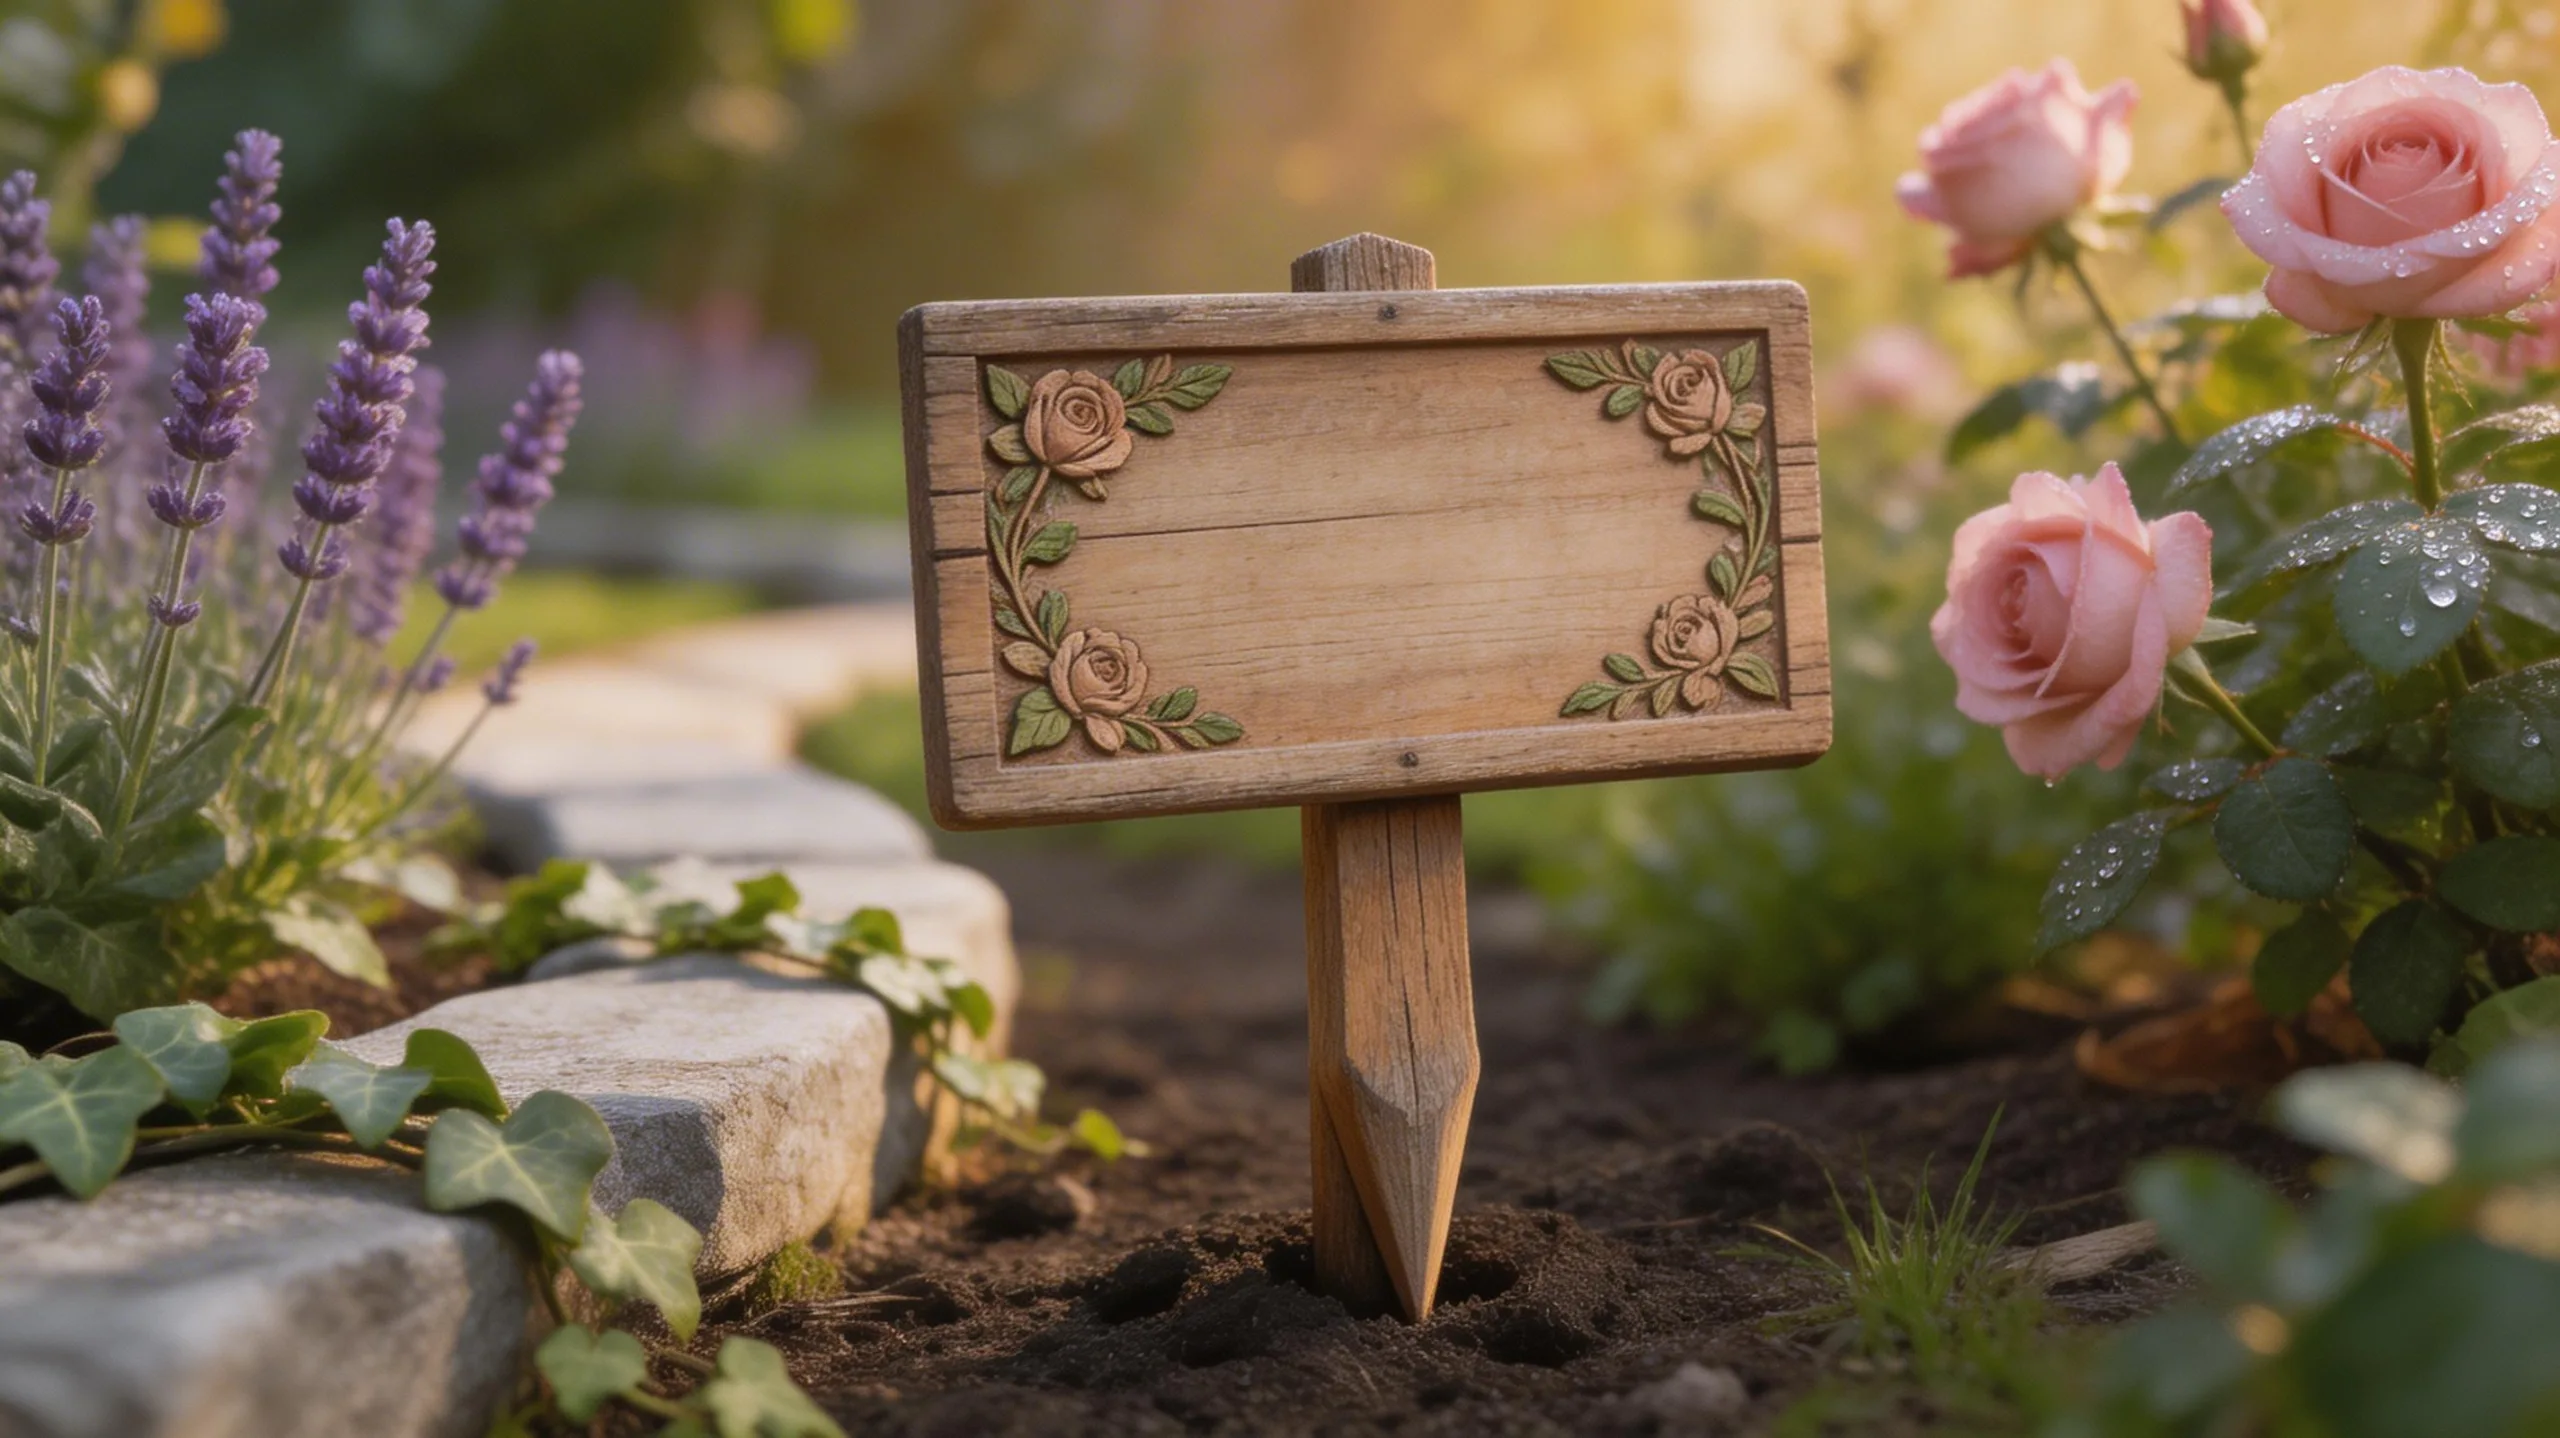
While colorful bottles create a lovely border, a personalized signpost adds character and direction to your garden space. You’ll start by selecting a sturdy wooden post and several smaller boards for the signs. Sand everything smooth, then paint or stain the wood in your chosen colors. Use weather-resistant outdoor paint for longevity.
For a whimsical touch, carve or stencil charming phrases like “Rose Garden” or “Vegetable Patch” onto the signs before attaching them with screws at varying heights on the main post. Finally, securely plant your signpost in the ground using gravel or concrete around the base for stability.
- Material Selection: Opt for durable, rot-resistant woods like cedar or use pressure-treated lumber to ensure your signpost withstands the seasons.
- Creative Lettering: Employ techniques from simple hand-painting to using vinyl decals or routed wood carving for clear, artistic directional text.
- Secure Installation: Dig a hole at least 18 inches deep, set the post, and backfill with a mix of soil and compacted gravel for a firm, lasting foundation.
Build a Vertical Herb Garden From a Ladder
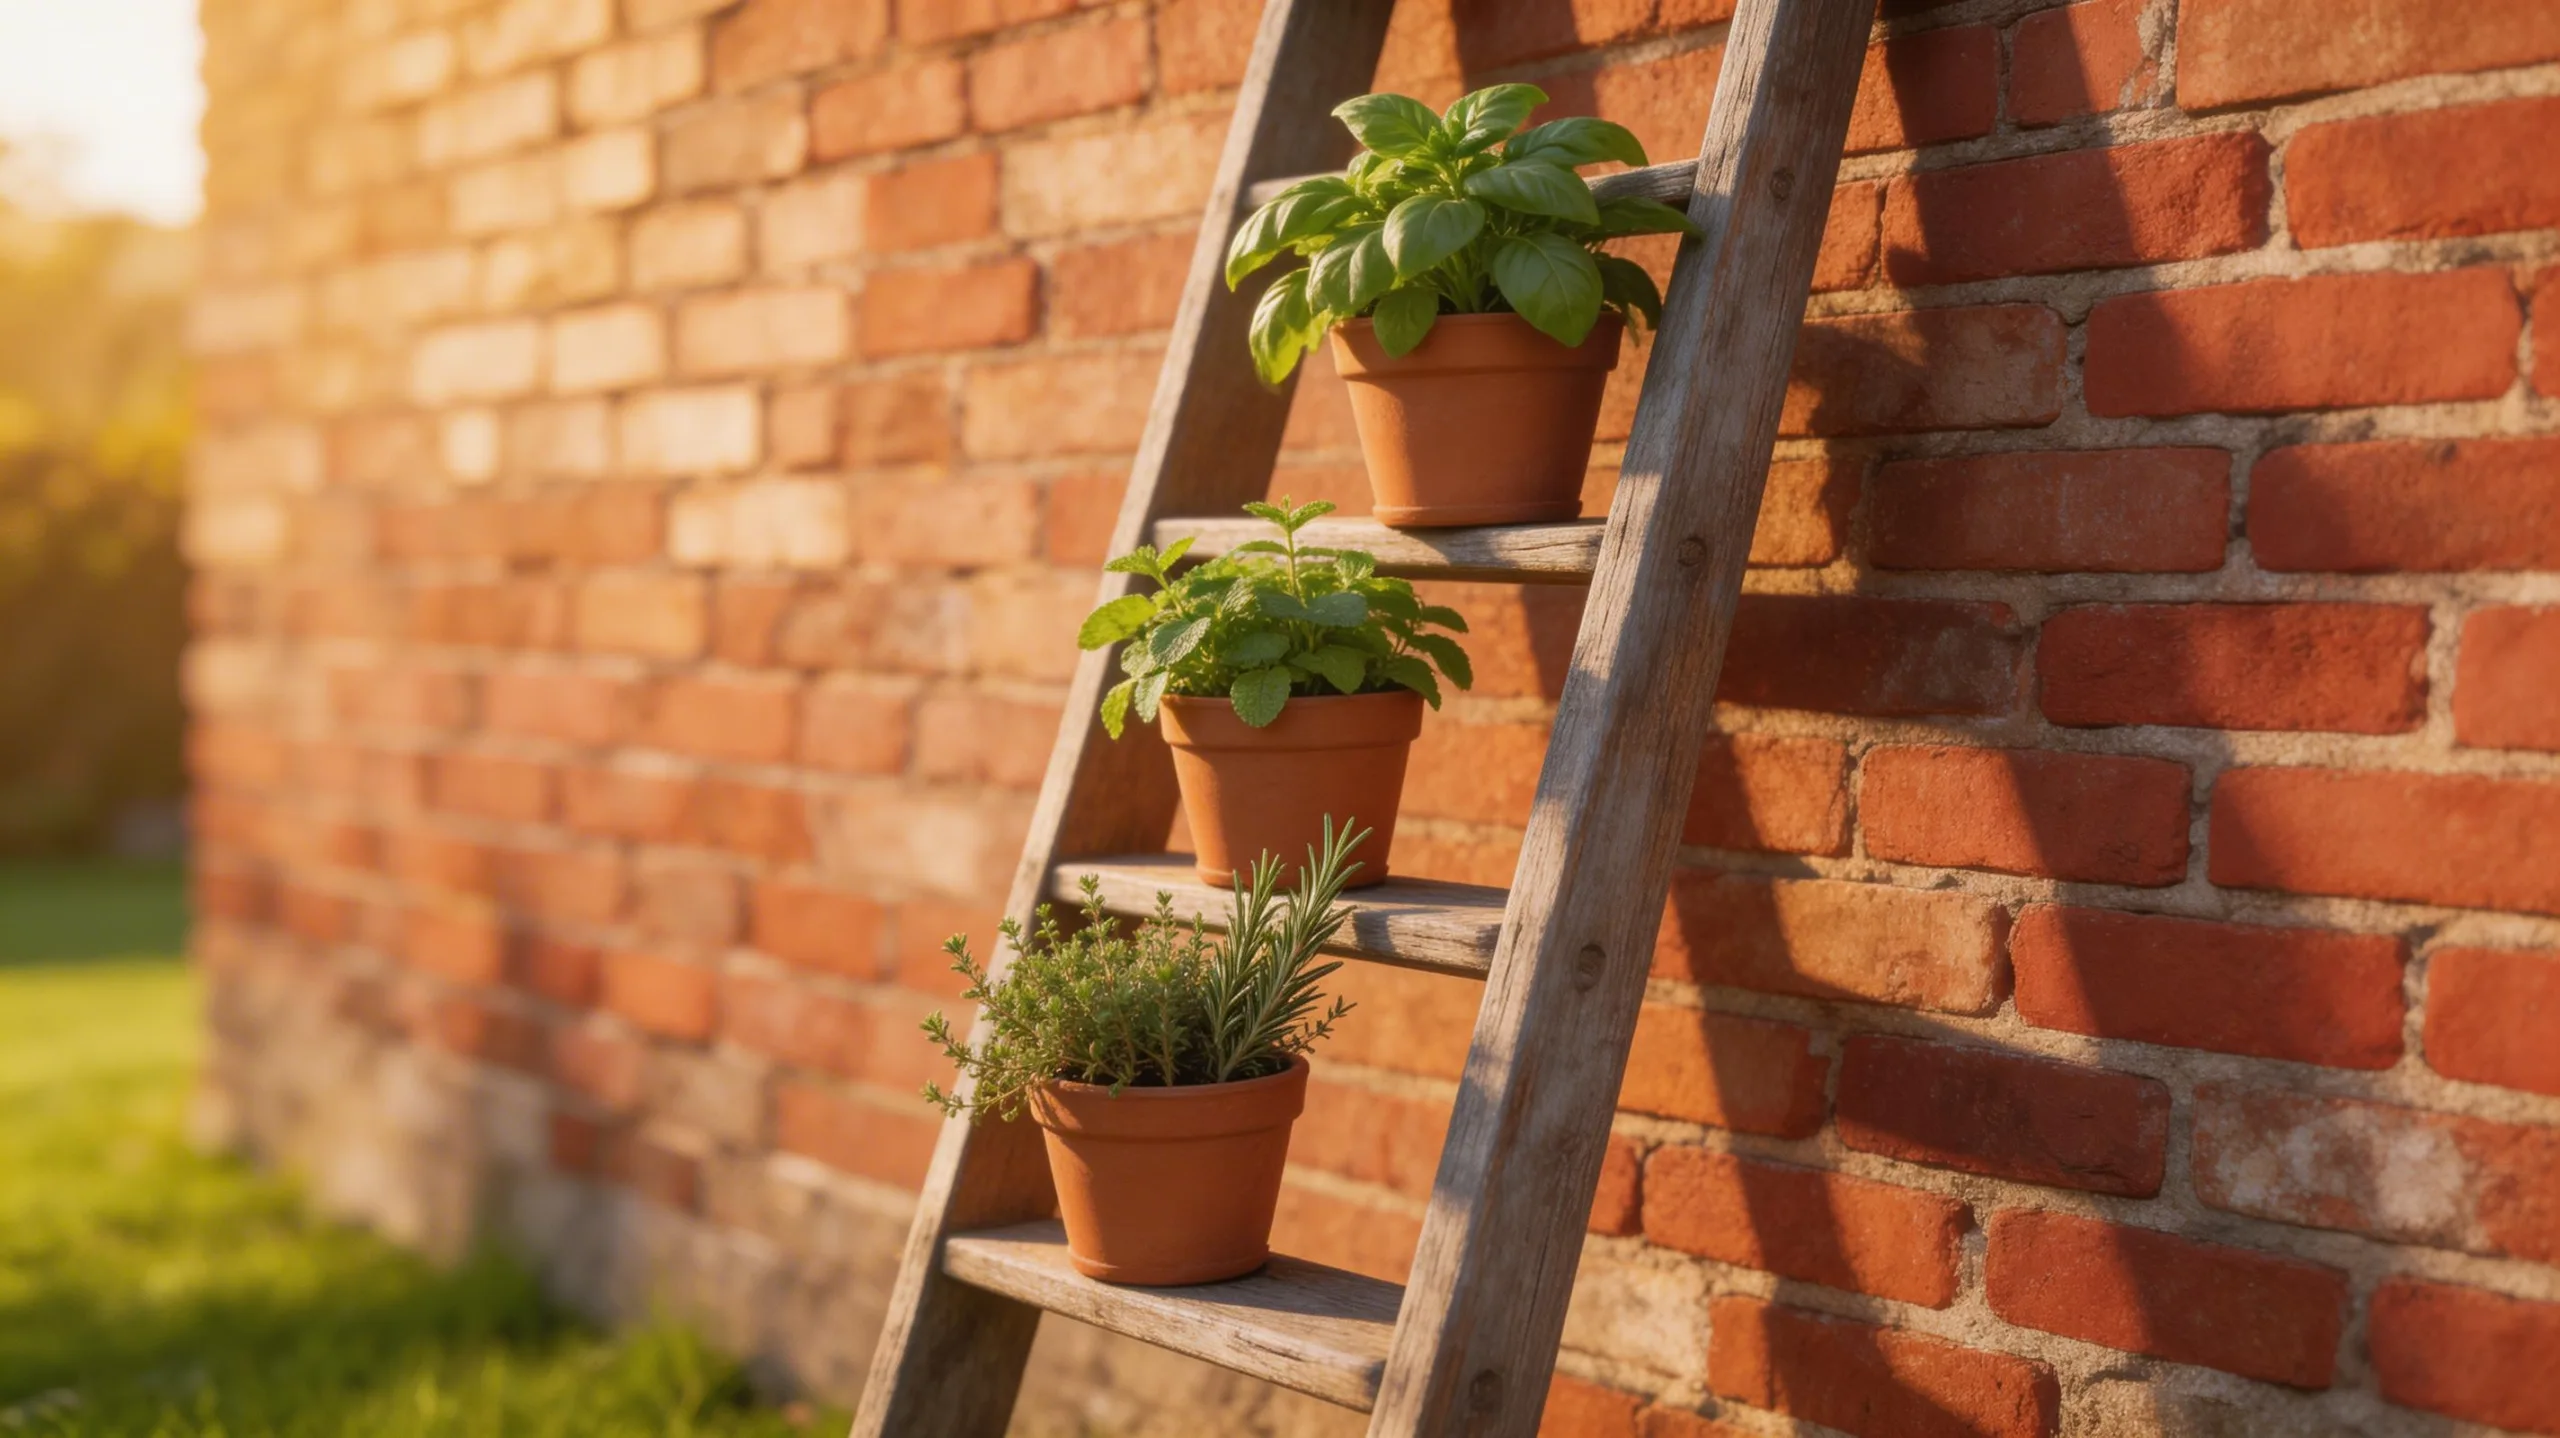
Transform an old wooden ladder into a flourishing vertical herb garden to maximize space and add rustic charm.
Start by giving your ladder a sturdy, clean base; you might even add a backboard to catch soil. Secure lightweight, shallow planters or wooden boxes onto each step.
Fill them with quality potting mix and choose sun-loving herbs like basil, thyme, and rosemary for the top tiers, saving shade-tolerant mint or parsley for the bottom. This setup’s perfect for a sunny patio corner.
You’ll love having fresh flavors at your fingertips while saving precious ground space. Remember to water consistently, as vertical gardens can drain quickly.
Your functional, aromatic display will be a conversation starter all season long.
Create Hanging Glass Globe Ornaments
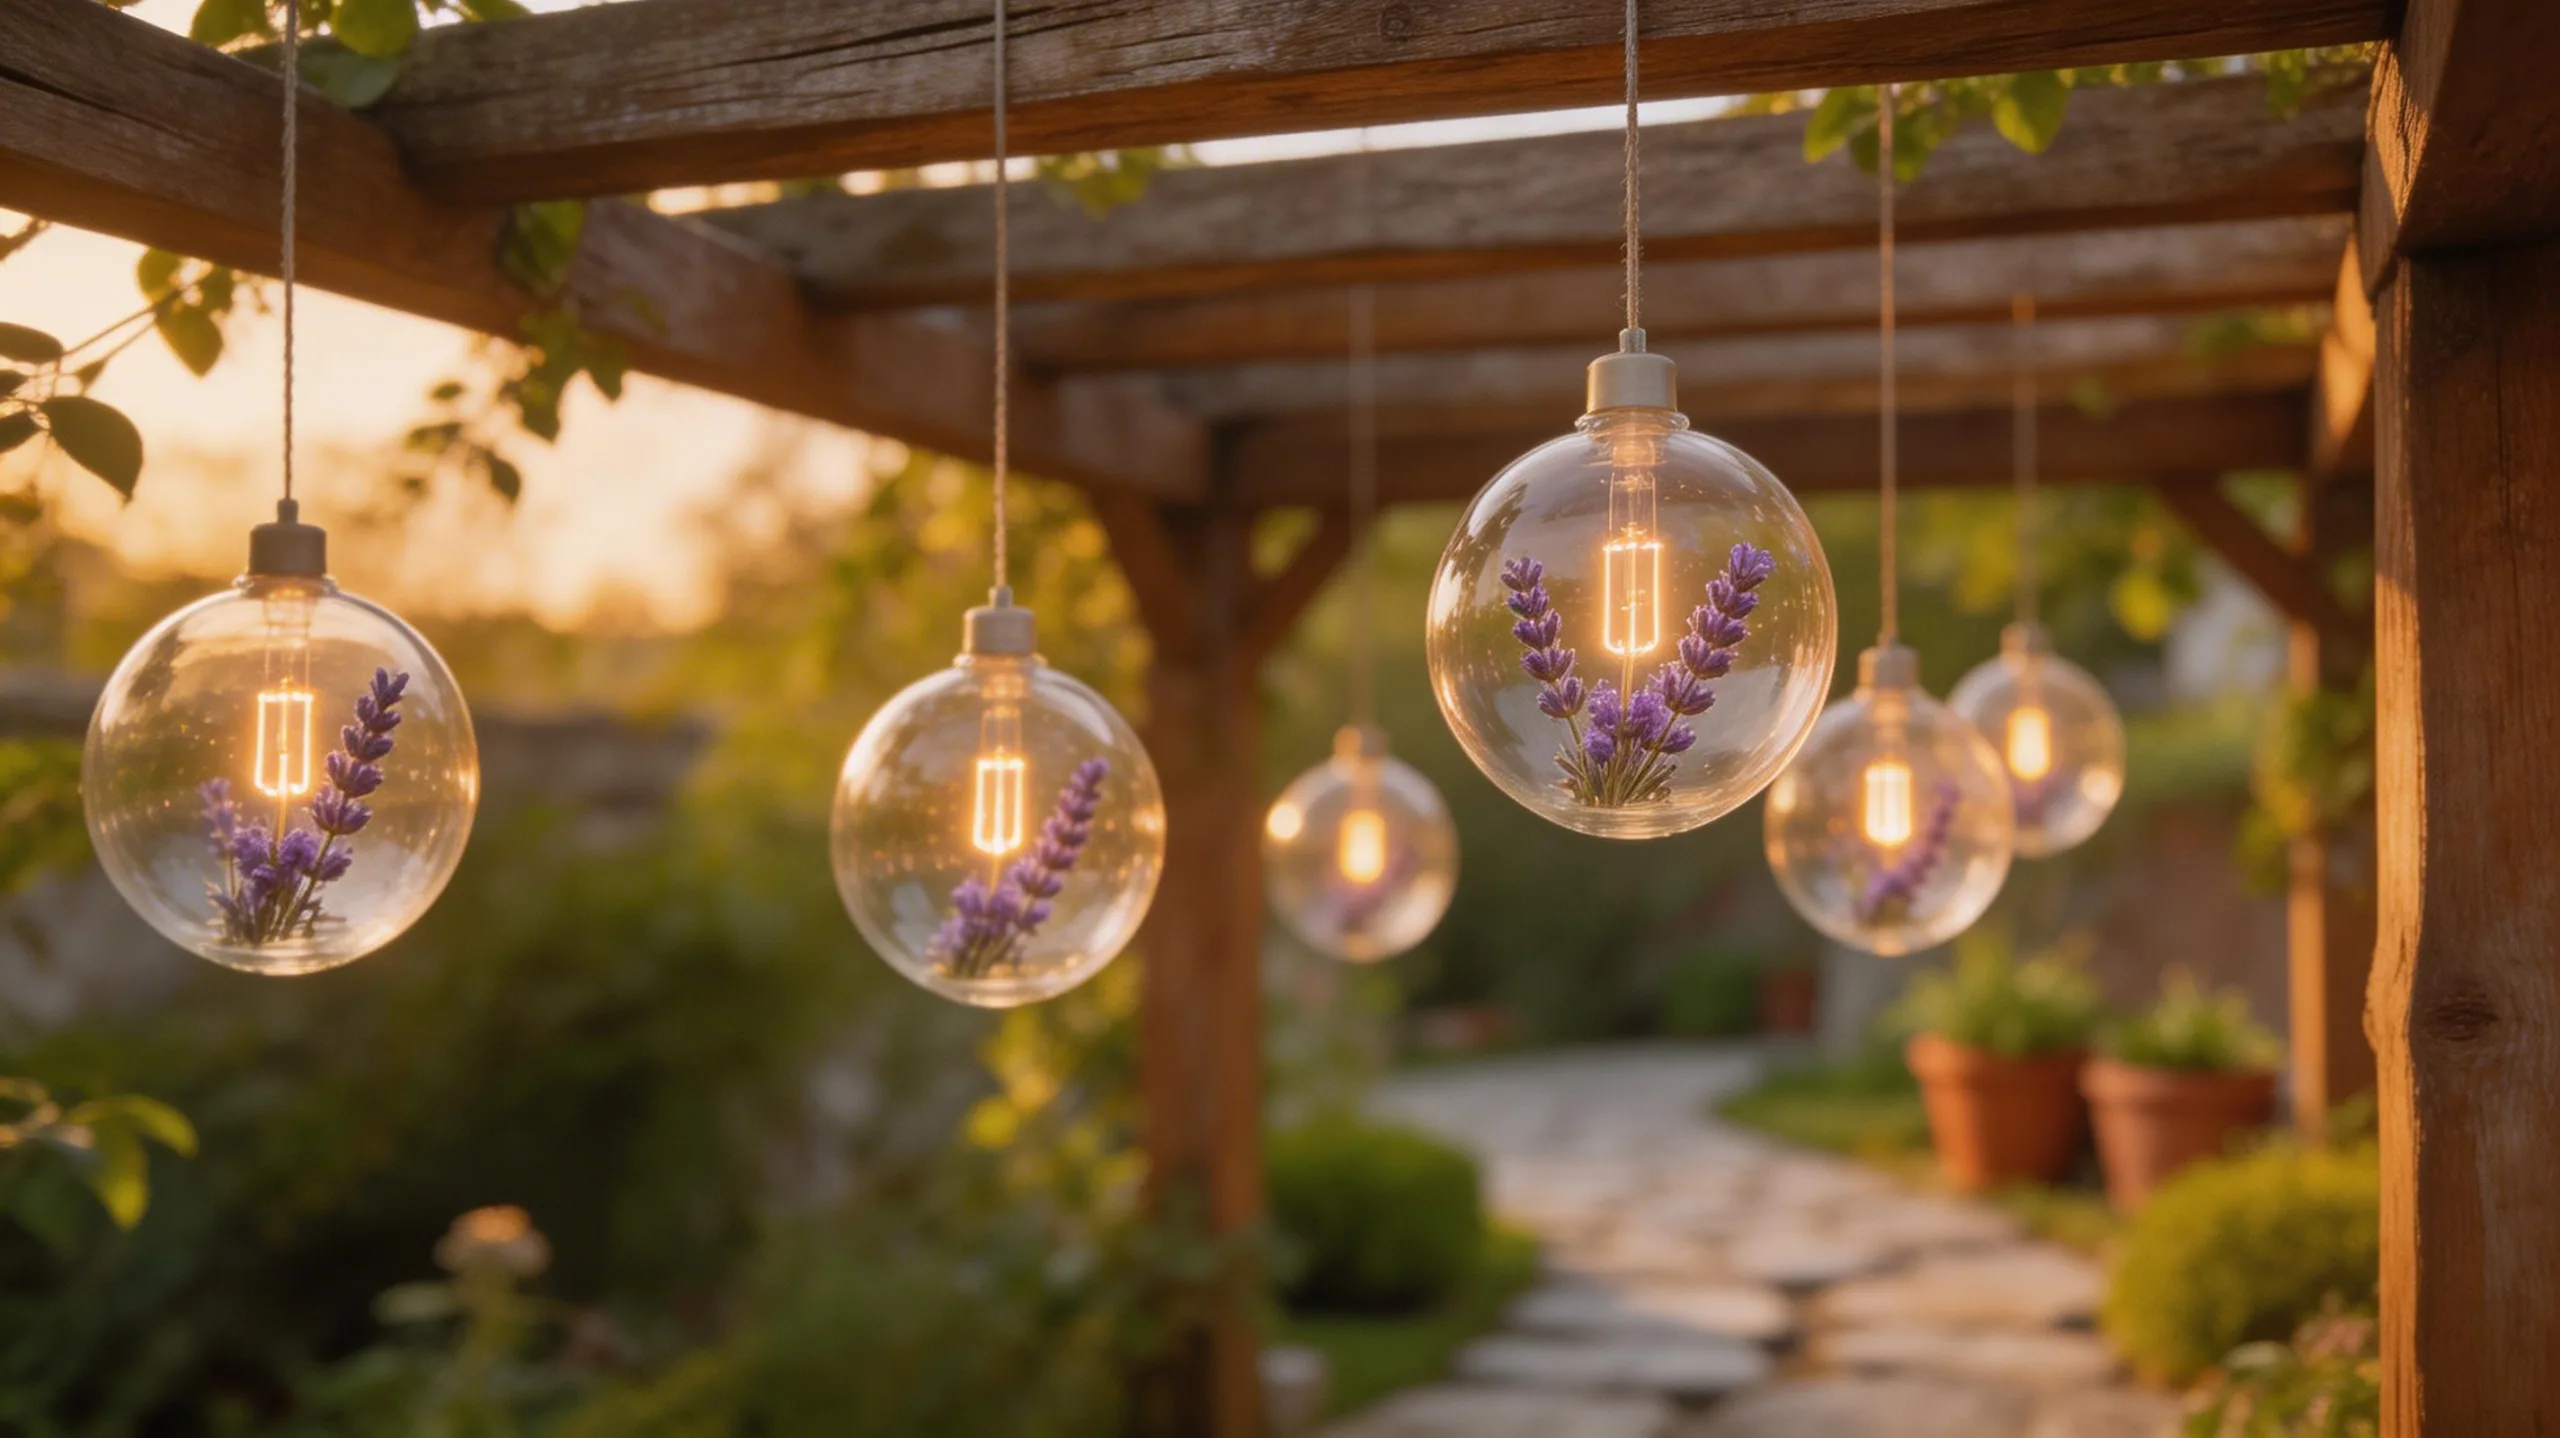
If you’re ready to add a touch of sparkling elegance to your garden, consider crafting your own hanging glass globe ornaments.
You’ll need clear glass globes with removable caps, available at most craft stores. Fill them with materials that catch the light and reflect your style, then seal them to withstand the weather.
Suspend your creations from shepherd’s hooks, tree branches, or a pergola using sturdy nylon cord or decorative metal chains.
They’ll add magical, dancing reflections throughout your space.
- Select durable fillers like colored sea glass, metallic beads, or preserved moss to create visual interest that lasts.
- Ensure a weatherproof seal by applying a clear silicone adhesive around the cap’s interior thread before screwing it on tightly.
- Vary the hanging heights in a cluster to create a dynamic, eye-catching display that moves gracefully in the breeze.
Turn an Old Window Into a Garden Trellis
Breathe new life into an old window frame by turning it into a charming garden trellis for climbing vines or flowers.
First, clean the frame thoroughly and check its stability. You might need to remove any broken glass or rotten wood. Drill small holes every few inches along the inside edges of the frame.
Then, weave jute twine, sturdy wire, or even colorful yarn horizontally and vertically through these holes, crisscrossing to create a grid. Secure the ends tightly.
Hang the frame on a wall or fence using heavy-duty hooks, or simply anchor its base into the soil. Plant sweet peas, clematis, or morning glories nearby, and watch their tendrils beautifully climb your new, rustic focal point.
Make a Simple and Stylish Rain Chain
Instead of settling for a plain gutter downspout, you can easily create a decorative rain chain to guide water in an elegant cascade. You’ll need a chain, a collection of cups or funnels, and a sturdy hanging hook.
Simply attach your first link to the hook where your downspout currently ends. Then, thread your chosen vessels onto the chain links, spacing them evenly to create a visual flow. As rainwater travels down, it’ll dance from one element to the next, producing a soothing trickle.
- Choose Your Materials: Opt for copper for a rustic patina or galvanized steel for a modern, durable look.
- Secure the Connection: Ensure your hook firmly attaches to the gutter outlet to handle the water’s weight.
- Test the Flow: Adjust the cup spacing after a rain shower to perfect the water’s melodic path.
Craft a Mosaic Stepping Stone Path
Transform your garden walkway into a vibrant tapestry by crafting your own mosaic stepping stones.
Start by gathering quick-set concrete, a mold—a plastic plant saucer works perfectly—and an assortment of broken tiles, glass, or pottery pieces.
Mix the concrete and pour it into your mold. Immediately press your mosaic pieces into the wet surface, arranging them in colorful patterns or simple, abstract designs. You must firmly embed the pieces so they won’t dislodge later.
Let the concrete cure completely, usually for about 24 hours, before carefully removing it from the mold. Then, simply place your unique stones along a garden path, spacing them for a natural stride. You’ll love this durable, personalized touch.
Build a Vertical Garden From a Wood Pallet
Just as you’ve personalized your garden path, you can also maximize your growing space by building a vertical garden from a reclaimed wood pallet. You’ll transform a simple pallet into a lush, living wall by securing it vertically and adding a liner for soil.
Fill it with a lightweight potting mix and tuck in your favorite succulents, herbs, or trailing flowers. It’s a project that combines rustic charm with practical gardening, giving you a stunning focal point without sacrificing square footage.
Remember these key points for success:
- Secure the Structure: Firmly anchor your pallet to a wall or fence to prevent tipping.
- Choose Appropriate Plants: Select varieties with similar light and water needs for a cohesive, healthy display.
- Ensure Proper Drainage: Use a well-draining soil mix and consider a drip system to maintain ideal moisture levels from top to bottom.
Make a Relaxing Bamboo Water Fountain
For a serene and meditative addition to your garden, you can craft a soothing bamboo water fountain that harnesses the gentle sound of flowing water. You’ll need a small submersible pump, a waterproof basin, and several sections of bamboo. Drill holes in the bamboo to create your water channels and secure them together with waterproof epoxy. Place your pump in the basin, run its tubing up through the bamboo structure, and fill the basin with water. When you turn it on, the water will cascade beautifully down the bamboo, creating that perfect calming trickle.
| Essential Materials | Key Steps |
|---|---|
| Submersible pump, bamboo, basin | Drill holes & assemble bamboo structure |
| Waterproof epoxy, tubing | Connect pump tubing through the bamboo |
| Water for filling | Fill basin and enjoy the serene flow! |
Craft a Willow Obelisk for Climbing Vines
If you’re looking to add a rustic support for your climbing plants, crafting a willow obelisk is a wonderfully natural and rewarding project.
You’ll start by gathering long, flexible willow rods and selecting a sturdy spot in your garden.
Drive four tall, thicker rods into the ground to form a square base, then weave the thinner rods diagonally around them, crossing at the top to create the iconic pyramid shape.
Secure everything with natural jute twine.
This living structure blends seamlessly into your landscape and provides perfect support for clematis, peas, or beans.
- Material Selection: Use freshly cut, green willow for maximum flexibility during weaving; it’ll dry and harden beautifully in place.
- Construction Technique: Employ a simple diagonal weaving pattern, alternating the direction as you build upward for stability and visual appeal.
- Plant Pairing: Train your climbers early, gently guiding their tendrils through the open framework for optimal growth and coverage.
Build a Cozy Fire Pit From Pavers and Stones
After guiding vines up a handcrafted willow obelisk, you can create another garden focal point for evening gatherings with a custom fire pit built from pavers and stones.
First, you’ll want to choose a flat, open area away from any structures or overhanging branches. Outline a circle, then excavate about eight inches deep. Fill this base with a compacted layer of gravel for drainage.
Next, lay your first course of sturdy retaining wall blocks or pavers in a tight circle. For the interior lining, stack fire-rated stones like natural fieldstone. You’ll need to use construction adhesive between layers for stability.
Once it’s built, add a metal fire ring inside for safety. You’ve now built a perfect spot for roasting marshmallows under the stars.
Make a Bug Hotel From Natural Materials
Craft a cozy refuge for beneficial garden insects by constructing a simple bug hotel from natural materials you can easily gather. Start with a sturdy, open-fronted wooden frame or a repurposed wooden box.
You’ll then pack it tightly with various hollow, nooky materials to create different-sized chambers. Place your finished hotel in a quiet, sheltered spot facing the morning sun to attract your new guests.
- Drilled Wood & Logs: Use sections of untreated logs or lumber and drill holes of varying diameters (2-8mm) to cater to different solitary bee species.
- Hollow Stems & Reeds: Bundle together bamboo canes, reeds, or the hollow stems of plants like elderberry, cutting them to fit your frame’s depth.
- Pine Cones & Dry Leaves: Layer in pine cones, dried leaves, and strips of bark to provide hiding spots for beetles, spiders, and other helpful predators.
Frequently Asked Questions
How Do I Make My Garden Decor Safe for Pets?
Start by avoiding toxic paints or plants; secure any structures so they can’t fall, and ensure all electrical components are properly insulated so your pets won’t get hurt playing in your garden.
What Is the Best Way to Winterize Outdoor Decorations?
Clean and store decor inside if you can. Weatherproof outdoor items with sealants. For lights or fountains, disconnect and drain them. Anchor lighter objects so they won’t blow away.
How Can I Keep My Painted Garden Stones From Fading?
Apply several coats of a clear, outdoor-rated sealer made for masonry. You’ll protect those beautiful colors. For lasting results, reapply the sealer annually or whenever you notice any wear or fading starting.
What Materials Are Safest for a Children’s Play Area?
Use sand, smooth bark mulch, or rubber tiles for a soft fall. Choose untreated wood and lead-free paint. Ensure all materials don’t have sharp edges or small parts that could pose a choking hazard.
Are There Any Beginner Projects for People With No Tools?
Yes, you can start with found items. Use painted rocks for borders. Plant succulents in vintage teacups. Upcycle old ladders into plant stands. You’ll create charm with just your hands, paint, and garden soil.
Conclusion
By adding just a few of these projects, you’ll see your yard transform. Remember to use exterior-grade sealants on painted pieces and always drill drainage holes in planters. Your creativity, paired with simple weatherproofing, means your new decor will last. So, grab those spare mason jars and that chipped teacup—your beautiful, personalized garden sanctuary is ready for you to build and enjoy all season long.
The Only Tools You Need for a Thriving Garden 🌱
Whether you're a weekend gardener or growing daily — these hand-picked tools make every session faster, easier, and more satisfying.