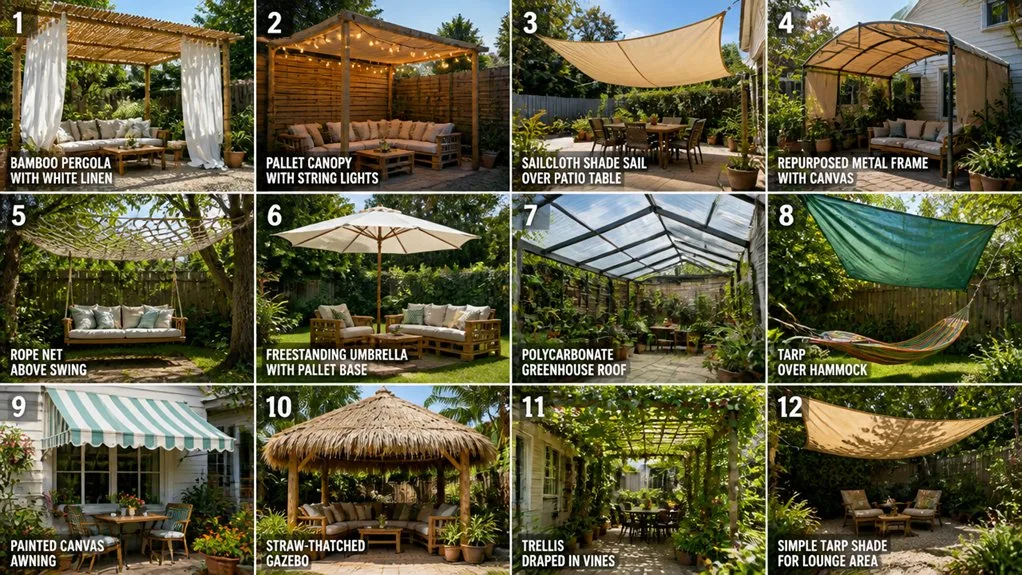
You’ve got the space and the drive to grow your own food year-round, but you need the right structure. Matching a greenhouse plan to your skill level and budget is key, whether you’re leaning towards simple PVC hoops or a reclaimed-window design. Let’s explore how to choose a practical plan and pick a location that sets you up for success before you even break ground.
Key Takeaways
- Start with a simple design like a cold frame or hoop house that matches your skill level.
- Choose a sunny, level site with a well-drained foundation and access to water.
- Select durable, suitable glazing like polycarbonate for insulation or polyethylene film for low cost.
- Integrate ventilation such as roof vents or louvers to manage heat and prevent mold.
- Control temperature with thermal mass like water barrels for heat and shade cloth for cooling.
How to Choose the Right DIY Greenhouse Plan
While you might feel eager to jump straight into building, picking the right plan first ensures your project fits your space, budget, and goals.
Start by honestly assessing what you can afford, including materials and any tools you’ll need.
Then, think about what you actually want to grow; a simple cold frame for seedlings demands a different structure than a year-round citrus haven.
Match your ambition to your skill level—a lean-to design attached to your house is often simpler than a freestanding glasshouse.
Look for plans with clear material lists and diagrams you can understand.
Don’t get seduced by the most elaborate design; the best plan is one you can confidently finish.
Pick the Perfect Location for Your Greenhouse
Since you’ve chosen a plan, you’ll want to give your greenhouse its ideal home by selecting the best possible site. Prioritize maximum sunlight, placing the structure where it’ll receive full southern exposure if you’re in the northern hemisphere.
You’ll also need a level, well-drained area to prevent water pooling and foundation issues. Consider proximity to your water source and electricity if needed; shorter runs save money and effort.
Check for protection from strong winds, perhaps using an existing fence or hedge as a barrier. Ensure the site is convenient for you to access daily.
Taking time to scout your property now prevents major headaches later and helps your plants thrive with minimal resource input.
Understand 3 Essential Greenhouse Design Elements
Now that you’ve picked your site, focusing on three key design elements will ensure your greenhouse is both functional and efficient.
First, prioritize ventilation. You’ll need vents or louvers to manage heat and humidity, preventing plant disease.
Second, consider your frame’s shape. A sloped roof sheds rain and snow, while the interior height should accommodate your plants’ growth.
Finally, plan your layout for practicality. Arrange benches and pathways so you can easily access all your plants for watering and maintenance. A well-thought-out design maximizes your space and light, making your gardening efforts more successful.
Addressing these elements early saves you from costly fixes later, so take time to sketch your ideas.
Choose Your Greenhouse Materials: Wood, PVC, or Windows
Moving from design to construction, you’ll need to pick your primary building materials, as this choice impacts your budget, durability, and the look of your greenhouse.
Your main structural options are wood, PVC pipe, or reclaimed windows. Wood is strong and traditional but needs weather protection. PVC is affordable and easy for arched designs but isn’t as sturdy. Old windows offer ready-made glazing and charm but require a solid frame.
Focus on using what you can source affordably or even repurpose. You’ll mix these with your chosen covering, like poly film or polycarbonate panels.
For a durable and cost-effective build, consider these material strengths:
- Wood: Best for permanent, load-bearing frames.
- PVC: Ideal for quick, low-cost seasonal structures.
- Windows: Perfect for upcycling into unique designs.
- Combinations: Often yield the best results (e.g., wood frame with window walls).
- Local Resources: Check salvage yards for windows or leftover construction lumber.
Build a Simple Foundation for Any Greenhouse
Before you assemble your materials, you’ll need a stable foundation to ensure your greenhouse lasts. You can build a simple, effective base using pressure-treated lumber or concrete blocks.
First, level your chosen site with a shovel and tamp the soil. Then, lay your lumber frame or blocks, checking for squareness with a carpenter’s square. Secure corners with galvanized screws or brackets for wood; simply stack and level your blocks for a concrete base.
This foundation prevents shifting, protects your structure from ground moisture, and provides a solid anchor for your walls. It’s a straightforward project that saves you future repairs, making your greenhouse a resilient and lasting garden asset.
How to Glaze Your Greenhouse: Glass vs. Plastic
Choosing your glazing material shapes your greenhouse’s climate, cost, and durability. Glass offers classic clarity and longevity but is heavy, expensive, and can break. Modern plastics like polycarbonate or polyethylene film are lighter, cheaper, and better at diffusing light to prevent plant scorch. For most DIYers, a durable, multiwall polycarbonate sheet strikes the best balance.
Remember, your primary goal is maximizing light transmission for plant growth. Consider these practical factors when deciding:
- Initial & long-term cost (include replacement cycles)
- Light diffusion (soft, even light is ideal)
- Insulation value (R-value; multiwall panels win)
- Hail & impact resistance
- Ease of installation on your frame
Your choice directly supports your garden’s success, so pick what fits your budget and local weather.
Build a Low-Cost PVC Pipe Greenhouse
Let’s dive into building an affordable, functional greenhouse with PVC pipe, a material that’s forgiving for beginners and kind on your wallet.
You’ll mainly need PVC pipe, fittings, and a durable plastic film for covering.
Start by creating a solid base, perhaps with treated lumber, to anchor your structure.
Then, assemble your pipe hoops by connecting lengths with elbows and tees, forming a simple arched frame.
Secure this frame to your base.
Stretch your plastic sheeting tightly over the skeleton and fasten it securely with batten strips or specialized clips.
This design is wonderfully adaptable; you can easily adjust its size.
It’s a quick project that maximizes growing space while minimizing cost and construction complexity.
Step-by-Step DIY Wood Frame Greenhouse Plans
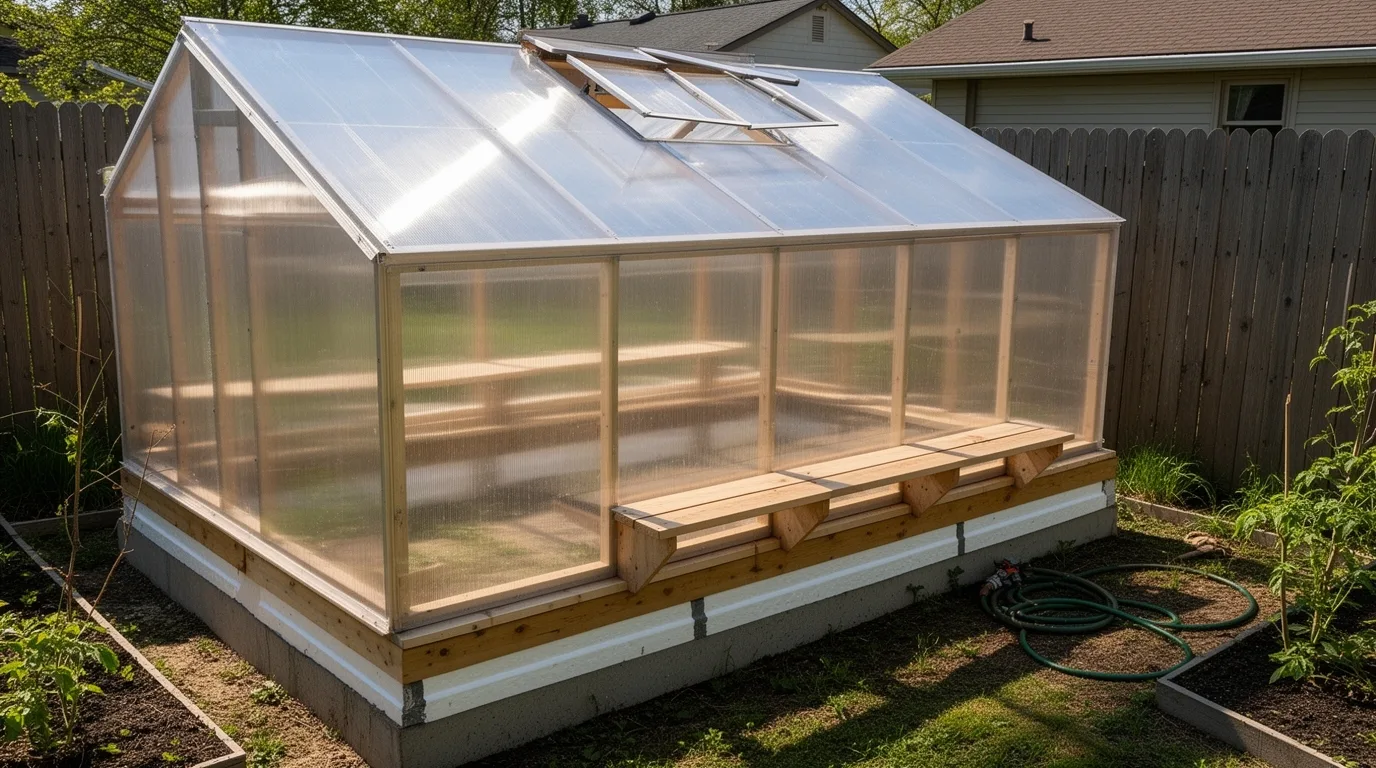
For those seeking a more permanent and classic structure, building a wood frame greenhouse offers timeless appeal and excellent durability. You’ll need pressure-treated lumber for the base and rot-resistant cedar or redwood for the frame to ensure longevity.
Start by constructing a solid foundation and floor frame, then assemble the wall and roof panels on a flat surface before raising them. Cover it with quality greenhouse plastic or polycarbonate panels, securing them well. Managing resources wisely means you can source materials economically without sacrificing stability.
- Pressure-treat your foundation lumber.
- Use durable, rot-resistant wood for above-ground framing.
- Pre-assemble wall sections for easier installation.
- Anchor the structure securely against wind.
- Seal all joints properly to retain heat and moisture.
This project requires basic tools and yields a sturdy sanctuary for your plants.
Construct a Greenhouse From Old Windows and Doors
Build up a beautiful and functional greenhouse by repurposing old windows and doors you can salvage or find at secondhand stores.
First, create a simple, sturdy frame using rot-resistant lumber or recycled materials, sizing it to fit your window and door panels.
You’ll lay a solid foundation, like concrete blocks or pressure-treated wood, to keep the structure level.
Then, carefully attach your salvaged panes to the frame, using nails or screws and sealing gaps with caulk to retain heat.
Position the largest glass panels on the southern side for optimal sunlight.
This approach saves money and materials, giving unique character to your garden space.
You’re not just building; you’re creatively upcycling with practical results.
Add Proper Ventilation to Your DIY Greenhouse
Three essential ventilation strategies can keep your greenhouse’s environment healthy and productive. You can incorporate passive vents, active fans, and strategic door use. Good airflow prevents mold, regulates temperature, and strengthens plants. Even a simple setup makes a huge difference.
For passive, low-cost ventilation, you can install:
- Roof vents that open automatically as heat rises
- Sidewall louvers you can adjust manually
- A vented door you can prop open on warm days
- Mesh screens on openings to keep pests out
- A simple hinged window panel from recycled materials
You’ll also want a small, affordable exhaust fan for stagnant days. Place it opposite a door or lower vent to pull fresh air through the entire space. Regularly open doors in the morning to exchange air before the day gets too hot.
Heat Your Greenhouse for Winter Growing
Extending your growing season through winter requires a thoughtful heating approach. Your first step is insulation. Add bubble wrap to the inside glazing to create an insulating air barrier. Seal all drafts around doors and vents thoroughly.
For heat, choose a method matching your climate and budget. A small electric space heater with a thermostat works for mild winters. In colder zones, consider a vented propane heater; just ensure you provide adequate ventilation for safety.
Thermal mass, like water barrels painted black, absorbs daytime sun and slowly releases warmth at night. Grouping plants together also creates a beneficial microclimate. You can successfully keep frost-sensitive plants alive with these resource-smart strategies.
Cool and Shade Your Greenhouse in Summer
Beat the summer heat by shifting your focus from heating to cooling your greenhouse to protect your plants from scorching temperatures. You can manage temperatures effectively with smart ventilation and shading.
Your first step is maximizing airflow; open all vents and consider adding an exhaust fan. Then, apply shade cloth, which is a cost-effective savior. You can make your own economical shading solutions.
- Hang a 30-50% shade cloth over the frame’s exterior.
- Paint on a diluted whitewash coating for temporary shade.
- Install retractable blinds inside for adjustable control.
- Use roll-up bamboo screens on the sun-facing side.
- Plant tall, deciduous vines nearby for natural, seasonal shade.
A combination of these methods creates a stable, cooler environment for thriving summer crops.
Automate Greenhouse Watering for Easy Care
Transform your greenhouse into a low-maintenance haven by automating the watering process. You’ll save time and ensure consistent moisture for healthier plants.
Start with a simple drip irrigation system using a main hose, feeder lines, and emitters. You can connect it to a timer on your outdoor faucet, which lets you set precise watering schedules. This method conserves water by delivering it directly to the roots, minimizing waste from evaporation or runoff.
For portable setups, use a reservoir with a solar-powered pump and timer. It’s a weekend project that pays off daily, freeing you up while your plants thrive.
You’re not just building convenience; you’re investing in a more resilient and productive garden.
Install Shelving for Maximum Growing Space
After setting up an automated watering system, you can focus your efforts on installing shelves to grow more in the same footprint. Shelving instantly multiplies your usable space, letting you cultivate seedlings, herbs, and smaller plants vertically. You can build sturdy, affordable shelves from repurposed materials like cinder blocks and wood planks or old pallets. Position them to avoid shading sun-loving plants below.
A simple, effective shelving design prioritizes airflow and light penetration. Consider these key points for your build:
- Use pressure-treated or rot-resistant wood for longevity.
- Ensure the structure is level and securely anchored.
- Opt for slatted or wire shelves to improve air circulation.
- Design shelves with adjustable heights for plant flexibility.
- Leave ample space between shelves for plant growth and maintenance.
This practical upgrade maximizes your greenhouse’s potential without a major investment.
Organize Your Greenhouse Interior Efficiently
While you’re maximizing vertical space with shelving, it’s also crucial to organize your layout to create a smooth workflow and keep plants thriving.
Start by designating clear zones for tasks like potting and storage. Keep your most-used tools and supplies easily accessible on a central workbench. Group plants with similar water and light needs together; this saves you time and prevents over or under-watering. Use clear, labeled bins for seeds and small items to avoid waste.
Leave ample aisle space so you can move and tend to plants without damaging them. A thoughtful, efficient layout makes daily maintenance quicker and your gardening more enjoyable.
What to Grow First in Your New Greenhouse
Choosing your first crops is an exciting step that sets the stage for a productive season. Focus on fast-growing, reliable plants to build confidence and provide quick rewards. Begin with leafy greens and herbs; they’re forgiving and yield continual harvests.
Start seeds in trays to maximize space before transplanting your strongest seedlings. Remember, your initial goal is learning your greenhouse’s unique climate, not achieving a massive yield.
For your first planting, prioritize these resilient, high-value crops:
- Lettuce & Spinach: Quick harvests from cut-and-come-again varieties.
- Radishes: Ready in just 3-4 weeks, offering instant gratification.
- Basil & Cilantro: Frequent trimming encourages bushier growth.
- Green Onions: Regrow them easily from kitchen scraps.
- Swiss Chard: Tolerates temperature swings beautifully.
Plan Your Greenhouse Planting for Year-Round Harvests
Extending your growing season beyond a single harvest transforms your greenhouse into a truly self-sufficient resource. You’ll need a planting calendar tailored to your climate. Think in layers and successions.
Start cool-season crops like spinach and kale in late winter for an early spring harvest. As temperatures rise, transition to heat-lovers such as tomatoes and peppers.
By late summer, sow another round of cool-weather vegetables for fall and winter eating. Utilize vertical space with climbers like beans, and keep fast-growing radishes or lettuce in between slower plants.
This successive planting maximizes every square foot, ensuring you’re always harvesting something fresh. Your careful planning turns a simple structure into a year-round food-producing engine.
Control Greenhouse Pests and Diseases Naturally
Having a steady supply of fresh food from your greenhouse can face challenges when pests and diseases find their way inside. Don’t reach for harsh chemicals first. You can manage most problems naturally with vigilant observation and simple remedies.
Focus on prevention by keeping your greenhouse clean and your plants healthy, as stressed plants attract more trouble. Regularly inspect leaves, especially the undersides, for early signs of aphids, whiteflies, or mildew. Spot-treat issues immediately to prevent spread.
- Introduce beneficial insects like ladybugs for aphid control.
- Use a strong spray of water to dislodge small pests.
- Apply neem oil or insecticidal soap sprays for persistent infestations.
- Remove and destroy severely infected plant material promptly.
- Ensure good airflow around plants to discourage fungal diseases.
Staying proactive is your best defense for a thriving, chemical-free harvest.
Maintain Your DIY Greenhouse Structure
While your plants are protected, the greenhouse structure itself needs regular attention to keep it functioning well for years. You should commit to a simple weekly and seasonal checklist.
Inspect glazing monthly for cracks or gaps that compromise insulation, and reseal them promptly with greenhouse-grade caulk to save heating costs. Check your frame’s integrity; tighten any loose bolts or screws and replace rusted hardware before it fails.
Keep ventilation systems clear—remove debris from vents and ensure fan blades are dust-free for efficient operation. Periodically clean your coverings with mild soap and water to maximize light transmission.
Fix 5 Common DIY Greenhouse Problems
Maintaining your structure helps avoid issues, but some problems can still arise. Tackle these common fixes yourself with basic tools and a bit of patience. You’ll save money and extend your greenhouse’s life. Remember, most repairs are simpler than you think.
- Seal small glazing cracks temporarily with clear silicone or specialized tape to stop drafts and heat loss.
- Re-tension loose plastic film on hoop houses by loosening your base boards, pulling it taut, and re-securing it.
- Clear clogged roof gutters or valleys regularly to prevent water damage and heavy snow loads.
- Re-anchor a wobbly frame by driving new, longer stakes or adding diagonal bracing for stability.
- Replace worn door seals with new foam weather-stripping to keep pests out and warmth in.
Upgrade With These Smart Greenhouse Add-Ons
Now that your greenhouse is running smoothly, you can boost its efficiency and your own convenience with a few clever upgrades.
Consider installing an automatic vent opener; it uses a heat-sensitive wax cylinder to open windows autonomously, preventing overheating.
Adding a simple drip irrigation system on a timer saves water and ensures consistent moisture while you’re away.
You can also hang affordable thermal mass, like black-painted water barrels, to absorb daytime heat and release it at night.
For pest control, introduce beneficial insects or set up yellow sticky traps.
A basic shelving unit made from recycled pallets maximizes your vertical growing space.
Each of these affordable add-ons makes your greenhouse more self-sufficient and productive.
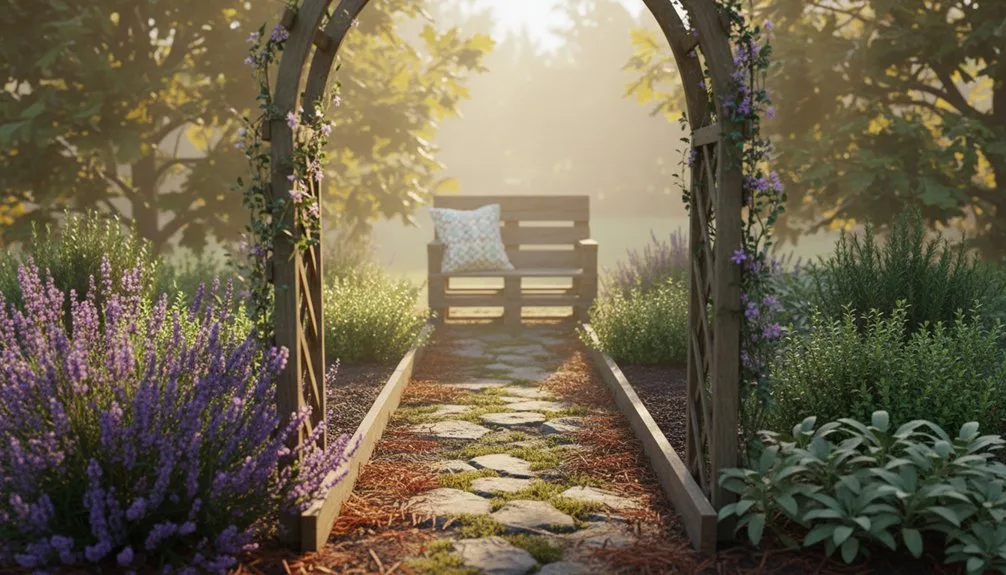
Insulate With a Simple Cold Frame Design
To extend your growing season without the expense of a full greenhouse, you can build a simple cold frame that traps solar heat and protects plants from frost.
Use an old window sash or clear polycarbonate as the lid, angled south to capture maximum sunlight.
Construct the base from scrap wood, bricks, or straw bales to create a snug, insulated box.
Your cold frame shields seedlings and overwintering greens, letting you harvest earlier in spring and later in fall.
Manage it easily by propping the lid open on warm days to prevent overheating.
Remember these key points for a successful build:
- Angle the transparent lid toward the sun.
- Ensure the frame has sturdy, sealed walls.
- Use free or recycled materials for the structure.
- Always include a simple venting mechanism.
- Site it on well-draining ground to avoid waterlogging.
Enjoy Fresh Harvests From Your DIY Greenhouse
You’ll often harvest fresh produce from your own greenhouse year-round, extending your garden’s bounty far beyond the typical season.
Stagger your plantings to ensure a continuous supply; sow new seeds every few weeks for a non-stop harvest of greens and radishes.
You’ll extend seasons for tomatoes and peppers, letting them ripen fully.
Utilize vertical space for cucumbers and beans to maximize your yield.
Practice simple succession planting—as you harvest one crop, immediately replant that space.
This efficient rotation makes every inch count.
Collect rainwater for irrigation to save resources.
You’re not just building a structure; you’re creating a resilient, productive system that rewards your effort with fresh, flavorful food right outside your door.
Frequently Asked Questions
Can I Get a Building Permit for a Greenhouse?
Yes, you may, but you must check your local zoning and building codes first. Always contact your municipal building department to determine specific permit requirements for your structure’s size and intended use.
Does a Greenhouse Increase My Property Value?
A quality greenhouse can increase your property’s appeal. However, you’ll need a durable, attractive build. It’s a functional upgrade that resonates with buyers who value gardening, potentially boosting your home’s market value.
How Long Will a DIY Greenhouse Typically Last?
With proper materials and maintenance, you’ll get about 5 to 10 years. Choose durable wood or metal, keep it clean, and you’ll protect your investment and enjoy it for seasons to come.
Are There Legal Restrictions on Greenhouse Height?
Check your local zoning ordinances and building codes for height restrictions. You’ll often find limits based on lot lines or roof types. Your DIY greenhouse must typically comply with setback rules too.
What Greenhouse Insurance Do I Need?
You’ll likely need property coverage. Check if it’s covered under your homeowners policy or if you require an addition. Consider separate liability insurance, especially if you’re selling what you grow.
Conclusion
Now you’ve got the plan to grow more. Use these designs to match your space and skills, stretch your budget with repurposed materials, and start simple. Build that solid foundation, manage moisture and heat, and you’ll extend your harvest. Your homegrown greenhouse is within reach—get those plans, pick up your tools, and enjoy fresh, thriving plants for seasons to come.
The Only Tools You Need for a Thriving Garden 🌱
Whether you're a weekend gardener or growing daily — these hand-picked tools make every session faster, easier, and more satisfying.