You’ve got a backyard that needs definition, but the budget’s tight. Using reclaimed pallets you can craft a sturdy fence in three simple steps, then customize it with paint, lattice, or even a hidden storage shelf. Add a pet‑safe wire mesh, a solar‑lit top, or a built‑in seating nook for extra function and charm. Each option stays under $50 and can be anchored with stakes or concrete footings—so you’ll see how far a few pallets can go before you decide which look fits your space best.
Key Takeaways
- Use reclaimed pallets flat, sand, and fasten side‑by‑side with 2‑inch deck screws for a sturdy, low‑cost fence.
- Stack two to three pallet tiers, staggering joints and adding corner brackets for visual depth and extra strength.
- Add rustic lattice or slatted “shadow box” tops using inexpensive pine or PVC lattice to create privacy and style.
- Incorporate seating nooks by cutting 6‑inch‑deep notches at eye level and optionally attach backrests or cushions.
- Finish with a water‑based exterior paint, stain, or UV‑resistant sealant; re‑coat annually for weather protection.
Build a Quick Low‑Cost Pallet Fence in 3 Easy Steps

Start by gathering a few inexpensive pallets and a few basic tools—your project can be completed in under an hour and for less than $30.
First, flip the pallets flat and sand any rough spots; a cheap belt sander or sandpaper works fine.
Next, line the pallets side‑by‑side along the desired fence line, using a drill and 2‑inch deck screws to attach them together securely; stagger the seams for extra stability.
Finally, anchor the fence to the ground with metal stakes or concrete footings, spacing them every 4‑5 feet to keep the structure steady.
You’ll have a sturdy, rustic barrier that defines space, blocks view, and adds charm without breaking the bank.
Paint or Stain the Pallet Fence for a Custom Color Scheme
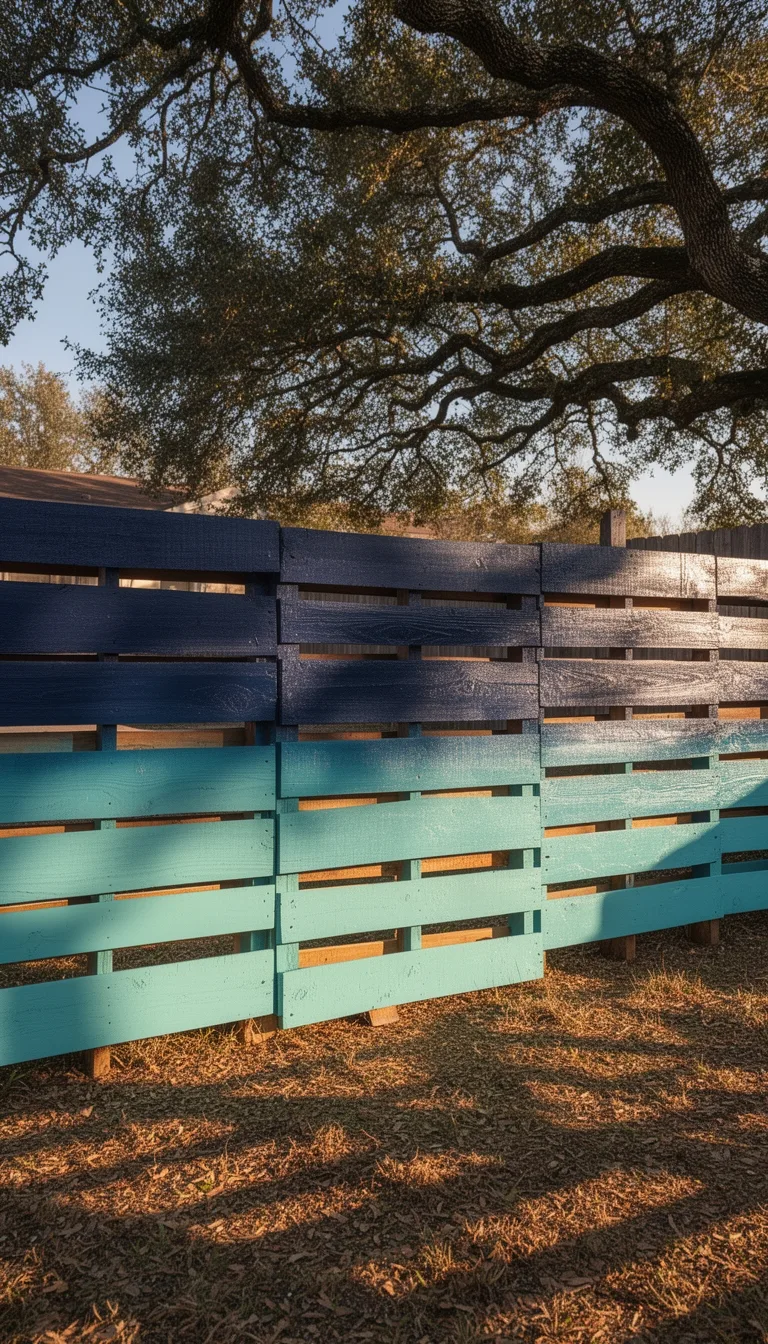
Choose a paint or stain that matches your décor and apply it with a brush, roller, or sprayer to give the pallet fence a polished, personalized look without breaking the bank.
First, sand the wood lightly to smooth rough spots and open the pores for better absorption. Then, wipe away dust with a damp cloth.
If you want a uniform hue, use a water‑based exterior paint; it dries fast, resists fading, and stays affordable.
For a natural vibe that shows grain, pick a clear or tinted stain—apply two thin coats, letting each dry fully.
Protect the finish with a low‑cost, UV‑resistant sealant, especially if the fence faces direct sun. Clean tools promptly, and you’ll enjoy a vibrant, durable fence that fits any budget.
Add a Rustic Lattice Top to the Pallet Fence for Extra Privacy
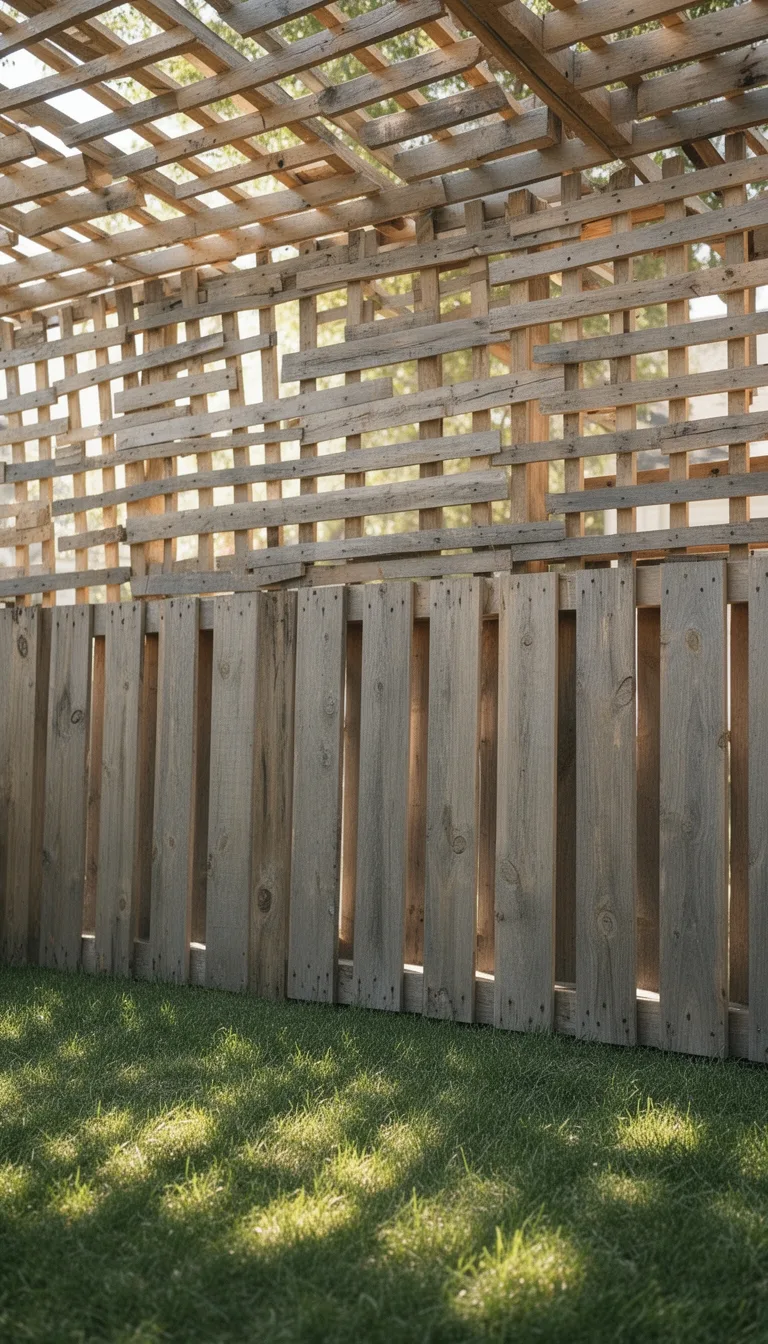
After the paint or stain dries, attach a rustic lattice top to boost privacy and add charm. Choose reclaimed wood or inexpensive pine slats, cut them to match the fence width, and secure with exterior‑grade screws. Paint the lattice a muted gray or leave it natural for a weathered look. Space the slats about two inches apart; this lets light filter through while keeping prying eyes out. A simple bracing frame prevents sagging, and you can add vines later for extra greenery.
| Material | Cost (per ft) | Installation Time |
|---|---|---|
| Reclaimed pine | $0.75 | 15 min |
| Pressure‑treated lumber | $1.10 | 20 min |
| PVC lattice (budget) | $0.60 | 10 min |
You’ll stay under budget, finish in an afternoon, and enjoy a private, rustic backdrop.
Stack Pallet Boards With Hidden Storage Compartments
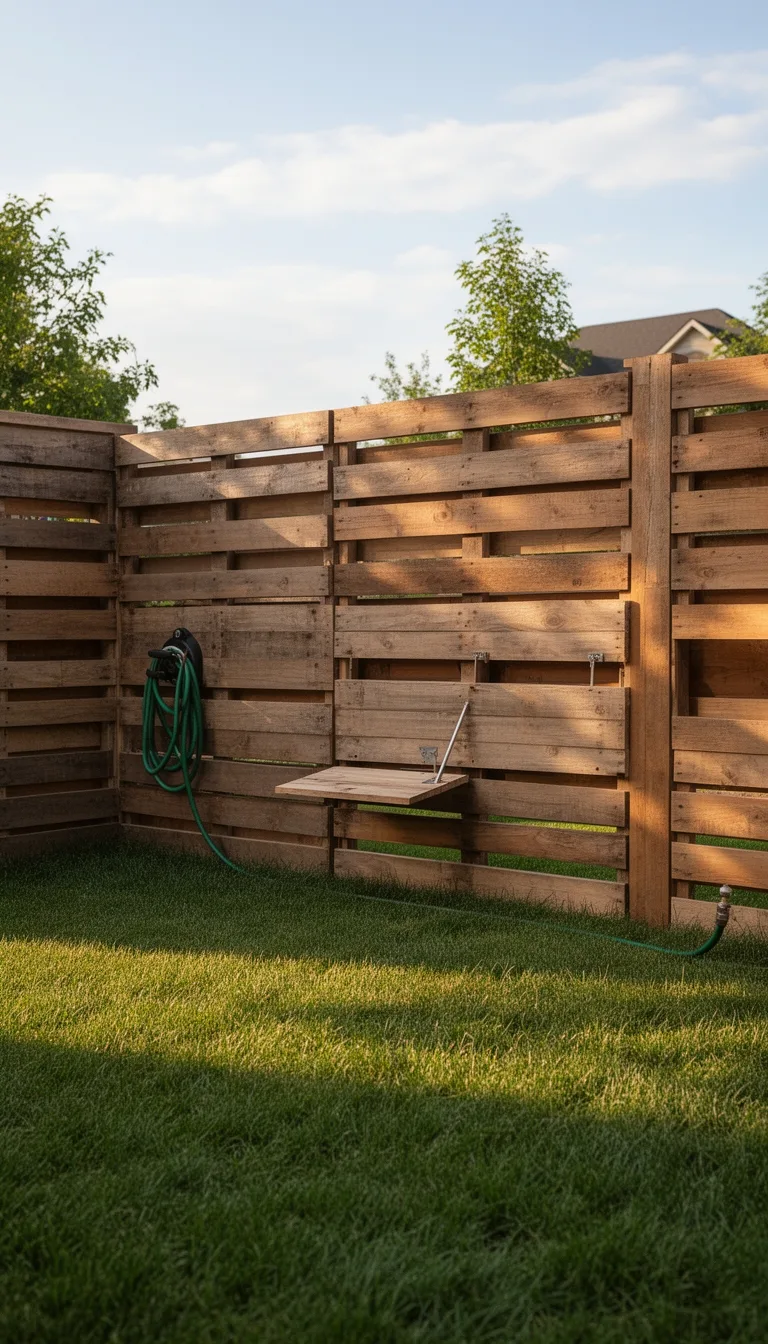
By stacking pallet boards and integrating hidden storage compartments, you can turn a simple fence into a functional, space‑saving feature without breaking the bank.
First, measure your fence length and decide how many layers you need for strength; two to three layers usually suffice. Cut each board to the same height, then notch the back of every second board to create a shallow cavity.
Secure the boards with screws or nails, leaving the notches aligned to form continuous storage slots. Slide a thin plywood liner into each cavity to keep items from falling out.
Use the compartments for garden tools, toys, or seasonal décor. Finish with a coat of weather‑proof paint or stain to protect the wood and match your yard’s aesthetic.
Attach Hanging Planters to the Pallet Fence for a Green‑Thumb Look

Your hidden‑storage fence already offers sturdy layers, so adding hanging planters is a natural next step to bring life and color to the same structure.
Pick lightweight fabric or metal pots that slip onto the pallet’s slats; they cost under $5 each and need no drilling. Use zip ties, old rope, or reclaimed chain to secure the pots, spacing them 12‑18 inches apart for balance.
Fill each with a fast‑growing herb, succulent, or trailing vine—plants that thrive in partial shade and need minimal watering. To keep soil from spilling, line the bottom with a plastic bag or old newspaper.
Rotate the planters seasonally, swapping out wilted foliage for fresh seedlings, and watch your fence transform into a vibrant, budget‑friendly garden wall.
Add Solar‑Powered LED Strips to the Pallet Fence for Night Ambiance
Typically, you can turn your pallet fence into a low‑cost night‑time showcase by attaching solar‑powered LED strips. Choose a flexible strip that fits the pallet’s length, and mount it with adhesive backing or zip ties. Position the solar panel where it catches sunlight all day, then run the thin wire discreetly along the fence.
The LEDs automatically turn on at dusk, casting a warm glow that highlights your DIY fence without a utility bill.
Quick setup steps
- Measure and cut the strip to match each pallet board.
- Secure the strip with weather‑proof clips or double‑sided tape.
- Connect the strip to a small solar panel and a rechargeable battery pack hidden behind the fence.
You’ll get an inviting ambience, extra visual interest, and a sustainable lighting solution—all for under $30.
Build a Slatted “Shadow Box” Pallet Fence for Modern Style
If you want a sleek, modern look that still lets light filter through, create a slatted “shadow box” pallet fence by spacing narrow wooden strips between the pallet boards.
Start by dismantling a cheap pallet, keeping the long side boards intact. Cut 1‑inch strips to the fence height and sand them smooth. Lay the strips on a workbench, then attach them to the pallet sides with 1‑inch wood screws, leaving a ½‑inch gap between each strip. Use a drill with a depth‑stop to avoid splitting the wood.
Once assembled, stand the panels on concrete blocks or simple metal posts for stability. Paint or stain in a neutral tone for a cohesive look, and you’ll have a stylish, low‑cost fence that adds privacy without blocking daylight.
Build a Decorative Picket‑Style Pallet Fence From Reclaimed Boards
After the sleek shadow‑box design, you can add a classic charm by turning reclaimed pallet boards into a decorative picket fence.
First, strip the pallets, sand rough edges, and cut each board to a uniform 4‑inch height.
Then, paint or stain in a pastel hue that matches your garden palette.
Finally, attach the pickets to a simple frame using galvanized nails, spacing them 2‑3 inches apart for that iconic “pick‑et” look.
- Prep & Cut – Remove nails, sand, and trim to size.
- Color & Finish – Apply budget‑friendly paint or stain.
- Assemble – Nail pickets to a sturdy frame, keeping even gaps.
You’ll achieve a timeless fence for under $50, boosting curb appeal without breaking the bank.
Install a Single‑Palet Gate for Easy Access
Swing a single‑pallet gate into place to keep your garden accessible without breaking the bank.
First, measure the opening and cut a sturdy pallet to fit, leaving a few inches for hinges. Sand rough edges, then attach two heavy‑duty hinges on one side, aligning the gate with the fence posts.
Use a simple latch—either a metal hasp or a rope‑loop—so you can close it quickly. If the gate sags, add a diagonal brace made from a leftover pallet slat.
Paint or stain the wood to match the fence and protect it from weather. This DIY gate costs under $20 in materials, takes an hour to assemble, and gives you convenient, low‑maintenance access to your backyard.
Combine Pallet Fence Panels With Wire Mesh for Pet‑Safe Enclosures
You can upgrade that single‑pallet gate into a pet‑safe enclosure by bolting a sheet of wire mesh to the pallet panels, creating a sturdy, breathable barrier that keeps dogs and cats inside while letting fresh air circulate.
Choose galvanized mesh for rust resistance, then cut it to match the pallet height.
Secure the mesh with stainless‑steel staples or self‑tapping screws, spacing fasteners every 6 in. to prevent sagging.
Add a low‑profile frame of 2×4s to keep the mesh taut and to simplify future repairs.
- Measure and cut mesh to pallet dimensions.
- Staple or screw mesh onto pallets, using 6‑inch intervals.
- Frame edges with 2×4s for extra rigidity.
This approach stays under $50, looks tidy, and protects your pets while you enjoy the backyard.
Design a Multi‑Level Pallet Fence With Seating Nooks
Create a multi‑level pallet fence with built‑in seating nooks by stacking reclaimed pallets in staggered tiers and cutting shallow recesses for benches.
First, measure your yard’s width and decide how many tiers you need—two to three works well for visual depth and usable seats.
Lay pallets flat, then secure each tier with long deck screws and corner brackets; stagger joints to keep the structure sturdy.
Mark bench dimensions, then use a circular saw to carve 6‑inch‑deep notches at eye level.
Sand rough edges, attach a simple wooden backrest, and add a few outdoor cushions for comfort.
Finish with a quick coat of low‑cost paint or stain to match your garden décor, keeping the project under budget while adding functional charm.
Apply Weather‑Resistant Sealant for Long‑Lasting Durability
Even if the fence sees rain, sun, and wind daily, a good weather‑resistant sealant will keep the wood from rotting and the paint from peeling.
Start by cleaning the pallet surface—scrub off dust and let it dry. Choose a water‑based sealant; it’s cheap, low‑odor, and easy to apply.
Use a brush or roller for even coverage, and let each coat cure before the next.
This simple step dramatically extends lifespan while maintaining a fresh look.
- Prep – sand, wipe, and dry the wood.
- Apply – spread sealant in thin, uniform layers.
- Protect – re‑coat annually or after harsh weather.
You’ll get a durable, budget‑friendly fence that stays beautiful year after year.
Conclusion
You’ve got a backyard fence that looks great, costs next, and does exactly what you need—privacy, pet safety, storage, or a cozy seat. By repurposing pallets, adding a few simple touches like paint, lattice, or mesh, and sealing everything for the weather, you’ve turned a cheap material into a durable, stylish solution. Keep it low‑maintenance, enjoy the extra space, and feel good knowing you nailed the project without breaking the bank.
The Only Tools You Need for a Thriving Garden 🌱
Whether you're a weekend gardener or growing daily — these hand-picked tools make every session faster, easier, and more satisfying.