You’ll transform your small yard by anchoring your layout to human scale and strategic circulation. Start with a single focal point—a Japanese maple or arbor—positioned near your main entry to direct foot traffic. Layer vegetation tall-to-short for depth, then deploy vertical growing systems like wall planters and trellises to maximize every inch. Use secondary paths around 750–900 mm wide, install durable stone pavers for sitting areas, and choose native, drought-tolerant plants requiring minimal upkeep. The right design strategy unlocks surprising possibilities in tight quarters.
Key Takeaways
- Use vertical growing systems like trellises, wall planters, and hanging containers to maximize growing space without consuming floor area.
- Apply the rule of thirds and anchor a single focal point to create visual depth and direct movement efficiently.
- Choose dwarf and compact plant varieties that require minimal pruning, water, and fertilizer while yielding faster harvests.
- Position space-saving furniture against walls and use round chairs or angled pieces to improve circulation and flow.
- Layer vegetation from tall to short and use tiered planters to increase planting density up to 50%.
Assess Your Space Before You Plant

Before you break ground on your garden, you’ll want to thoroughly evaluate your outdoor space to understand how it’ll support your plants and hardscaping.
Start by observing drainage patterns—note where puddles form after rain and how quickly water disperses.
Test your soil by squeezing a sample; sandy soil falls apart, loam crumbles, and clay holds together.
Look for organic components like decomposing plant material and visible fungi, which indicate healthy soil.
Assess water access and existing irrigation systems.
Document sunlight exposure, wind direction, and humidity levels throughout the year.
Take dimensional measurements and create simple drawings of your garden areas.
Consider sight lines and foot traffic patterns.
This baseline data ensures your layout works with your site’s natural conditions rather than against them.
Understand Scale and Proportion for Small Spaces

Once you’ve mapped your site’s conditions, you’re ready to think strategically about how every element—plant, pathway, and structure—relates to your space and to each other.
Scale and proportion determine whether your garden feels harmonious or cramped.
Start by grounding everything in human scale.
Layer plants from tall to short, creating depth without overwhelming your space.
Size hardscapes proportionally: patios should accommodate entertaining without excess room, while pathways wide enough for two people maintain intimacy.
Echo your home’s architectural style through garden elements.
Modern homes pair with minimalist designs; rustic homes suit organic shapes.
Use the rule of thirds—relating spaces in 1:3 or 2:3 ratios—for balanced composition.
This strategic approach prevents discord and creates cohesive, inviting small gardens.
Map Circulation Paths for Easy Movement

How you move through your garden determines whether it feels spacious and inviting or cluttered and confusing.
Start by identifying your primary access points—doors, gates, driveways—then plan your main paths to connect these to key features like patios or pools.
Make primary paths 1200mm wide for two-person comfort; narrower single-person paths work for secondary areas at 750-900mm.
Use durable materials like stone or pavers for high-traffic routes, reserving gravel or mulch for lesser-used spaces. Cross-fall drainage of 1:100–1:50 ensures safe water runoff without creating excessive slope on these surfaces.
Curved paths feel natural and encourage exploration, while straight paths provide direct, utilitarian access.
Consider adding gentle curves or lengthwise banding to enhance perceived length.
Strategic niches with benches create discovery points that make movement feel purposeful.
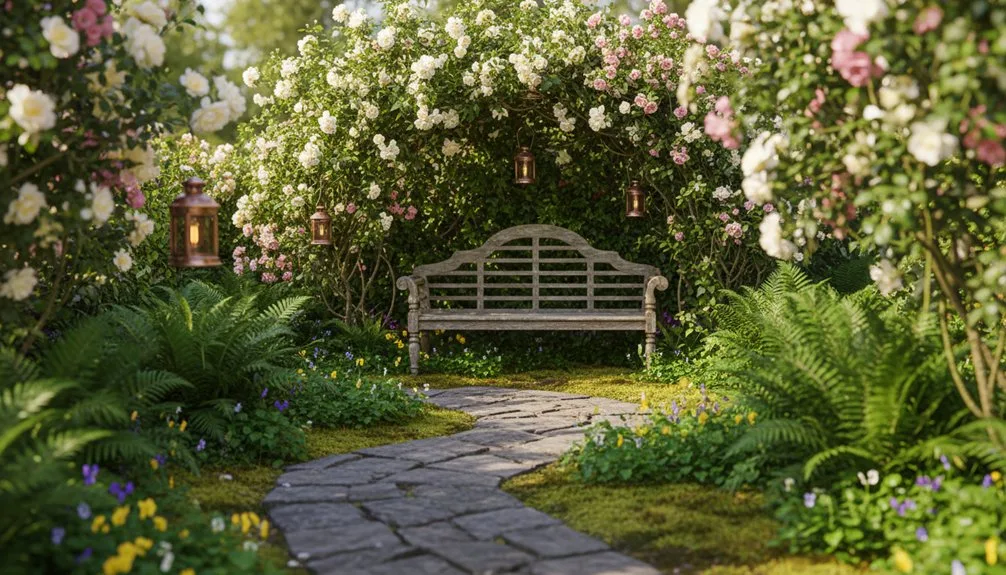
Get a Focal Point to Ground Your Design
While circulation paths organize how you move through your garden, a strong focal point anchors the entire design and gives visitors a reason to move at all.
In small spaces, you’ll want to choose one primary focal point rather than multiple competing elements.
Consider what naturally draws attention: a sculptural plant like Japanese maple, a water feature such as a birdbath, or architectural elements like an arbor framing a view.
Position your focal point where it’s visible from your main entry or seating area to maximize its impact.
Strategically placed focal points direct foot traffic and create visual order, making compact gardens feel intentional and cohesive.
This single anchor transforms your small space into a purposeful, inviting retreat.
Start With Vertical Growing Systems
Now that you’ve anchored your garden with a compelling focal point, it’s time to multiply your planting potential without expanding your footprint.
Vertical growing systems transform confined spaces into productive gardens by utilizing walls, fences, and railings.
Two Green Stalk planters occupy just 2 square feet while supporting vining crops like cucumbers, tomatoes, and squash.
Vertical structures offer practical advantages beyond space efficiency.
They improve air circulation, reducing pest and disease issues while elevating plants away from ground contamination.
You’ll minimize back strain during watering and harvesting—particularly beneficial if you have mobility limitations.
Vertical gardening maximizes yields through espalier techniques and strategic plant placement, allowing you to grow more food without increasing maintenance demands or garden footprint.
Build Trellises for Climbing Plants
When you’re ready to train vining crops upward, you’ll find that building a sturdy trellis doesn’t require specialized skills or expensive materials. You can construct several effective designs on a tight budget:
- Remesh Panel Trellis – Secure wire concrete panels to tall stakes with zip ties for under $20, leaving 1-2 feet of stake below ground for stability.
- Wood Frame Trellis – Connect 2×2 lumber pieces with decking screws and L-brackets, then attach remesh panels using cabinet screws every foot along the perimeter.
- Wire Wall Trellis – Mark anchor points with painter’s tape, drill holes for plastic anchors, and install screw eye hooks for wire attachment with aluminum ferrule loops.
- Low-Cost Stakes – Use tree branches or rebar pounded into ground, securing them with twine or zip ties for minimal expense.
Install Wall Planters for Living Walls
After mastering vertical trellises, you’ll find that living walls take your small-space garden to the next level by transforming bare walls into lush, productive growing surfaces.
Start by assessing your wall’s sunlight exposure, stability, and water access.
You’ll need to install brackets spaced 12-18 inches apart, using at least two screws per bracket on top holes for security.
Level your first bracket to prevent misalignment downstream.
Select modular planters—Florafelt panels, PlantBox systems, or eco planters—based on your plants’ mature sizes.
Mount pots by sliding flat hooks into bracket slots for easy removal during maintenance.
For irrigation, run 1/4-inch micro tubing to all pots with drip lines positioned near plant crowns.
Use 4-inch potted plants for instant results, arranging trailing varieties to cascade and upright plants for vertical growth.
Hang Planters to Grow Herbs Without Floor Space
You’ll maximize your small garden’s potential by hanging planters directly from walls, ceilings, or sturdy rods—transforming unused vertical real estate into a thriving herb garden.
This approach eliminates the need for floor space while providing fresh herbs at your fingertips. Position hanging planters near kitchen windows for convenient access during cooking. Here’s what you’ll need to know:
- Install secure ceiling hooks or wall brackets rated for planter weight
- Choose compact herbs like basil, mint, rosemary, and thyme
- Position planters at accessible heights for easy watering
- Ensure adequate lighting based on each herb’s requirements
You’ll preserve valuable counter and floor space while cultivating a productive garden. Hanging arrangements also protect herbs from ground-level pests like slugs and snails, promoting healthier growth in confined quarters.
Choose the Right Container Garden Setup
Container gardening forms the foundation of any successful small-space garden, building on the vertical growing methods you’ve already explored.
You’ll want to select containers sized appropriately for your plants—tomatoes need 5- to 10-gallon pots, while most vegetables require at least 12 inches of soil depth.
Herbs thrive in smaller containers.
Choose food-grade plastic for lightweight, affordable options, or explore creative alternatives like upcycled wagons, buckets, and bathtubs.
Whatever material you select, ensure it has drainage holes to prevent waterlogging.
Fill your containers with soilless potting mix rather than yard soil, which harbors pests and diseases.
Add compost and organic fertilizer for optimal nutrition.
Position containers in spots receiving 6-8 hours of daily sunlight with convenient water access, making maintenance straightforward.
Pick Dwarf Plants for Tight Spaces
How can you maximize planting variety without overwhelming your compact garden?
Dwarf plants are your solution. These specially bred varieties remain proportionally smaller than their standard counterparts, allowing you to cultivate multiple species without spatial dominance.
You’ll benefit from several advantages:
- Reduced maintenance — fewer leaves to clean and less pruning required
- Lower resource consumption — dwarf varieties need minimal water and fertilizer
- Faster production — dwarf fruit trees yield crops sooner than standard types
- Design flexibility — they work equally well in containers, borders, and ground covers
Before purchasing, verify labels for descriptors like “compact” to accurately predict final sizes.
Dwarf fruit trees typically require stake support due to weak grafting rootstocks. Consult nursery staff about fruit quality, as dwarf varieties may differ from standard counterparts.
Use Succulents and Topiary for Texture
When you’re working with minimal garden space, texture becomes your most powerful design tool.
You’ll find that succulents and topiary create striking visual interest without demanding much room.
Combine structured topiary shapes with Echeveria’s powdery rosettes and Sedum’s fleshy leaves for dimensional contrast.
Layer varied heights using tiered planters, or cascade trailing varieties like String of Pearls in hanging baskets.
Vertical wall displays maximize space while showcasing compact growth habits.
You’ll appreciate that these plants thrive on neglect.
They’re drought-tolerant and slow-growing, preventing overcrowding in your textured arrangements.
Well-draining soil mixes with pebbles maintain fresh surfaces year-round while requiring minimal intervention.
Use repurposed containers and gravel bases to enhance tactile elements.
This combination transforms tight spaces into sophisticated, low-maintenance gardens with substantial visual impact.
Choose Native Plants to Reduce Garden Upkeep
Why struggle with thirsty, demanding plants when native species thrive naturally in your local climate?
Native plants are naturally adapted to your region’s conditions, requiring minimal maintenance once established.
You’ll enjoy significant practical benefits:
- Reduced watering needs – Deep root systems lower water bills and decrease maintenance time
- Minimal chemical inputs – Hardy native plants resist local pests and diseases without pesticides or fertilizers
- Erosion prevention – Strong root systems hold soil in place during heavy rains
- Wildlife support – Native plants provide essential food and shelter for birds, butterflies, and pollinators
In small spaces, native plants maximize efficiency.
They grow naturally without constant attention, freeing you from mowing, fertilizing, and pest management.
You’ll create a thriving garden that sustains itself while supporting local ecosystems.
Native plants transform your small garden into a low-maintenance, environmentally beneficial landscape.
Create Layers With Tiered Planting
While native plants handle themselves beautifully with minimal fuss, you’ll unlock even more potential in your small garden by stacking plants vertically. Tiered planting lets you accommodate up to 50% more plants in a 200-square-foot yard without expanding your footprint.
Position taller plants on upper levels where they’ll thrive in full sun—think sunflowers and lavender.
Place shade-tolerant varieties like hostas below, creating distinct microclimates that enhance biodiversity. This layering prevents competition and promotes healthier growth.
Use raised beds, containers, or stackable planters to build your tiers.
Ensure each level has at least 4 feet of width for access.
Set up irrigation to handle varying watering needs across levels, since upper tiers dry faster than lower ones.
This approach transforms unusable slopes and tight spaces into productive growing zones.
Arrange Furniture to Define Garden Zones
How you arrange furniture in a small garden dramatically impacts how the space functions and feels. Strategic placement creates distinct zones without overcrowding your garden.
Consider these arrangement techniques:
- Wall-adjacent seating frees your central space for movement and visual openness
- Angled furniture placement maximizes corner areas that’d otherwise sit unused
- Outdoor rugs visually define lounging or dining zones with clear boundaries
- Planters as dividers subtly separate functional areas without consuming precious square footage
Choose slim-profile pieces with tapered legs to maintain an airy feel. Round chairs enhance flow in tight quarters better than angular designs.
Nesting tables adapt to various configurations, letting you reconfigure your layout seasonally. This thoughtful furniture arrangement transforms cramped gardens into multifunctional outdoor rooms where each zone serves a distinct purpose.
Try the Keyhole Garden Layout for Easy Access
When you’re working with minimal space, the keyhole garden offers an ingenious solution that combines growing beds with integrated composting.
This circular raised bed features a central compost basket with a radial access path resembling a keyhole from above, typically measuring six feet in diameter.
The soil slopes gently outward from the basket, allowing nutrients to distribute as you water.
You’ll reach every plant comfortably without crouching, thanks to the wide central pathway.
The design adapts to rectangular or square shapes for urban settings and adjusts from ground level to hip height based on your needs.
You’ll maximize yields in your compact footprint while maintaining on-site nutrition through continuous decomposition, eliminating separate compost space requirements.
Use Mini Pots on Wall Shelving
As your floor space fills up, vertical gardening on wall shelving becomes your best strategy for expanding your growing area without sacrificing precious square footage.
You’ll transform bare walls into productive growing zones that elevate plants above ground-level pests while improving your home’s air quality and aesthetics.
Wall-mounted mini pots work exceptionally well for:
- Herbs, salad leaves, and strawberries in 15-centimeter-deep pockets
- Ornamental plants and flowers that add visual interest
- Fresh herb positioning near kitchens for cooking convenience
- Privacy screening along neighboring property lines
You’ll need to water daily since shallow soil dries quickly, though drip irrigation systems reduce this burden.
Install balanced liquid fertilizer weekly to compensate for limited soil volume.
Extended-spout watering cans make reaching higher pots manageable and straightforward.
Maximize Driveway Edges With Low Plantings
Your driveway’s edges offer prime real estate for transforming your outdoor space without consuming valuable planting area. Low plantings strategically positioned along driveways soften harsh lines while maintaining clear sightlines for safety. Layer ornamental grasses with evergreen shrubs to create visual depth and texture. Groundcovers like succulents or creeping herbs prevent mulch spillover and add functionality. Pebble borders seamlessly blend with gravel driveways, enhancing curb appeal.
| Planting Type | Benefits |
|---|---|
| Evergreen Shrubs | Year-round foliage, minimal pruning |
| Ornamental Grasses | Texture, visual interest, layered appearance |
| Low Groundcovers | Structure, drought tolerance, edging definition |
| Culinary Herbs | Functionality, seasonal visual appeal |
Proper spacing ensures healthy growth and air circulation. This approach maximizes your driveway’s design potential while keeping maintenance manageable.
Add Permeable Pavers to High-Traffic Areas
Because traditional hardscaping creates impermeable surfaces that trap water and generate runoff, permeable pavers offer a smarter alternative for driveways and walkways in compact gardens.
You’ll transform high-traffic areas while managing stormwater on-site effectively.
When you install permeable pavers, you gain multiple advantages:
- Rapid drainage: Water infiltrates at rates up to 38.5 inches per square foot per hour, clearing surfaces within minutes after storms
- Heavy-load capacity: Compressive strength exceeding 17,000 psi handles vehicles and emergency access without rutting
- Enhanced safety: Quick water absorption eliminates hydroplaning hazards and ice formation in freezing conditions
- Environmental impact: Filtered rainwater recharges groundwater while reducing urban heat island effects by up to 7°F
You’ll also lower maintenance costs and comply with stormwater regulations while maximizing functionality in your small garden space.
Install Stone Pavers for Sitting Areas
Stone pavers create durable, attractive sitting areas that’ll transform your compact garden into a functional outdoor retreat. You’ll start by marking your perimeter with stakes and mason’s line, then excavate 6 inches beyond for edging space. Spread 4-6 inches of compacted gravel as your base layer, maintaining a 1-inch slope per 8 feet for proper drainage. After compacting, add 1 inch of leveled sand using screed pipes and a 2×4 board for consistency.
| Step | Material | Depth |
|---|---|---|
| Base | Gravel/crushed stone | 4-6 inches |
| Bedding | Paver sand | 1 inch |
| Surface | Stone pavers | Variable |
Lay pavers in your chosen pattern, leaving 1/4-inch gaps. Install edging restraints every foot, then compact everything with a plate compactor. Sweep polymeric sand into joints and fill exposed edges with excavated dirt.
Add a Pergola to Frame Garden Views
How can you maximize a compact garden’s visual appeal while creating functional shade? A pergola strategically frames your outdoor space, transforming it into a defined focal point while maintaining an open feel.
Consider these options for your small garden:
- Corner pergolas with benches create intimate retreats without consuming yard space
- Cantilever designs use minimal posts, keeping your patio visually uncluttered
- Climbing vines and trailing plants soften the structure while providing natural shade
- Open rafter designs filter light over dining areas, connecting indoor and outdoor spaces
Choose aluminum or lightweight materials for compact areas.
Pair your pergola with raised patio seating to elevate views for al fresco meals.
String lights add evening ambience, transforming your garden into a welcoming retreat that maximizes every square foot.
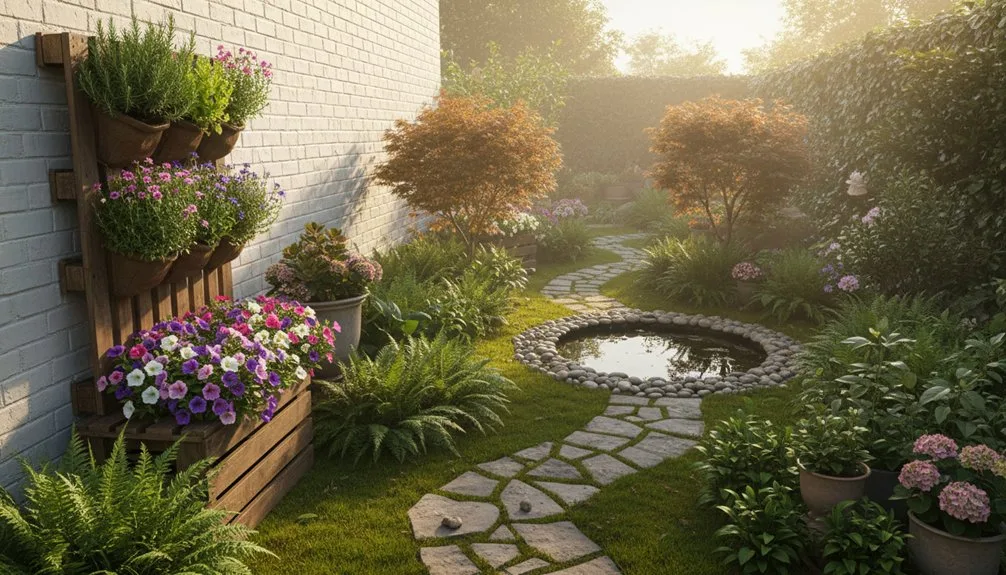
Position Pathways to Guide Movement
While pergolas create visual structure overhead, thoughtfully positioned pathways direct how visitors actually move through your compact garden.
Curved or meandering paths create far more interest than straight lines, making your space feel larger while enticing exploration.
You’ll want primary pathways wide enough for two people walking together—typically three to four feet—while narrower secondary routes work perfectly for accessing garden sheds or side yards.
Strategic pathway placement also protects your delicate plantings.
Designated routes concentrate foot traffic away from fragile shade-loving perennials like hostas and ferns, preventing soil compaction and trampling.
Different materials mark transitions between distinct garden areas, effectively breaking your small space into separate rooms.
Stepping stones minimize ground impact while defining clear boundaries that naturally discourage visitors from wandering into planted beds.
Implement the Less-Is-More Design Approach
Because small gardens demand intentional choices, you’ll want to strip away unnecessary elements and focus on what truly matters.
This approach maximizes enjoyment while minimizing maintenance.
Start by allocating your space strategically:
- Reserve approximately one-third for garden features and two-thirds for open areas like lawns or patios
- Select bold focal points—a sculptural fountain or urn—visible from multiple vantage points
- Limit your plant palette to reduce visual clutter and emphasize texture over color variety
- Group smaller decorative items rather than scattering individual pieces throughout
Conclusion
You’ve got all the tools you need to transform your small garden into a thriving oasis. By layering vertical systems, strategic pathways, and thoughtful focal points, you’ll make every square inch count. Remember, your compact space isn’t a limitation—it’s actually a golden opportunity to create an intimate, manageable garden that you’ll genuinely enjoy maintaining and spending time in.
The Only Tools You Need for a Thriving Garden 🌱
Whether you're a weekend gardener or growing daily — these hand-picked tools make every session faster, easier, and more satisfying.