You’ll triple your cut flower production by orienting beds north-to-south, spacing plants densely at 7-by-7 inches, and layering containers vertically. Build 3-foot-wide beds with 18-inch walking paths to maximize reach while maintaining workspace. Position tall plants at the north end so shadows fall backward, protecting delicate varieties from afternoon scorch. Mix perennials like coreopsis and peonies with quick-maturing zinnias and cosmos for continuous harvests. Mount planters on fences using terra-cotta clips to reclaim ground space. Stagger plantings every 2–3 weeks for rolling blooms through fall frost. There’s strategic depth to every dimension that’ll transform your output.
Key Takeaways
- Align beds north-to-south with 3-ft width and 18-in paths to maximize sunlight while keeping centers reachable.
- Stack perennials (coreopsis, peonies) with succession-planted fast annuals (zinnias, cosmos) every 2-3 weeks for continuous blooms.
- Use vertical trellising and layered containers to triple output in confined spaces while improving airflow and reducing disease.
- Install 7-in × 7-in spacing grids via landscape fabric to suppress weeds, reduce fungal risk, and increase density production.
- Mount hanging planters on fences and walls using low-cost terra-cotta clips and metal pot hangers without permanent modifications.
Assess Your Garden’s Sunlight and Terrain First

Before you plant a single stem, you’ll need to evaluate two critical factors: how much direct sunlight your garden receives and whether water drains properly from your soil.
Track your garden’s sunlight over a full day, noting intensity peaks between 10 a.m. and 4 p.m.
Most cut flowers thrive in full sun—at least 6 hours of direct daily light. Vegetables perform best with 8 hours.
Morning sun suits shade-tolerant varieties, while afternoon exposure risks scorching delicate plants.
For drainage, observe how water behaves after rain.
Cut flowers demand well-draining soil; waterlogged conditions cause root rot.
Sloped terrain naturally aids runoff, but flat, low spots risk pooling.
If your garden sits on clay-heavy soil or compacted ground, consider raised beds to mitigate poor drainage issues. Compost or leaf mulch incorporated into the top several inches will improve soil texture and transform poor earth into fertile growing medium over time.
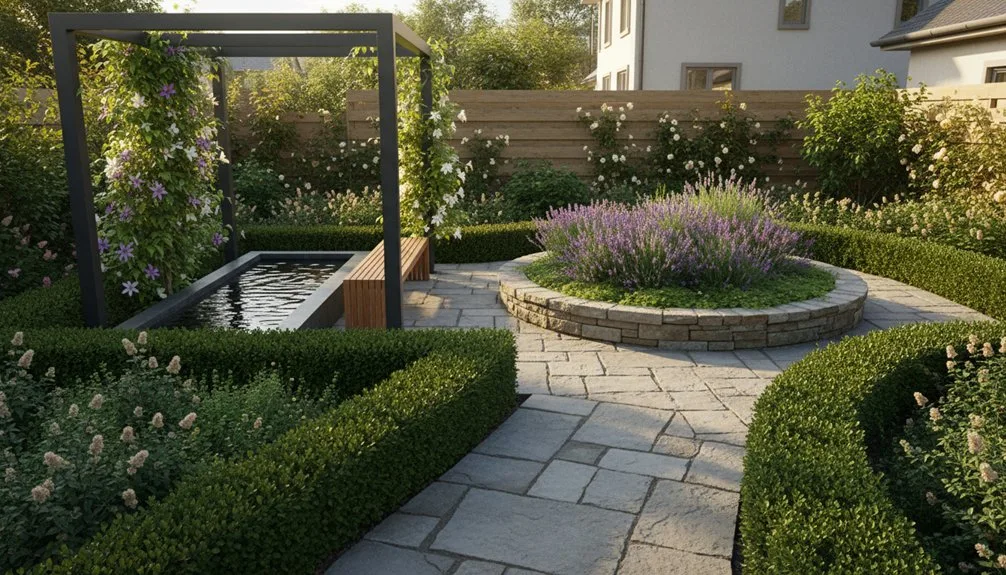
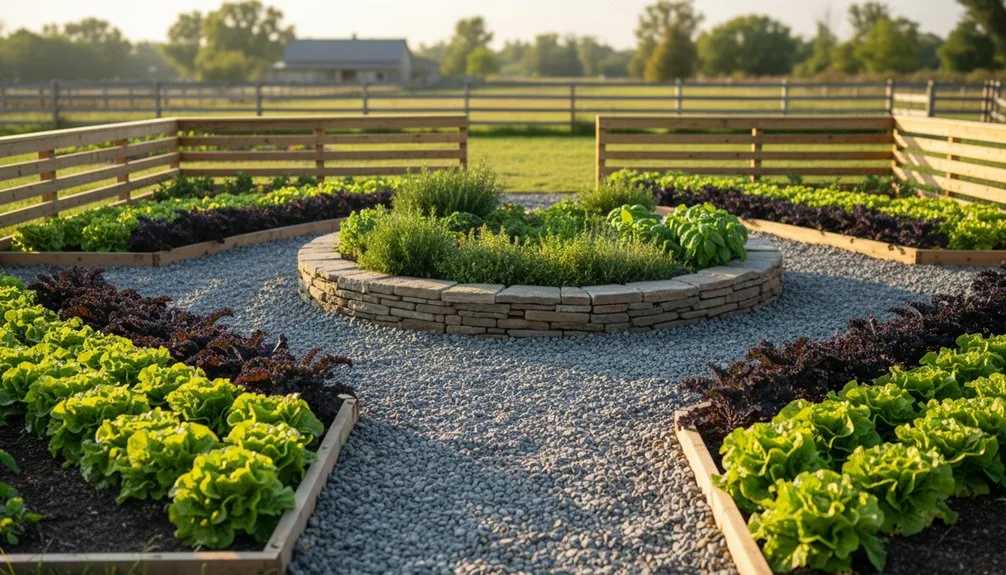
Orient Beds North-to-South for Even Winter Sun

Once you’ve mapped your garden’s sunlight patterns and confirmed adequate drainage, you’ll want to orient your beds strategically to maximize that light exposure.
North-to-south bed alignment gives you the best light balance across all your growing areas.
This orientation prevents taller plants from casting shadows on adjacent beds throughout the day, ensuring even sun distribution that keeps every bed equally productive.
Position your tall plants—like trellised cucumbers or sunflowers—at your garden’s north end so shadows fall backward, away from your other beds.
This placement protects southern plants from shade while maximizing your usable growing space. However, it’s worth noting that orientation choice does not affect overall garden productivity in most home settings.
For cut flowers specifically, north-to-south beds let you harvest from both sides without shading restrictions, producing higher-quality stems with better development and consistent sunlight access.
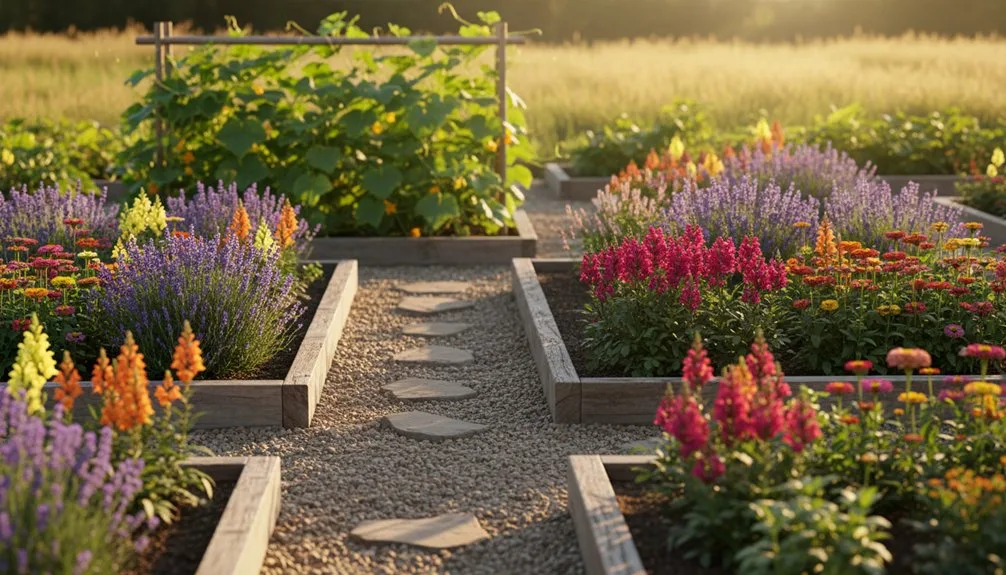
Build 3-Foot Beds With 18-Inch Walking Paths

How you dimension your beds directly impacts your harvest efficiency and physical comfort during peak season.
A 3-foot bed width maximizes production while keeping the center easily accessible without strain.
Pair this with 18-inch pathways to balance planting density with functional workspace.
This combination offers you:
- Reduced soil needs: You’ll fill just 8-12 inches deep, lowering material costs
- Easy reach: Access the bed’s center from either side without overextending
- Optimal density: Narrow paths increase growing area in limited gardens while maintaining workflow
The 3-foot-by-18-inch formula proves ideal for intensive cut flower operations.
You’ll minimize back strain during peak harvest periods while maintaining efficient tool access and bucket placement between beds. Consistent row spacing ensures uniform irrigation and reduces uneven water pooling across your planting area.
Give Plants Breathing Room: 7-by-7-Inch Spacing
While 7-by-7-inch spacing might seem cramped compared to traditional landscape plantings, it’s actually the sweet spot for intensive cut flower production—you’ll pack significantly more stems into your beds without sacrificing plant health or workflow efficiency.
This grid-based approach triples production compared to traditional row spacing, generating substantially more flower stems per linear foot than wider intervals like 9×9 inches.
You’ll benefit from improved disease prevention too. Dense foliage naturally suppresses weeds by blocking sunlight from reaching soil, while reduced bare soil exposure lowers moisture levels that promote fungal issues. Landscape fabric with burned-in holes matching your spacing grid further enhances durability and weed control throughout the growing season.
Single-stem varieties like lisianthus and Procut sunflowers thrive at this spacing, reaching harvest maturity quickly and enabling succession planting for continuous yield throughout your season.
Position Plants by Sun and Water Needs
Before you position a single plant, you’ll want to map your farm’s sun exposure throughout the day.
Observe how light moves across your garden from morning through evening, identifying full sun zones that receive 6-8 hours of direct sunlight.
Next, group your plants strategically:
- High-light annuals thrive in sunny corners with unobstructed southern exposure
- Shade-tolerant varieties occupy pockets near buildings and trees that stay cooler and retain moisture longer
- Low-water types cluster in drier microclimates near structures where evaporation accelerates
Align your beds north-to-south to maximize even sunlight distribution, especially in northern regions.
Consider wind patterns affecting water loss—south-to-north winds increase dryness significantly.
Narrow beds ensure consistent water access across your layout.
Conduct a soil test before finalizing bed placement to confirm pH and nutrient levels match your selected cut flower varieties.
This strategic positioning minimizes maintenance while maximizing your cut flower yield.
Group by Height to Prevent Shading
One of the most critical mistakes new cut flower farmers make is overcrowding plants without considering their mature heights.
You’ll prevent shading by arranging plants in a north-to-south height gradient, positioning your tallest varieties like Amaranth ‘Red Spike’ (48-60 inches) at the garden’s back or north side.
Place medium-height plants like Cosmos and Zinnias in the middle section, then position shorter varieties like Calendula (18-24 inches) at the front facing south.
This tiered arrangement ensures all plants receive adequate sunlight for even growth and optimal flowering.
You’ll maximize your bed’s productivity by using compact spacing that encourages vertical growth rather than lateral spread. Dense planting also limits weed emergence and reduces overall maintenance demands on your cutting garden.
For a 12×4 foot raised bed, orient it with tall plants north and short plants south for consistent light exposure throughout your garden.
Succession Plant Rows for Continuous Harvests
How’d you like to harvest fresh blooms from early summer straight through fall frost?
Succession planting divides your garden into manageable sections, each a complete cutting garden planted 2–3 weeks apart.
This staggered approach ensures continuous harvests without overwhelming your workload.
Here’s your practical framework:
- Plant in thirds: Divide your beds into three blocks, spacing plantings 6 weeks apart. Your first block establishes early summer color while you prepare subsequent sections.
- Time your successions: Zinnias planted early May bloom mid-July; mid-June plantings peak early August; mid-July plantings produce until frost.
- Rotate crops: When first successions tire, replant beds with fast-growing sunflowers for fall harvests or cut back plants hard to 6 inches for potential fourth flushes. Pulling beds and reseeding within days maintains continuous production after blooms fade.
Map 15–20 varieties using days-to-bloom data, adjusting successions based on your local frost dates for maximum production.
Plan Harvest Pathways for Peak Season Access
As your cut flower farm hits peak season, poorly planned pathways’ll crush plants, slow harvests, and waste valuable growing space. You’ll need strategically positioned access routes that balance density with workflow efficiency.
| Pathway Width | Best Use |
|---|---|
| 18-24 inches | Walking, bucket placement, weeding |
| 2.5 feet | Paired with 4-foot beds; divides field efficiently |
| 3+ feet | Equipment access, carts, U-pick events |
Position pathways every 4 feet within borders to prevent crushing plants during peak harvesting. Use stone, mulch, or cardboard for durable stepping surfaces. Ensure flat terrain for smooth labor operations. Size paths to accommodate your equipment—low tunnels, hoop benders, harvest carts. Maintain clear access to sheds and infrastructure. Orient shorter rows west-to-east for simplified peak-season picking. Replant spent beds as the season progresses to maintain continuous output without sacrificing the walkway infrastructure you’ve established. These practical dimensions transform chaos into organized, efficient harvesting.
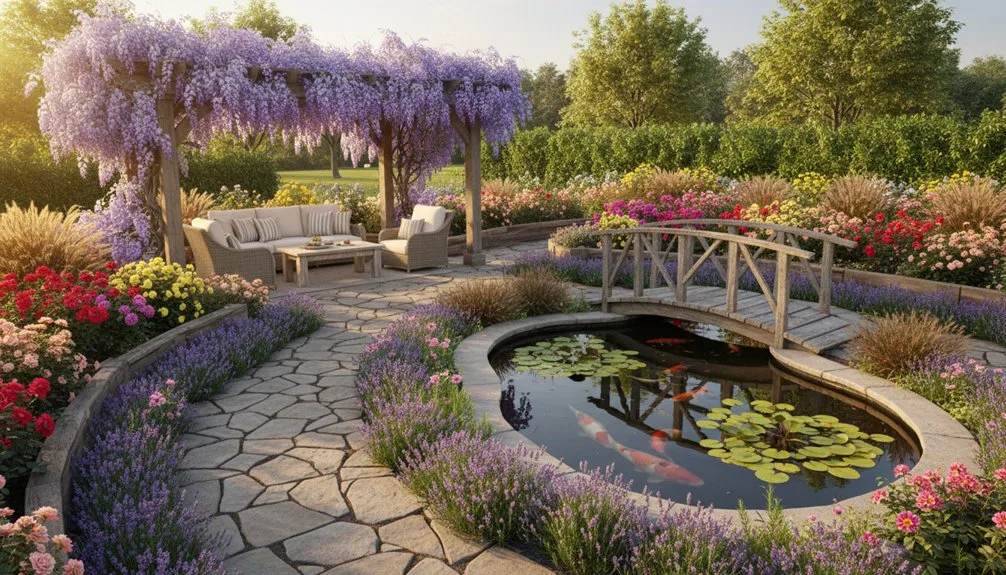
Grow Vertically to Multiply Growing Space
Your organized pathways create the foundation for what comes next: maximizing yield from every square foot by growing up instead of out.
Vertical trellising systems transform your layout’s productivity.
You’ll install trellis netting between sturdy stakes positioned every four feet, allowing vining crops like sweet peas to climb upward.
This approach fits 154 plants in a 45-foot row while conserving valuable ground space.
You can also employ horizontal netting stretched 18 inches above beds as your plants mature through it.
Consider these strategies:
- Space flowers intensively at six inches apart with four plants across to encourage competition and longer stems
- Install support infrastructure before plants grow tall to avoid retrofitting damage
- Raise netting gradually as your crops develop for continuous support
- Use buried plastic tubing with emitters spaced six inches apart to deliver water directly to the root zone beneath your vertical systems, ensuring even moisture distribution without interfering with your trellising infrastructure.
These techniques multiply your growing capacity without expanding your footprint.
Layer Containers by Height on Compact Plots
When you’ve maximized your vertical space with trellising systems, container layering offers the next productivity leap for compact plots.
Arrange taller plants like sunflowers or hibiscus in rear containers to prevent shading shorter blooms.
Position compact varieties such as French lavender in lower tiers for balanced aesthetics.
Elevate shorter pots on stands or bricks behind ground-level ones, creating visual depth while optimizing sunlight exposure.
Orient your layered setups north-to-south for even light distribution.
Use stakes and string lines to align container rows straight, eliminating wasted space.
You can employ the 3-4-5 triangle method for precise right-angle starts in layered layouts.
This strategic arrangement doubles or triples production in confined areas while maintaining healthy airflow between plants. Ensure adequate drainage holes in each container to prevent waterlogging and support optimal growing conditions across your tiered layout.
Mount Planters on Fences and Walls
Once you’ve layered containers on compact ground plots, mounting planters on fences and walls unlocks another dimension of vertical productivity.
You’ll maximize your cut flower farm’s output by utilizing fence space efficiently. Metal brackets and terra-cotta clips offer affordable solutions:
- Metal pot hangers ($3 each) secure 8-inch pots on fence gates, positioned 1 foot from edges to prevent interference
- Terra-cotta clips ($1 each) grip pot lips without drilling, ideal for wooden fences and trees
- Spacing strategy involves mounting planters every few feet along fence sections, flanking gates with paired hangers for balance
Install brackets at consistent heights using fence rails as alignment guides. Pre-fill 8-inch pots with moistened soil before hanging.
This approach frees ground space while creating welcoming entrances around gates and side porches. You’ll complete installations in minutes using basic tools, scaling your operation without permanent modifications to your property.
Mix Perennials With Quick-Maturing Annuals
While vertical mounting systems expand your growing footprint, strategic planting combinations multiply your harvests throughout the season.
You’ll establish perennials like Coreopsis and Peonies as your backbone, then interplant quick-maturing annuals like Zinnias and Cosmos to fill seasonal gaps.
This layered approach keeps bouquets flowing continuously.
Space perennials wider and underplant with fast annuals to maximize yield in compact areas.
Tall Peonies pair beautifully with mid-height annual Sunflowers, while drought-tolerant Yarrow complements low-water annuals for efficient gardens.
Direct-sow annual seeds around established perennials for rapid fill-in.
Succession plant Cosmos near late-blooming Asters for fall extension.
Deadhead consistently to promote continuous blooming across your mixed beds, ensuring steady harvests without replanting.
Scale Your Garden to Fit Your Maintenance Capacity
Your garden’s success hinges on matching its size to the time and energy you can realistically invest.
Overextending yourself leads to neglected beds and poor harvests, so start conservatively and expand strategically.
Consider these maintenance realities:
- Weekly tasks: deadheading, watering, and harvesting demand consistent effort across all planted beds
- Seasonal demands: succession planting and turnover require planning during peak growing periods
- Physical accessibility: narrow paths and bed dimensions must accommodate your mobility and reach capabilities
A 3’x10′ bed producing one weekly bouquet uses 300 square feet and represents a manageable starting point.
You’ll build skills and understand your actual capacity before scaling up.
Prioritize intensive productivity over ambitious acreage, ensuring you can deliver quality flowers throughout the season without burnout.
Conclusion
You’ll maximize your small garden’s potential by implementing these strategic layouts. Research shows that gardeners who use vertical growing methods increase their yield by up to 40% in limited spaces. You can grow stunning cut flowers year-round by positioning beds for optimal sunlight, spacing plants properly, and layering containers strategically. Start with what you can maintain, then scale up as you develop your routine. Your compact garden’s productivity will surprise you.
The Only Tools You Need for a Thriving Garden 🌱
Whether you're a weekend gardener or growing daily — these hand-picked tools make every session faster, easier, and more satisfying.