You’ve got a backyard that could use a sturdy, low‑cost home for your chickens, and reclaimed pallets can give you just that. By cutting, stacking, and bolting together a few pallets, you can create a predator‑proof coop that’s easy to assemble, ventilated, and even portable. From a minimalist single‑pallet shelter to a multi‑level design with a green roof, each option balances durability with eco‑friendliness. The next step is figuring out which layout fits your space and flock size best.
Key Takeaways
- Use reclaimed pallets as the primary structure, cutting side panels, roof, and floor from the same stock for a low‑cost, sturdy foundation.
- Add ventilation by leaving a 2‑inch gap between roof and walls, and install galvanized wire mesh or hardware cloth to keep predators out.
- Incorporate modular stacking with lag bolts and removable ramps, keeping total height under 6 ft for stability and easy cleaning.
- Finish with exterior‑grade sealant, low‑VOC paint, and a UV‑resistant clear stain for weatherproofing and a polished look.
- Include built‑in feed/water systems, solar‑powered lighting, and an optional green roof of lightweight soil and hardy herbs for temperature regulation and forage.
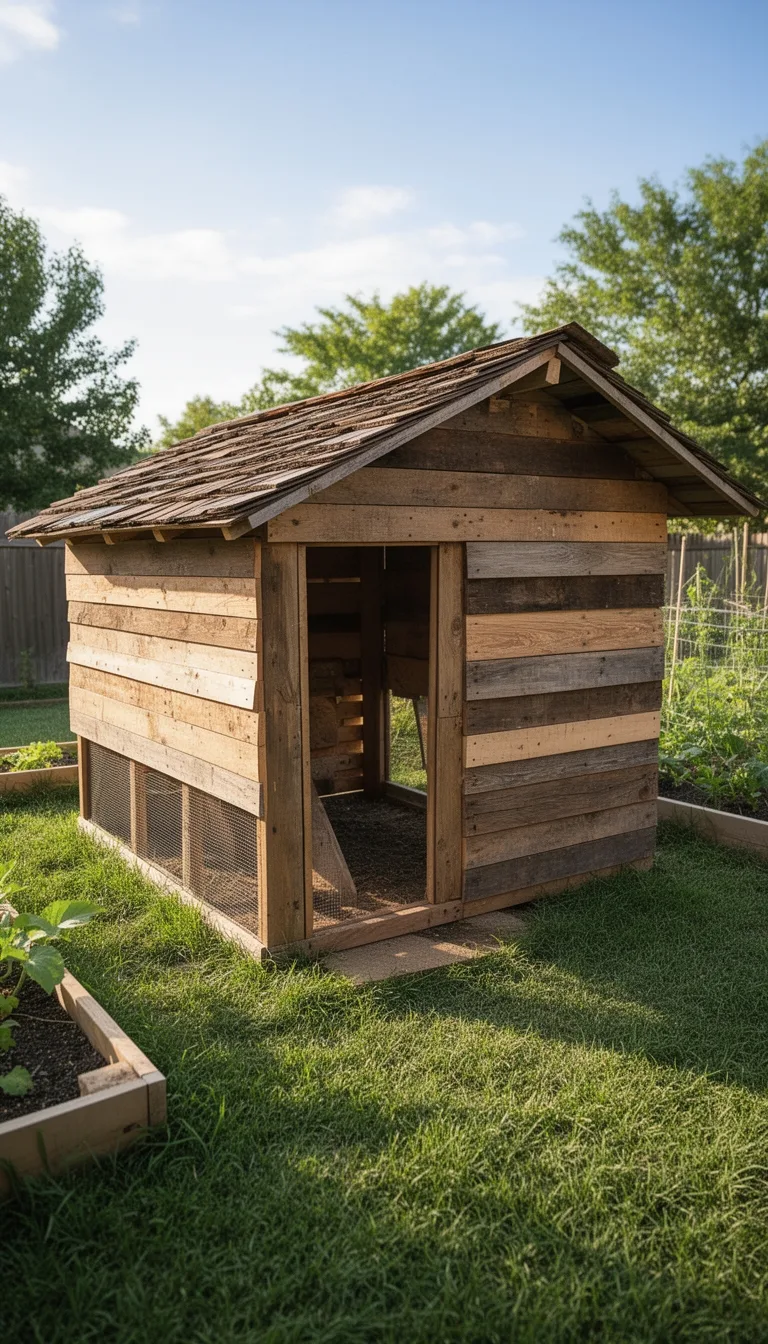
Minimalist Rustic Pallet Chicken Coop From a Single Pallet
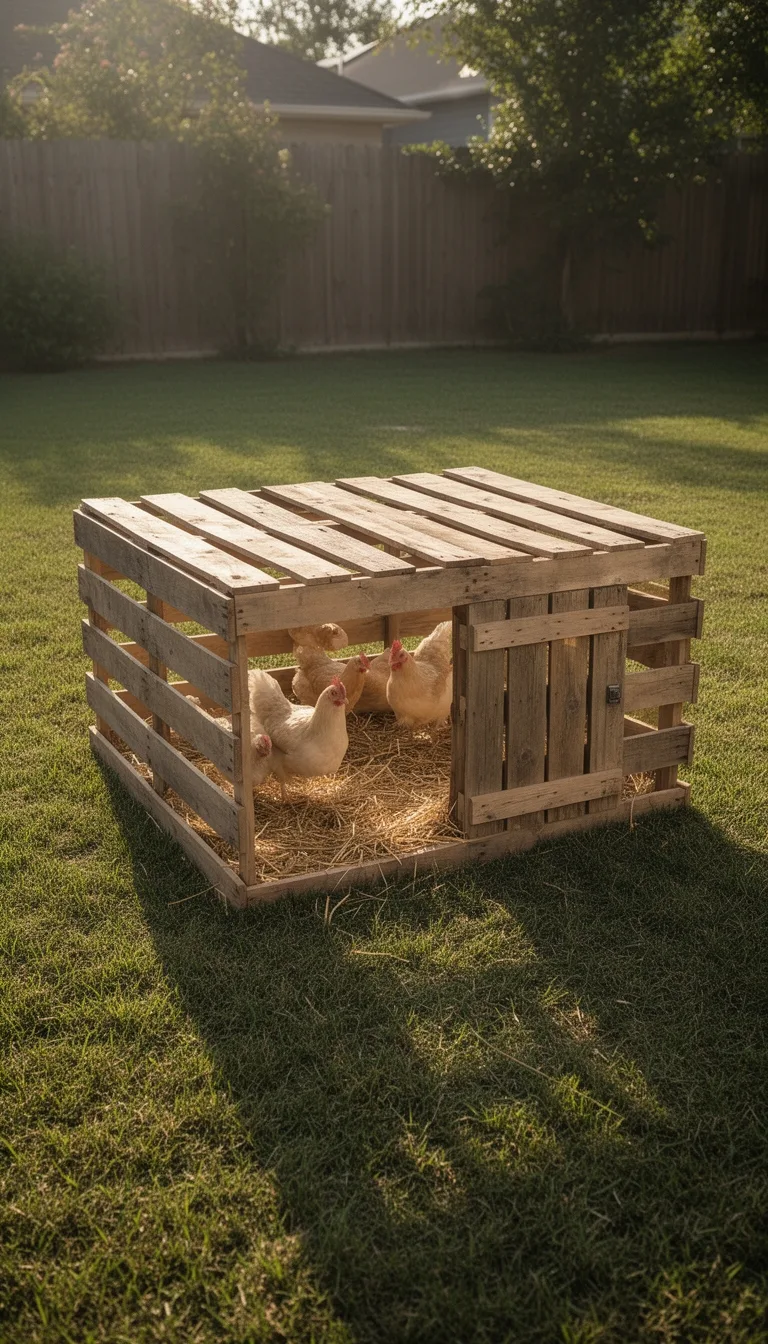
Start by selecting a sturdy, reclaimed pallet and stripping it down to its raw boards; this gives you a rugged, rustic foundation while keeping costs low.
Measure the pallet’s dimensions, then cut two side panels and a roof from the same board stock, leaving a 2‑inch gap for ventilation.
Nail the side panels to the base with galvanized screws, reinforcing corners with metal brackets.
Attach the roof using hinges so you can lift it for cleaning.
Cut a 12‑inch opening for a door, frame it with a simple latch, and cover the interior with a thin layer of straw for bedding.
Secure the coop to the ground with stakes or a concrete anchor to prevent predators from tipping it.
Finish with a weather‑proof sealant to extend the wood’s life.
Modular Stack‑able Pallet Chicken Coop for Growing Flocks
After you’ve nailed the single‑pallet coop together, you can expand it by stacking additional pallet modules that snap into place like building blocks.
First, cut each new pallet to the same dimensions as the original, then drill 1‑inch holes along the edges for bolts.
Attach the top of the lower module to the bottom of the new one using stainless‑steel lag bolts and washers; the bolts should be spaced every 12 in. for even load distribution.
Add a removable ladder or ramp between levels, securing it with hinges so you can clean each tier independently.
Install a hinged roof panel on the topmost pallet for ventilation, and line the interior with straw for bedding.
As your flock grows, simply repeat the stacking process, keeping the overall height under 6 ft to maintain stability and easy access.
Elevated Pallet Chicken Barn With Built‑In Ramp
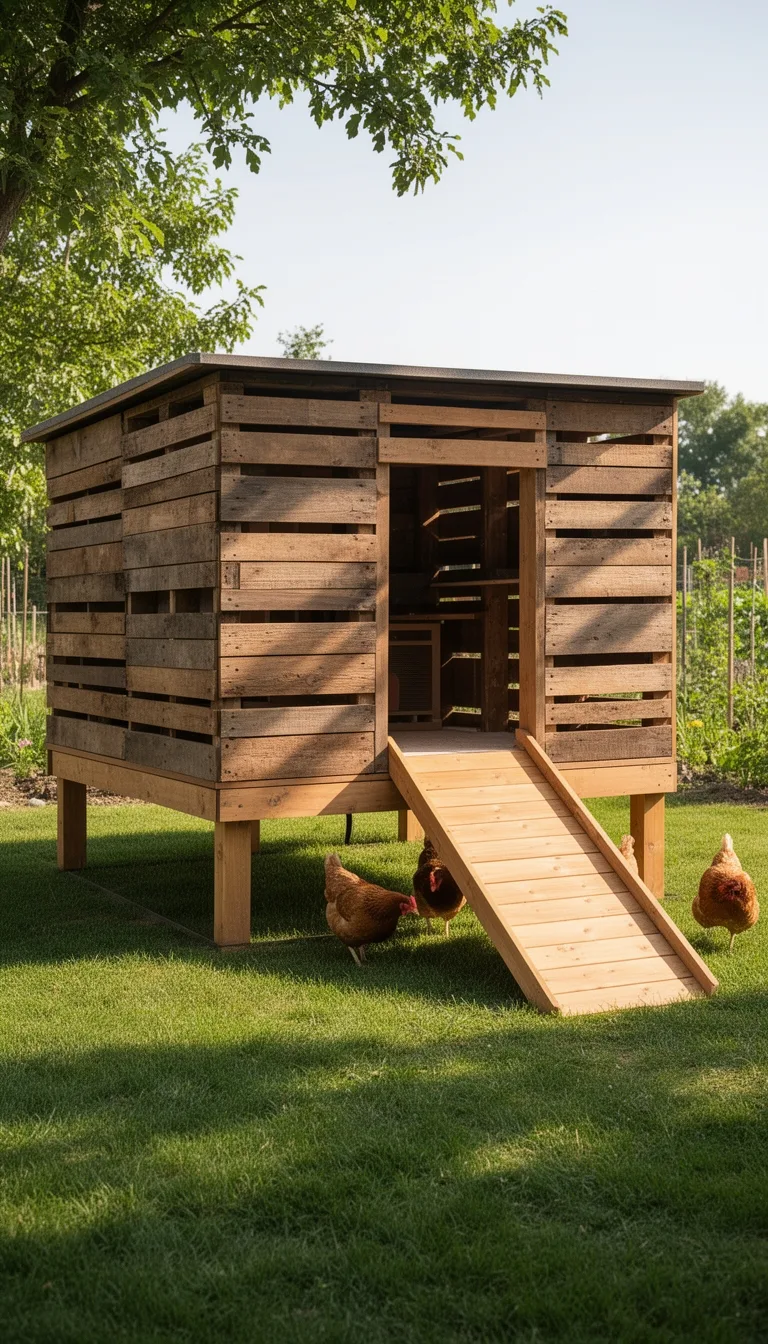
Lift the pallet onto sturdy sawhorses and attach a sturdy, angled ramp that folds down onto the ground, giving your chickens easy access to the elevated coop while keeping the floor dry and predator‑proof.
Secure the pallet with galvanized brackets, then reinforce the floor with 2‑inch plywood to prevent sagging.
Add a 12‑inch lip around the perimeter to stop rainwater from pooling, and line the interior with straw for insulation.
Mount a ventilation vent on one side, covering it with hardware cloth to keep pests out.
Install a hinged roof panel for cleaning, sealing seams with silicone to stop leaks.
Use a lockable latch on the ramp when not in use, and attach a perch at the top for roosting.
This setup stays sturdy, dry, and safe.
Weather‑Proof Pallet Chicken Coop Using Reclaimed Siding
Your elevated pallet barn already keeps the floor dry, so the next step is to seal the sides against rain, wind, and drafts.
First, remove any loose debris from the pallet frames and sand rough spots. Cut reclaimed siding to fit each pallet face, leaving a ½‑inch gap for ventilation. Attach the boards with stainless‑steel screws, staggering seams to prevent water channels. Apply a exterior‑grade, low‑VOC sealant to all joints and edges, then brush on a water‑based paint that matches your yard’s palette.
Install a simple overhang using a short roof scrap, angling it 10 degrees to shed runoff.
Finally, add a strip of weather‑strip around the door frame to keep drafts out while allowing easy access for feeding and cleaning.
Multi‑Level Perch & Nest Within a Single Pallet
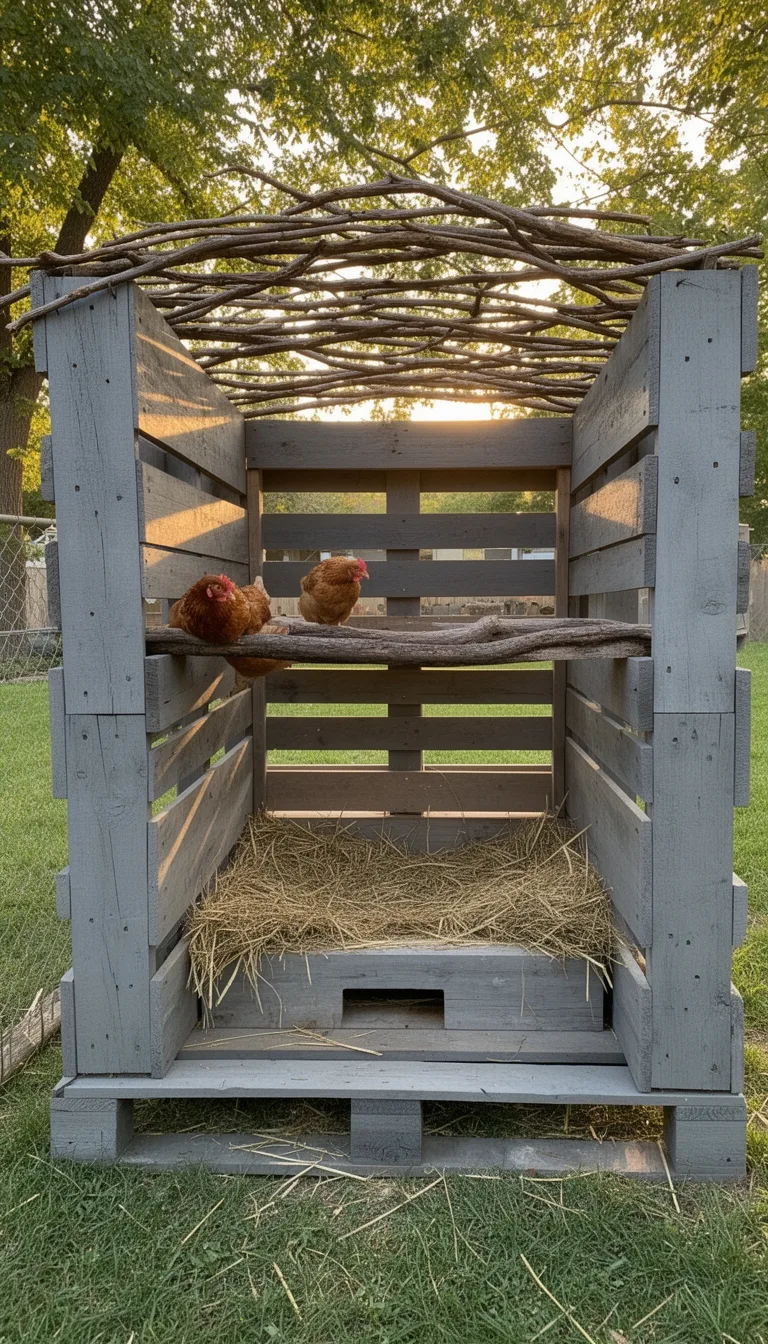
If you want hens to roost comfortably and lay eggs without crowding, turn a single pallet into a tiered perch‑and‑nest system.
Start by laying the pallet flat, then attach a second board across the middle to create a lower perch. Add a third board a few inches above for the upper perch, leaving a gap for a nest box beneath the upper level.
Secure each board with rust‑proof screws and reinforce with brackets. Fill the nest box with straw or shredded paper, and cover the perches with a thin layer of sand to keep feet dry.
This design maximizes vertical space while staying compact and easy to clean.
- Lower perch – 2‑inch wide, positioned 6 in above the floor.
- Upper perch – 2‑inch wide, 12 in above the lower perch.
- Nest box – 12 × 12 in, placed under the upper perch, lined with bedding.
Wheel‑Mounted Portable Pallet Coop for Seasonal Moves
Hook the pallet onto a set of sturdy wheels and you’ll have a mobile coop that you can roll to any seasonal spot without dismantling. Choose a 4‑by‑8 pallet, reinforce the corners with metal brackets, then attach two 12‑inch pneumatic garden wheels and two lockable caster wheels for stability.
Drill a central hole for a weather‑proof latch, then mount a hinged roof that folds flat when you need extra clearance. Install a removable ramp made from a spare pallet slice, securing it with quick‑release pins.
Add a lightweight wire mesh panel on one side for ventilation, but keep it detachable for cleaning. When you move, unlock the casters, push the coop to its new location, lock the wheels, and re‑attach the ramp and mesh.
This setup lets you follow sunrise, shade, or pasture changes while keeping the flock safe and comfortable.
DIY Predator‑Proof Pallet Chicken Coop With Wire Mesh
A solid predator‑proof pallet coop starts with a sturdy 4‑by‑8 pallet reinforced at every corner by steel brackets, then wrapped in a tightly woven galvanized wire mesh that’s welded or stapled to the wood.
You’ll add a floor of hardware cloth, seal gaps with silicone, and install a lockable latch on the door to keep raccoons out.
The mesh should have ½‑inch openings, and you’ll double‑layer it where the roof meets the walls for extra security.
Use pressure‑treated lumber for any additional framing, and treat the wood with a non‑toxic sealant to resist moisture.
- Secure brackets and reinforcement
- Weld or staple mesh tightly
- Seal all seams and install lockable latch
Add Solar‑Powered Lighting to Your Pallet Coop for Night‑time Visibility
Installing a small solar panel on the coop’s roof gives you reliable, low‑maintenance lighting without wiring to the house. Choose a 5‑watt panel that fits a single pallet board, mount it with stainless‑steel brackets, and angle it toward the sun’s path.
Connect the panel to a waterproof charge controller, then run a short 12‑V line to a motion‑sensor LED strip inside the coop. Set the sensor to trigger at dusk, providing enough illumination for you to check nests and for chickens to navigate safely.
Use a battery pack rated for at least 1 Ah, sealed in a weather‑proof box under the coop’s floor. Periodically clean the panel’s surface and inspect connectors for corrosion to keep the system humming year‑round.
Compact Pallet Chicken Shed for Small Backyards
If you’re short on yard space, a compact pallet chicken shed can fit snugly between garden beds while still giving your flock a safe, weather‑proof home. You’ll start with a single‑pane pallet frame, reinforce the corners with metal brackets, and add a sloped roof of reclaimed corrugated metal to shed rain.
Cut a 2‑ft by 4‑ft opening for a predator‑proof door, then line the interior with straw or pine shavings for insulation and easy cleaning. Position the shed so the door faces away from prevailing winds, and secure it with ground anchors to prevent tipping during storms.
- Footprint optimization – keep the base under 8 sq ft.
- Ventilation – drill two 2‑inch holes near the roof ridge.
- Access – attach a hinged latch for quick egg collection.
Built‑In Feed & Water Stations for a Pallet Chicken Coop
Because space is at a premium, integrate the feed and water stations directly into the pallet frame so you don’t have to add extra structures that clutter the yard.
Cut a shallow notch in the front rail, then slide a sturdy PVC pipe for the water line and a shallow metal tray for feed into the cavity. Secure both with stainless‑steel brackets to prevent wobble.
Attach a small drip‑irrigation hose to the pipe, using a valve that lets you turn the flow on or off without disturbing the birds.
Position the feed tray a few inches above the water pipe to keep spillage separate. Run a short power cord to a solar‑powered pump if you prefer automatic refilling, and check the connections weekly for leaks.
This built‑in design saves space, reduces mess, and keeps everything within arm’s reach for easy maintenance.
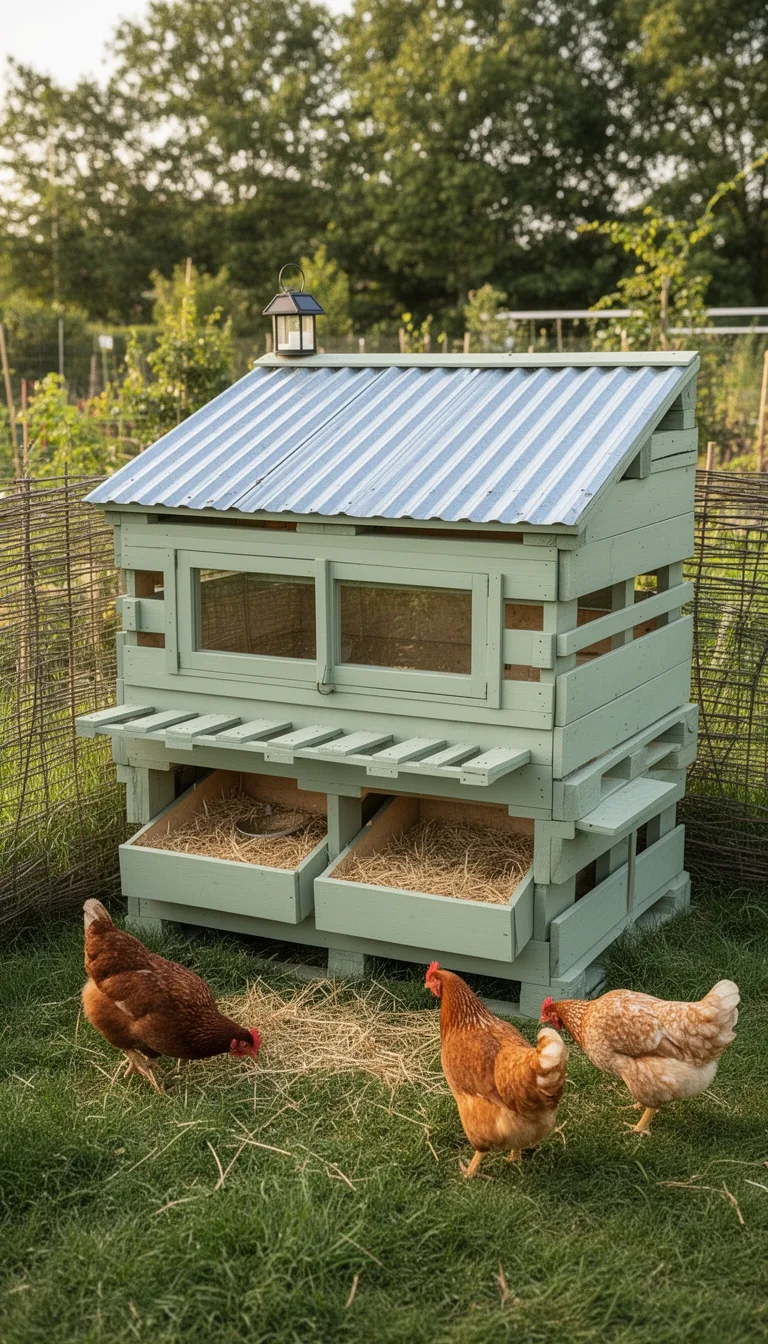
Eco‑Friendly Pallet Chicken Coop With a Green Roof
Integrating feed and water directly into the pallet frame frees up space, so you can now focus on adding a green roof that boosts insulation and provides fresh forage.
Lay a waterproof membrane over the pallet top, then spread a lightweight soil mix—half compost, half sand—to a depth of three inches.
Seed a hardy mix of clover, thyme, and chickweed; these plants tolerate foot traffic and supply protein-rich greens for your hens.
The living roof also regulates temperature, keeping the coop cooler in summer and warmer in winter while soaking up rainwater.
- Choose a breathable, UV‑stable membrane.
- Use a low‑profile, well‑draining soil blend.
- Plant drought‑tolerant herbs and grasses for continuous forage.
Designer Pallet Chicken Coop With Paint, Stain & Decorative Trim
Paint the pallet panels, stain the wood, and add decorative trim to turn a simple coop into a stylish backyard feature that still meets your hens’ needs.
First, sand each pallet face to remove splinters, then apply a weather‑proof primer. Choose a matte or semi‑gloss paint that matches your garden palette; two thin coats prevent cracking.
After the paint dries, wipe the surface and rub a clear, UV‑resistant stain into the grain for extra protection and a warm tone. Install pre‑cut, brushed‑pine trim around the roof ridge, door frame, and window shutters, securing with stainless‑steel nails to resist rust.
Add a low‑profile, painted trim strip at perch height to guide chickens and keep the interior tidy. Finish with a sealed, sloped roof to shed rain and protect the wood.
Conclusion
You’ve got a dozen solid pallet coop plans that fit any backyard, budget, or flock size. By reusing pallets, adding sturdy hardware cloth, lockable latches, and good ventilation, you’ll keep predators out and chickens happy. The modular and elevated options grow with your flock, while the green‑roof and built‑in feed stations add eco‑friendly flair. Pick the style that matches your space, follow the simple steps, and you’ll have a durable, low‑cost coop ready for laying season.
The Only Tools You Need for a Thriving Garden 🌱
Whether you're a weekend gardener or growing daily — these hand-picked tools make every session faster, easier, and more satisfying.