You’ve got a backyard, a balcony, or even a spare closet, and you want to make the most of it with fresh flowers and veggies. From reclaimed wood crates that breathe easy to self‑watering modular boxes that keep roots happy, each design tackles space, water, and soil in a practical way. The next step is to match the right system to your spot, so you can start planting without guessing.
Key Takeaways
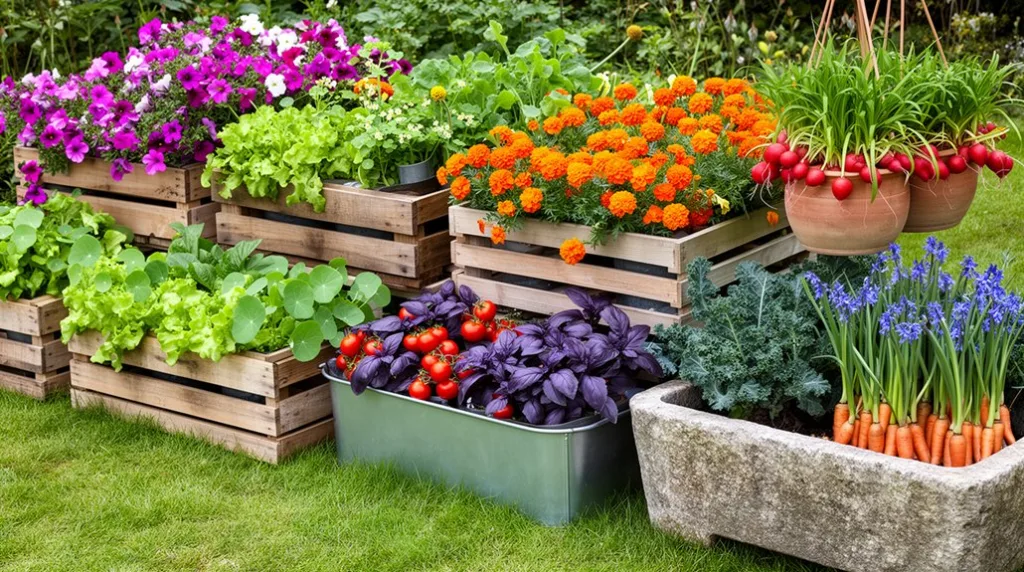
- Use reclaimed wood crates or pallets, sand and seal them, then line with breathable fabric for a rustic, budget‑friendly planter.
- Build a tiered, vertical planter with stacked shallow trays and a capillary reservoir to maximize space and reduce watering frequency.
- Incorporate self‑watering modules with a bottom reservoir, gravel or hydroton, and a silicone‑sealed drain hole for consistent moisture.
- Add sensor‑driven irrigation (moisture probe, low‑voltage pump, smartphone alerts) to automate watering and prevent over‑saturation.
- Choose portable or rotating designs—rolling frames, hanging fabric pockets, or sun‑tracking boxes—to adjust light exposure and move plants as needed.
Reclaimed Wood Crate Planter Box
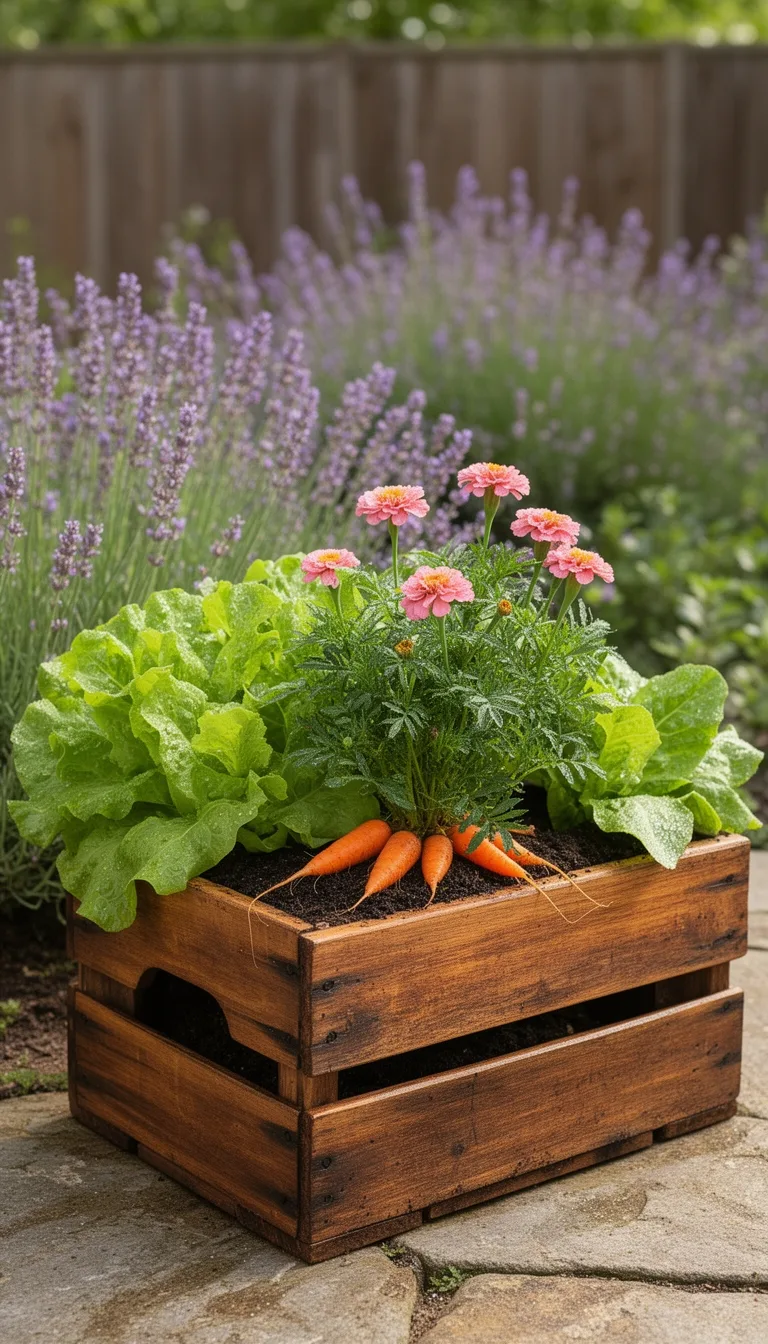
Kick off your garden upgrade by repurposing an old wooden crate into a sturdy planter box. First, inspect the crate for nails or splinters; pry out any hardware and sand rough edges smooth. Line the interior with landscape fabric, securing it with staples to keep soil from leaking.
Fill the crate with a mix of compost, peat, and perlite—about 50% compost for nutrients and 50% coarse material for drainage. Plant seedlings at least 4‑6 inches apart, allowing room for growth.
Water gently until the soil settles, then add a thin mulch layer to retain moisture. Position the box where it receives 6‑8 hours of sunlight daily, and rotate it monthly for even light exposure.
This reclaimed crate delivers a compact, attractive growing space with minimal cost and effort.
DIY Pallet Garden for Herbs & Flowers

Turn an old pallet into a vertical herb and flower garden in just a few steps. First, sand the pallet, then treat it with a weather‑proof sealant. Next, attach landscape fabric to the back and staple it securely. Fill each slot with a lightweight potting mix, leaving space for roots. Plant low‑maintenance herbs—basil, thyme, mint—along the top rows, and sprinkle annual flowers—marigold, petunia—below for color and pollinator appeal. Water from the top, and the fabric will guide moisture down to the lower plants.
| Plant | Position |
|---|---|
| Basil | Top row |
| Thyme | Upper middle |
| Mint | Lower middle |
| Marigold | Bottom row |
Maintain by trimming regularly and rotating the pallet for even sunlight.
Self‑Watering Modular Planter Box
Create a self‑watering modular planter box by stacking interlocking trays that each hold a water‑reservoir layer beneath the soil.
First, cut three to four identical trays from durable, rot‑resistant wood or heavy‑duty plastic. Drill a ¼‑inch drain hole at the center of each tray and attach a silicone gasket to seal seams when stacked.
Place a waterproof liner in the bottom tray, then fill the reservoir space with coarse gravel or hydroton. Add a layer of coarse sand, top with a high‑quality potting mix, and plant your seeds or seedlings.
Connect the trays using the interlocking notches, ensuring the water‑reservoir layer aligns vertically. Fill the bottom reservoir with water; capillary action will draw moisture upward, keeping soil consistently moist while reducing watering frequency. Adjust the water level as plants grow.
Vertical Tiered Planter Box for Small Spaces

If you’re short on floor space, a vertical tiered planter box lets you grow herbs, greens, or flowers upward instead of outward.
Choose a sturdy frame—cinder blocks, reclaimed wood, or metal brackets—and stack three to five shallow trays, each with drainage holes.
Line each tier with a breathable liner, fill with a lightweight, well‑draining mix, and plant low‑rooted varieties on the lower levels and taller herbs or dwarf tomatoes on top.
Secure the box to a wall or balcony railing to prevent tipping, and attach a simple drip line or water‑catch tray at the bottom for easy watering.
Rotate the box periodically for even light exposure, and prune regularly to maintain airflow and prevent overcrowding.
This setup maximizes yield while keeping your garden tidy and accessible.
Upcycled Concrete Block Planter Box

After maximizing vertical space with tiered trays, you can repurpose the sturdy, weather‑resistant concrete blocks you already have into a compact, low‑maintenance planter.
First, gather a few blocks, a drill with a masonry bit, and a ½‑inch drainage pipe.
Drill two holes near the bottom of each block for water outflow, then insert a short pipe segment into one hole to act as a drip outlet.
Next, line the interior with landscape fabric to keep soil from escaping while allowing moisture to drain.
Fill the block with a lightweight potting mix, leaving a two‑inch margin at the top.
Plant herbs, shallow‑rooted vegetables, or compact flowers, spacing them evenly.
Water gently until the mix settles, then place the block on a stable surface.
Installing Your Concrete Block Planter Box
Place the prepared concrete block on a level surface, then verify that the drainage holes are unobstructed before filling.
Spread a layer of coarse sand or fine gravel inside the block to improve drainage and keep soil from escaping.
Fill the block with a light, well‑draining potting mix, leaving about an inch of space at the top.
Gently tap the sides to settle the soil, adding more mix if needed, and compact lightly with your hands.
Water the soil until it drains evenly, then check that excess water exits through the holes.
If the block sits on a patio or deck, place a tray or waterproof mat underneath to protect the floor.
Finally, plant your chosen flowers or vegetables, spacing them according to label recommendations, and water them in.
Hanging Fabric Pocket Planter Boxes for Trailing Veggies
Now that your concrete block planter is set up, you can add a vertical element by hanging fabric pocket boxes for trailing veggies.
Choose a sturdy, breathable fabric with reinforced seams and install a metal or rope loop at the top of each pocket. Secure the loops to a sturdy hook or ceiling beam using carabiners, ensuring the weight is evenly distributed.
Fill each pocket with a lightweight, well‑draining potting mix—about one‑third compost, one‑third peat, and one‑third perlite. Plant seedlings of beans, peas, or cherry tomatoes, spacing them 2–3 inches apart.
Water gently until the mix is moist, then mist daily to keep the fabric from drying out. Rotate the boxes weekly for even sunlight exposure, and harvest vines as they reach the edge of the pocket.
Cedar Raised Box That Doubles as a Compost Bin
Build a cedar raised box that also serves as a compost bin by constructing a sturdy, double‑wall frame with a removable front panel and a slatted back for airflow.
Cut two cedar boards to the desired length, then attach them with stainless‑steel screws to form the outer walls.
Insert a second set of boards half an inch inside to create a gap for ventilation.
Secure a hinged front panel that opens for adding kitchen scraps and turning compost.
Add a slatted rear using using spaced slats to promote aeration and drainage.
Line the interior with a breathable fabric to keep soil separate from compost.
Fill the bottom with coarse material, then layer soil on top for planting.
Rotate the front panel weekly to mix compost and maintain moisture.
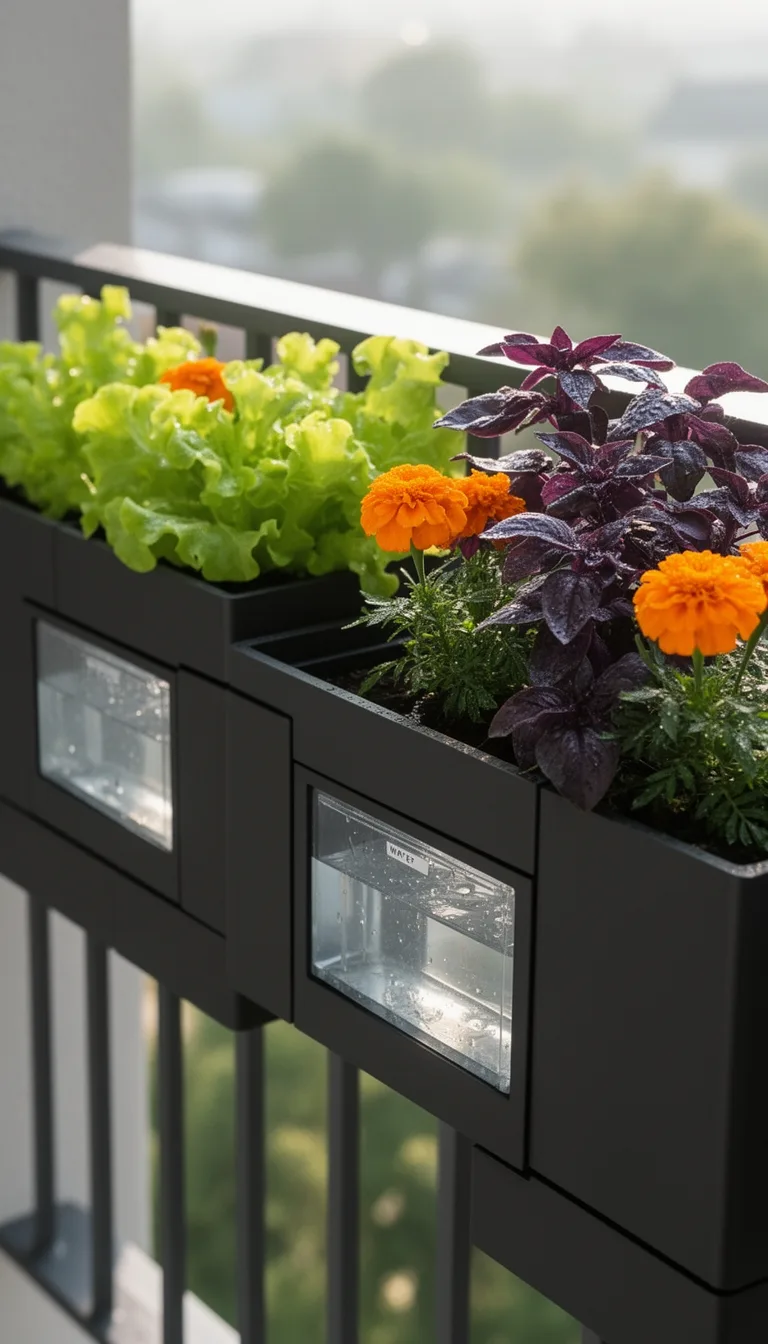
Adjustable‑Width Balcony Rail Planter Box
Create a flexible balcony rail planter that slides to fit any rail width, then lock it in place for steady growing.
First, measure your rail’s inner distance; most balconies range from 2 in to 4 in.
Cut two parallel aluminum or hardwood strips to that length, then drill a series of evenly spaced holes along each strip.
Thread a stainless‑steel rod through the holes, using wing nuts to tighten and lock the width.
Attach a removable tray or fabric liner to the bottom of the frame, securing it with clips.
Fill the tray with a lightweight potting mix, choosing compact herbs, lettuce, or trailing flowers.
Water sparingly, because the rail’s drainage is limited; place a drip‑tray beneath if excess moisture accumulates.
Adjust the width whenever you change the rail or move the box.
Multi‑Level Metal Box for Succulents & Lettuce
After you’ve mastered the sliding rail system, you can take advantage of the same adjustable‑width concept to stack a metal box that holds both succulents and lettuce on a balcony.
First, choose a rust‑resistant steel box with three tiers, each 6‑inch deep. Drill drainage holes in the bottom tier and line it with mesh to keep soil from escaping.
Fill the bottom with a gritty cactus mix for succulents; they thrive in fast‑draining media. Add a middle tier of lightweight potting soil, then plant lettuce seedlings, keeping them spaced 4‑inch apart for airflow.
Place the top tier on a shallow tray, add a thin layer of soil, and sow a few herb seeds for extra flavor. Secure the box to the rail using the same brackets you used before, adjusting width as needed.
Water succulents sparingly, lettuce daily, and rotate the box weekly for even light exposure.
Reusable Plastic Bin With Built‑In Drainage Grid
Often you’ll find that a reusable plastic bin with a built‑in drainage grid makes balcony gardening both tidy and low‑maintenance.
Choose a bin with a sturdy lid, pre‑drilled holes, and a grid that channels excess water away from roots while retaining moisture.
Fill the bottom with a thin layer of coarse gravel, then add a high‑quality potting mix.
Plant compact varieties that thrive in containers, and water sparingly, letting the grid do most of the work.
- Position the bin where it catches morning sun and afternoon shade.
- Use a drip‑irrigation hose attached to the lid’s opening for consistent moisture.
- Rotate the bin monthly to ensure even light exposure and prevent soil compaction.
Portable Rolling Planter Box for Seasonal Crops
Roll the planter box out onto your patio or balcony when you’re ready to grow seasonal crops, and you’ll have a mobile, low‑maintenance garden that you can relocate with ease. Choose a lightweight frame with sturdy wheels, fill it with a high‑quality potting mix, and space crops according to their sun and water needs. Water from the top, add fertilizer every two weeks, and roll the box to follow the sun or protect from frost.
| Crop | Sun | Water |
|---|---|---|
| Lettuce | Partial | Light |
| Tomatoes | Full | Moderate |
| Herbs | Partial | Light |
| Peppers | Full | Moderate |
Keep the wheels clean, check drainage holes weekly, and store the box in a sheltered spot during extreme weather. This setup lets you harvest fresh produce all season without permanent garden space.
Adding Automation to Your Rolling Planter Box
Integrate a simple sensor‑driven irrigation system into your rolling planter to keep crops hydrated without constant monitoring. First, choose a moisture sensor that plugs into a low‑voltage pump; position it near the root zone for accurate readings. Connect the sensor to a timer or microcontroller that triggers the pump when soil moisture drops below your preset threshold. Secure the pump’s tubing along the planter’s frame, using zip ties to prevent kinks as the box rolls. Test the flow rate, then adjust the timer to water in short bursts, avoiding over‑saturation.
- Moisture sensor + microcontroller combo
- Small submersible pump with flexible tubing
- Battery pack or solar panel for off‑grid power
Follow these steps, and your rolling planter will water itself reliably while you focus on planting and harvesting.
Smart Sensor‑Enabled Planter Box (App Alerts)
Ever wonder how you can stay on top of your garden’s needs without constantly checking the soil? Install a moisture, temperature, and light sensor suite in your planter box and pair it with a smartphone app.
First, drill holes for sensor probes, then secure them with waterproof silicone. Connect the probes to a low‑power Wi‑Fi module, and mount the module inside the box’s lid.
Download the companion app, create a new planter profile, and calibrate each sensor using the app’s guided steps. Set thresholds for watering, temperature, and light; the app will push alerts when conditions drift outside safe ranges.
When you receive a notification, adjust watering or relocate the box, keeping plants healthy without guesswork.
Sun‑Tracking Rotating Planter Box for Maximum Light
Because sunlight moves across the sky, a rotating planter box that tracks the sun can keep your plants bathed in optimal light all day. Build a simple motorized base using a 12 V DC gear motor, a solar‑powered controller, and a swivel arm that holds the box. Attach a light‑sensor array to the controller so it adjusts rotation speed based on intensity. Secure the box with a lightweight frame to reduce inertia, and balance it on a low‑friction bearing for smooth motion.
- Motor & controller: 12 V gear motor + solar‑charged microcontroller.
- Sensor array: Four photo‑resistors positioned at cardinal points for real‑time tracking.
- Mounting system: Swivel arm, bearing, and balanced frame for effortless rotation.
Follow the wiring diagram, calibrate sensor thresholds, and test rotation before planting. This setup maximizes photosynthesis, boosts yields, and reduces shading issues.
Conclusion
Now you’ve got a toolbox of 15 planter box ideas—from reclaimed crates to smart, self‑watering modules—so pick the design that fits your space, budget, and garden goals. Secure the wood, add proper drainage, and choose a soil mix that matches your plants. Install any irrigation or sensor tech, rotate for even light, and keep an eye on moisture levels. With these practical setups, you’ll harvest thriving flowers and vegetables all season long.
The Only Tools You Need for a Thriving Garden 🌱
Whether you're a weekend gardener or growing daily — these hand-picked tools make every session faster, easier, and more satisfying.